Lesson Info
4. Small Blemishes in Lightroom
Lessons
Rethinking Retouching
10:36 2Basic Retouching Workflow in Lightroom
10:17 3Correcting Color Issues in Lightroom
07:56 4Small Blemishes in Lightroom
05:20 5Removing Distractions in Portraits
05:19 6Retouching Eyes and Fly Aways
20:42 7Reducing Shadows in Lightroom and Photoshop
08:56 8Liquify in Photoshop
03:32Lesson Info
Small Blemishes in Lightroom
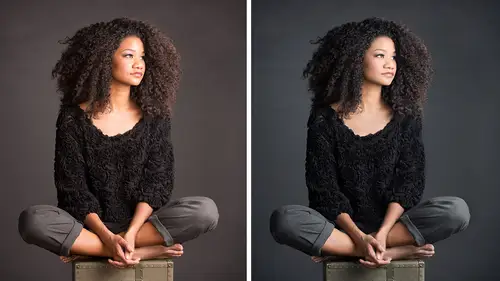
Let's get on to detail work um we're listening to the image right so the intent here we have a minimal color palette doesn't feel that cold forman yeah but it's not that colorful you know their eyes match the background match your lips and with these kind of an images and we're entering into our john run what I mean by that writing if you're writing a poem you use words differently than if you're writing I don't know on essay versus journalism or something so in this case were to use our spot removal tool and just to go back here spot room weevil tools a cuchi right so that's our little shortcut and we'll grab this image we pressed the cuchi because we want to remove some spots are gonna close a panel over here and maybe minimize this down below so that we have a little more space for the image and the visual eye spots tool is phenomenal I mean it's such a helpful thing that we have in in like room and so I think of that is for california like surfing and skateboarding it is awesome yo...
u with me on that can't we just say this is awesome so a for awesome so so I throw that thing on there and what that's going to do for me is help me identify problem errors and let me crank it up and maybe zoom in a little bit here so we can see some of these issues and what I want us to think about is when we do our spot retouching is really important because let's say I do my spot healing and then I go back and add contrast, I'm going to see different spots or different details in there same thing with clarity so in our workflow that's going to affect notice out, you know, I mean it's it's really shifting what we're seeing there that's gonna affect what's happening. So while we tend to think, you know, kind of going back to that seal comment, we have a digital image it's a beauty photograph, there's problems I'm fixing goingto relax for a second, so okay, well, it's workflow workflow what? This image isn't a ton with lights pretty good, so maybe a little bit of contrast my shadows I like the detail there. Um, you know, maybe my color I am going to drop back the oranges and the reds a little bit a little bit less bright colors in that area and that's it then then I'll go to that tool, the spot healing brush, and here we press a key turns on our preview for awesomeness, which we can see these little things dialling the slider and part of the reason why this is important is when we're retouching away with the spot healing brush we can choose cloner he'll size and feather hit those in one second when we're doing that we'll want to occasionally tap again and just be able to see what we did and realize okay it's a freckle well if this was a portrait of a friend I would have to leave the freckle right because in that space that's part of their personality if it's a beauty image where it's really more idealism I'm going for this kind of ethereal perfection yeah that maybe I'm going to read move it but that is just going to give me in and out of there all right? So over to our tool brush size we can change with the slider on day one of the brush like shortcuts in photo shop in light room it's a key that makes a bigger smaller bracket kisa right bracket bigger left bracket smaller you can use that too and all that we want to do it is just work our way through an image space far and we're zooming in pretty close to do this work with a lot of little detail work we'll see in another project a little bit later we're going to get really close and what I tend to do is start with the bigger issues and hit my age to see if I'm missing anything crank this up and kind of show me texture maybe a little something over there I wouldn't have seen um we're gonna work with our bigger issues and then we're going to get teo smaller ones who had the egg and exit out of that this image we're not going to retouch start to finish but I do at least one highlight how we start to work with this tool the trick obviously is it almost looks worse because of all the circles you know in here like uh what I can't even see what I did so a couple of short cuts the each key hides overlays and light room and h will bring it back there's if we forget that in the two of our down below weaken choose different options otto is helpful because when you're cursors over the image there they are when you have her off of it they're gone but each can control goes on and off and then it's also helpful to kind of see our before and after in the before and after consuming even closer there before and after in light room does anyone know that shortcut backslash backslash not forward slash forward because this way but let's go back in time what did I just do? Where where was I before and that's so important and I know this may seem kind of kind of basic but in my class is where I work with these phenomenal seed it's like I said um if they had just looked at their before work they would have caught before they were derailed. And so what I have to do to catch myself is blink or look away and come back. Or just do the back slash. That helps, too, because retouching is easy to get carried away with.
Class Materials
bonus material with purchase
Ratings and Reviews
brad in glenwood
Not sure where all the criticism is coming from. It is a good source for a basic workflow to create realistic portrait retouching. Probably not for the advanced Photoshop user, but I consider myself an intermediate and picked up some very good tips that I will consider and definitely add some to my workflow.I think Chris gave some good philosophy for retouching in the short amount of time. If you want a more involved course with more info then I would recommend Lindsay adler's portrait retouching, but even then her course is given over THREE days! In under 1.5 hours for this lecture, did you really expect more for $19-29? By the way if you look in the upper left hand corner of Lightroom it says Adobe PHOTOSHOP Lightroom, so if you want to be technical he was using Photoshop for all of his retouching! Would you have felt better if he was in Camera Raw? It's the same thing!
Rebecca George
Chris is an amazing teacher -- and he's all about efficiency, which I LOVE. He knows ALL the shortcuts and he's so skilled at smoothly working in repetition as he's teaching, so by the end of the class I found that I had effortlessly learned so many important shortcuts and had shifted my editing into warp speed! Such a great class, as are all his classes
grrjr
Lots of good information here. I just wish there would have been more of a walkthrough with the main image that is used for this lesson. It would be useful to see how he manipulated the color in the portrait of his friend for a beginner like me. I like the side by side comparison, but would like to know what else was changed in that photo besides getting rid of shine and softening skin.
Student Work
Related Classes
Portrait Photography