How to Leverage Local Tools for Black & White Conversion
Lesson 3 from: Black & White Photography Post-Processing in Lightroom CCSerge Ramelli
How to Leverage Local Tools for Black & White Conversion
Lesson 3 from: Black & White Photography Post-Processing in Lightroom CCSerge Ramelli
Lesson Info
3. How to Leverage Local Tools for Black & White Conversion
Lessons
Establishing Black & White Tones & Processing
06:14 2How to Make a Simple Black & White Conversion
04:06 3How to Leverage Local Tools for Black & White Conversion
11:32 4How to Make a Black & White Panorama
16:03 5How to Master Presets
01:32 6Landscapes in Black & White
05:12 7Black & White Long Exposures
06:08 8How to Add Haze in B&W
10:13Lesson Info
How to Leverage Local Tools for Black & White Conversion
So I'm gonna go here, maybe add a bit of clarity. Charity. You know, I never do it on color photo, but sometimes, like in white, I can. All right. And, um, one thing I'm going to do also is I'm gonna go here, okay? Oh, once I'm gonna show which is really cool is no. I don't like a basic basic black and white. And that's something that's kind of important is when you have something that you like, create, appreciate on it. So I'm gonna click here on plus, and I'm gonna call this basic b W. So what did I do here? I did the white balance. I did the basic tones. I didn't use the tone curve. I did some carry to get into sharpening. Um, but it's just like a really bathing thing, So I'm going to create Oh, and folder. I'm gonna create a new folder. Let's create a new folder Cold creativelive Black and white. I'm gonna I'm actually gonna put it a so it comes up as the first folder here, Create black and white create. So now OK, it's here. I have another one. There was a lot of presets, so it's ...
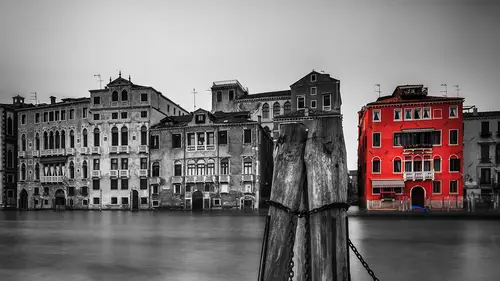
here, and we will be able in one click to use it later on. And the cool thing is, that light room remembers in a preset any local adjustment which camera does not. So let's continue. I'm gonna go here in the develop module and I'm gonna go use the famous greater tool and I'm gonna click here and I'm gonna. So the way the greater tool works is if I minus exposure. Whatever I'm doing here between the top of the video is here is that full Stranz. And from this to this is on ingredient, usually for black and white. I go crazy. I'm unstoppable. I do too. I do one first for the clouds. The and, um and I do a 2nd 1 for the top of the photo. Very often, you throw that in black and white where you have, like, a very strong vignette atop I do too. And it's free. You don't pay more for the 2nd 1 isn't totally free. So and sometimes I don't make them straight, like you see, if, like I she's very black. Here's wife. I won't dated a little bit. Maybe I take that a little bit out of here and, you know, I can make it a bit later, but I'm really going for a strong V needing look. And when it comes to the bottom, edges can click and right to do it here. But I like to follow along. What's going on here? I like the idea. I don't like that bit of grass. I mean, I like that it's there, but one. It's a high frequency texture to its Not that nice compresses alone exposure of the water. So I'm gonna make it even darker. You know, I don't mind a little bit of it, but it's not the star. The stories is this, you know, And you can see here a small version of it. It started to look like one of this good old, black, dramatic, black and white, which I mean so much in love for, But it is not over. It's not finished. Um, what I'm going to do now is I'm going to go. So usually So. I did the Grady INTs, so I'm gonna go here again. Click Appreciate. And I'm gonna call it basic black and white ingredients because I just did ingredients on this one And of course, you want to make sure you see grated fill. Terry's is marked on. It doesn't matter when you do preset. If stuff that are marked that you haven't done, you know, it's it's there. So now I'm have have the basic preset and have the prison where is great, and so far we said the photo and I click on basic Appreciate. I have a busy conversion, but if they're going here, I have the greatest on top of it, okay? And it's good to do that and I'll show you why. Bill it on. But I say build this photo, I'm gonna create presets. Okay? The next thing I'm going to do is I'm gonna take a Reginald Circle year, and of course I want to guide the ID of the photo. So here we have you. We have this oracle. So we got the circle here, and I'm going to invert demise by default on light room. It's always on the outside. So what? Whatever I do here is only happening inside of the circle. You see, for you, I'm gonna overdo it a little bit, so I've got a sort of like who I got a lamp here. It's crazy high. I can do whatever I want. But you see the mass by default, which is not the case in camera is at 50%. So boom, I'm gonna put it at 100. So it's more subtle and I wanna have I always wanna have the white, you know, light in the middle of that. I want people to look outside. It gives a more more third dynamic fitting to your father and, uh, so on this one, I'm going to do that. Then I'm going to right click and duplicate. And so that's very important. And everything is playing this over and over. But on black and white, it's more important than other, um, Joe Mack. Anyone said, And I was at a worker with them that an object, which is partial aid, is more interesting than a novel which is fully laid. I think it's one of the biggest secret in photography, so that grass has all the same tones what I'm trying to do now. Is he here? This whole hell has the same tone. And so what Ansel Adams used to do with his own system. He had 10 zone 1 to 10 and used to say to Israel, Toucher, I want the hill to bees on three. I want the sky to be some four. I want this other hell to be sold four and he was It was big chunk of the further they would give different things with. It was so hard because you had to make canvas. And it's so with Ansel Adams available is crazy was one of the wanted to have this. The way he would project light instead of just projecting, was one big light bulb. He had tons off small light bulbs and so he could turn off the top light bowls. And this way it would or if you want, wanted to make the side brighter or turn off all the middle light. And this way he had deviating. It would burn the top and the bottom. The photo make them darker and in the middle, and it was very expensive to have this type of projector. We call it a connoisseur in France, and you could in English when you project life. But he had all these libel that he made, and I think it was 100 like bolts instead of just one big one that, you know, usual lamb had to add. That's why you would have a lot of light room because it's so much easier to use. So again, I'm trying to break the tones. So I'm gonna go here. You see, I'm looking for I like, you know, maybe a little bit. That's a little too much. And again, there, will Here is that when you make something brighter, you know, go do something else, come back to it. And if you see you made something brighter, you've gone too far. And so I'm gonna duplicate. I'm gonna go here and I just want to make a little bit that he a little bit more interesting. All of a sudden he goes from a certain tone a little higher, brighter to it as and it's just a lot more interesting. But by all means, please be settled. I'm gonna dedicate. I'm gonna put this one here and ah, let me show you that before seeing light room. You have this little slider here on every panel. You can see the before and after just of that. And, uh, I think I might have gone a little too far, but we'll see. It's a non destructive workflow, so I can always go back to it. Okay, One last thing is the brush. When more truly is a brush on this one, I'm going to zoom in. You see how I get a nice flow from the loan exposure? If you press, I you can see it was only a 1.3 2nd exposure at F 22 but I was too lazy to put my indie filter on. So I went all the way to F 22 so that very little light would come with forcing the camera to make a long exposure. But actually one second it was actually a happy accident because I used to like 2nd 10 15 2nd no matter what long exposure, But then you lose liberty, the flow of the river. We need to that like, for example, with wave, you lose. You know, I shouldn't wonder doing surfer aware he was shooting the wave at 1/3 of seconds. A very slight on exposure. So you still have the way form, but it's kind of blurry. It's kind of it's an aesthetic in itself. So what I usually do with a brush and, uh, here you can see him in the photo, this light ramekins. And I'm just gonna take a brush. Make sure that I have a bit of exposure flowing density pretty low, like around 70. Ulta mask off because I'm gonna paint on the river and I just want to make some highlights on some of this. Ah, you know, loan exposure effect, especially here. We have some nice ones here and just to, you know, the eyes again goes to the brothers part of Look, tonight, that is healthy shape are amazing. So you don't get that if you do like 45 2nd is just flat. So again, because I was lazy. A lot of things I find is by being lazy in life and you discover all kind of cold tricks, you know? And so now I'm gonna go to fit, Take eye off, because it's a little too much. So before the brushstrokes, you high just made some of that thing a bit lighter. I think it's gonna cool, but I think the photo is lacking of contrast. It's cool, but I would add even more contrast I really wanted to be like, Really? And maybe it could be brighter or darker because some of this old black and whites, they really went on on the black and white, and that's kind of the final result. Now, there is a lot of sense of this and this one. So if you do and that happens a lot when you should F 22 no matter clean your sensor is you will get even coming out of the factory. I should have 20 Do. I've got sense of dust. How is that possible? Because higher is your aperture. Like over F 10 or eight. The smallest, smallest, smallest, smallest dust is gonna be here, So that's the downside. If I would have put on an indie filter, I wouldn't have this issue. But I'm just gonna you know, you raise some of the most visible once, and this is a very low resolution resolution screen. So it's hard to tell like I usually work. But for tutorials, purposes, it's nicer, so you can see what's going on. So, um, the backs, like skiing on NitroMed gives you the before any after before after, So that's our first project And that's our first homage to Ah, Mr Ansel Adams. Remember? I said every time I do something great, appreciate I'm going to something. I'm gonna go here, and I'm gonna cook all this btw basic with gray agent and great. I don't have to put and radiant and circle an original radio. Great aunt. So I know there is great gents, Amini actually should call this linear and Rachel. There's two types of radiant and you see here you don't have the option to save the brush, so I don't write brush. You cannot save brushes A preset. Every photo has to be its own brush. So I'm gonna create that. And now I can. We said this. I got my busy black and white basic black. In what ways? Grady INTs and basically no Rachel. So it comes to life like Frankenstein. I'm coming alive. I'm alive. I mean, I'm black and white and dramatic, but that's the whole idea.
Class Materials
Bonus Materials