Lessons
Class Introduction
03:23 2Set Up Your Black & White Portrait
08:35 3Create & Augment Light
08:31 4Backlight Your Model
08:42 5Light for Contrast
13:09 6Portrait - Male Model
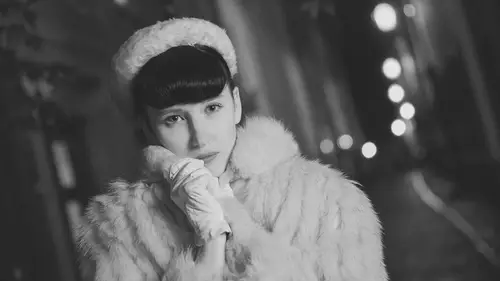
16:17 7Portrait - Female Model
06:30 8Shoot In Black and White Q&A
09:01Lesson Info
Class Introduction
we're going to educate you on taking black and white portraiture. Now, a lot of this stuff that we talked about today can be translated. Obviously, the color eso just don't think black. I'm just showing you black and white because I love black and white and we're going to show you how to do some cool stuff with it. But you can also translate this into color. You can also translate this into other types of photography, not just portrait photography. You could translate a lot of what I'm gonna say into product photography or still life photography or even stuff outdoors. Landscape photography. There's a lot of stuff we're gonna talk about here today that you can translate. So think beyond just portraiture when we're talking because I always get that person that is like a pet photographer. And then if I'm talking about something other than a pet, they can't translate. You know the idea, and it's if I'm talking about file naming, it doesn't matter whether you're taking a picture of a human...
or a pet. It's all the same. Lighting is actually the same two. It doesn't matter if I'm photographing a statue or a person or a thing. It's all the same. The lighting principles are the same. All right, so just kind of expand yourself outside of the one thing we're talking about and see the possibilities of what we're talking about. Okay, so the first thing that we want to do is cover up some equipment ideas. Some things that way need to get right before we can actually start the portraiture. Eso I'm gonna introduce you to what we're using here, so you get an idea of how we're gonna operate here. So, um, I am most of the time outside, taking pictures at weddings and things like that. Um and so I'm moving around a lot, which keeps me awake, and I like it. That's why I'm a photographer, because I couldn't sit behind a desk my whole life. But when I'm in the studio, I'm gonna shoot tethered. And the reason I shoot tethered in the studio is that the back of the camera is not a really accurate place to gauge anything, right? The hissed a gram tells you the truth, but everything else is difficult to gauge on a little tiny three inch screen. And so when I'm in the studio, I'm gonna take advantage of tethering so I'm attached via cord. You can also tether WiFi, but it's a lot slower. So tethering via chord. This is the Canon five D Mark four. And so it's a USB three connection, so it's a lot faster. Um, and then that's gonna go to the computer here, and it's gonna straight in the light room. And the advantage of that is, then I can actually have my client involved in the decision making process. So by the time they leave the studio, they already have their selections made, and then I can get toe working on them. So it's a lot faster process, so the images will We will shoot, will go from here into light room. We can make the selections here, and light room can actually be adjusting the images as they go in. So I don't have any post production work to do. So there's a lot of advantages to working tethered like this. Okay, so we're gonna be shooting to the computer from the canon five D mark four. Um and we're also going to be using some pro photo lighting gear. Um, and we're triggering that here with an air remote
Ratings and Reviews
rorofot
This course is a good overview and I love the way Jared teaches. But the course mixes basic lightroom handling with intermediate portrait photography and really expensive gear. Which person, that doesn't know the basic importing and editing in lightroom, has three studiolights from profoto with grid or a calibrating system for the inkjet printer?? And be aware, it's only about LR-editing and nothing about photoshop. But over all it's a good overview for beginners - alas not for intermediate users.
TIm Smith
I usually don't write reviews, but thought Jared did a great job presenting the material. Clear, concise and didn't talk excessively fast. Material was well organized and reasons were given for why something was done a certain way. The fill lighting technique was something different and plan on using. The discussion on tones, textures, clothing and background were also helpful when discussing black and white.
Amy Vaughn
I haven't shot much with the intention of turning the photos black and white, but this class piqued my interest in trying it. This class isn't just about how to turn any photograph black and white, but how to think about the photo as you're shooting for black and white. I especially appreciated Jared's explanations about the importance of texture, creating drama and carefully targeting lights.