Import Your Black & White Images
Lesson 9 from: Capture and Edit Classic Black & White PortraitsJared Platt
Import Your Black & White Images
Lesson 9 from: Capture and Edit Classic Black & White PortraitsJared Platt
Lessons
Class Introduction
03:23 2Set Up Your Black & White Portrait
08:35 3Create & Augment Light
08:31 4Backlight Your Model
08:42 5Light for Contrast
13:09 6Portrait - Male Model
16:17 7Portrait - Female Model
06:30 8Shoot In Black and White Q&A
09:01Lesson Info
Import Your Black & White Images
a lot of people will play with the color and then they'll turn into black and white because, like, the color didn't work out. So I'm gonna turn into black and white. Well, as a result of that, you have to then re fuss with the same image to get it to look great in black and white because images that look great in color if you just add black and white to it, don't look great in black and white. There has to be a change. And that's because, as we said in the earlier class, color in itself is a contrast. So blue versus red, they pop against each other because they're the opposite sides of the color wheel, right blue or in our red and orange against blue green, their own different sides so they pop. But if you have blue and green together, they don't Pappas much, right. So off blue and blue aren't gonna be a great combination for a black and white portrait, cause they're just gonna look the same. Okay, so we think in black and white when we shoot in black and white and then when we come in...
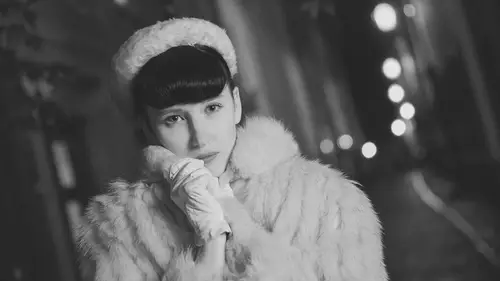
to light room, we're going to start thinking about it in terms of black and white, and we're going to start in black and white. We're not gonna fuss with colors and whatever and then work on the black and white. We're going to just turn into black and white. Then we're going to start working. So if you know you're doing a portrait in black and white and let's say you didn't tether in our case, we tethered. So everything came in and we said it to change the black and white on the way in. But if you shot out on location and you brought it in when you put your card in and you start importing your images, just add a black and white preset on the way in. So if you're in the import dialog box, I'll show you how to do that in the import dialog box Here, you would choose your files, go over here and choose where it's gonna go on what kind of previews and all that kind stuff. And then at the very bottom, you're just gonna go to the developed settings and say, go to a black and white presets. So this is my black and white collection. I'm gonna go in and I'm gonna look for the appropriate black and white So we'll just do a classic black and white click on that and then import, and it's going to add black and white tall. So when you look at him for the very first time, they will be in black and white. That way you're not wasting any time looking at the color cause you know, it's gonna be a black and white image. I actually once did an entire wedding in black and white. It's pretty cool. Like I told the client, we're going to shoot this whole thing in black and white, so we're not gonna have color. And they were like, Okay, cool. So he shot the whole thing on Ah, it was I was testing a like a M camera back when they first came out right When the M eight, I think, was the first digital one, and it was it were the bus and all that great. It was kind of a it was like a concept, right? But I shot it and I would shoot that alongside with my canon, right? So I was shooting cannon. And but I told the client, which is all gonna be black in life. And so I shot the whole thing black and white on fixed lenses, you know, 50 millimeters and stuff like that. So it became very documentary very in your face type of. And it was beautiful and the images were great. And I had all the style set on black and white. So no matter what, I was seeing it in black and white. And then when I imported the whole wedding, I turned on a black and white preset so that I would never see it in color, cause I didn't want to be tempted to see these beautiful flowers and color and go, Oh, I need to fuss with those and I want, you know, And then all of a sudden I would have broken my word that I was shooting it in black and white by giving them color images of something. So I did the whole thing and delivered the entire thing in black and white and it was beautiful, is brilliant. But you realize that my mom's wedding was shot in black and white to because that's what they shot all right. It wasn't, you know, early. So the whole thing I was looking at her phone. I was digging through some photos the other day. Um, and I was just reminiscing with my kids and showing them different pictures of like me growing up and all the ones of me growing up or like yellow seventies like, you know, grainy out of focus, like hold a type camera shots. And then all of the photographs of her wedding and her growing up are all these amazing, like black and white, you know? Awesome. So I just want to go back to that time where we don't have color. It's just such a amazing I think. I think the thing that makes black and white so artistic and beautiful is that very few of us almost none of us can actually see in black and white. Even people who are colorblind seat, mostly color. They just see different versions of color, right? There's very few people who just see black and white. I want to, just like by some glasses that would allow me to see in pure black and white. That would be amazing experience, because it's like because everything you see is always in color. When you see a black and white image, you're transported out of reality instantly. You cannot see that. So therefore, it is fantastical experience to look at a black and white image. And so that's why I love it. I've just always been a big fan of black and white, so we're going to edit these images now in black and why I brought them in in black and white. Now remember that I was shooting tethered so the images went from the camera into the computer. But in order to keep it from being a long, laborious process of transport, porting a 30 megapixel image into the computer so that the client and so that you could enjoy your experience and see the images pop up quicker. I have two different files being shot on the card here. So one card was shooting the full raw image, and the other card was shooting the small, raw image. That's only like I think it's maybe megapixels or something like that. Maybe it's 12 something small on DSO. It's coming in much faster, but we're looking at the small ones now. I want to edit from the big ones. I could edit from the small ones and then alter over to the big ones. But I want to build a print from the Big portrait, so I'm gonna show you how to alter that. The first thing I did is I came into my computer and I plugged in, so I plugged in my camera cards. So here's this is the card. All these chords. There we go. This is the card that had all the large raws in it. And the reason I chose this for my large raw is because I have a card reader for it in my computer. So that's why I chose it time. Um, otherwise you could choose the other one. It doesn't matter. So I chose raw, large wrong here. I put it into my computer. So, um, shoved it into the computer here, and I did this while we're on break, so you didn't have to wait for it, but I'm gonna show you where I put them. So I opened up my hard drive and I went to the actual job where we're shooting. So let me go to that. And remember, I had this folder called Portrait, and in it there was a folder called Black and White Portrait, and that's where all of our small, raw images were being placed. So what I did is I made another folder called The Large Raw, and I just simply opened up this card and found all the files here and dragged them into their. But it's important when you do this that you look at the way. So look at the black and white portrait's here. See how they're right inside of that folder. There's no interior folders, so light room sees the black and white folder and then sees photos. So I'm mimicking that's folder structure. And I'm putting large raws in a folder and you see the same images, same edge, image numbers. That's why we don't have light room rename. Our image is on the way in because then they would be different image numbers so that small Roz would be like and the big raw would be J to a 56394 Okay, so this process wouldn't work them. All right, so I have imported all these photos. I'm gonna inject the card. So now what I'm gonna do is I'm gonna go light room where all the small raws air being referenced. And I'm just going to simply go to that folder, that black and white folder I'm gonna right click it and I'm going to say update the folder location. So I'm gonna click on update the folder location. And instead of choosing the black and white portrait, I'm just gonna choose the large, raw and hit choose done. So now we're referencing the large Ross And did it take any time? I just said these photos air now here. But instead of them being little photos now it's referencing big photos. So now if I go to this photo and I zoom in, see how far I zoom in now because now I'm looking at huge photos before it would assume, too, just like his face or maybe even less. Okay, so now I'm looking at the full raw photo, and it's now 6000 6720 pixels tall instead of I think the other one was 3000 pixels. So it's twice as large. And now I can really work on these photos all right. Any questions on that? Okay, so now that we're inside of light room, we're just gonna go through, we we can go through and choose these images on DCI choose the ones who really want to work with, um, So I'm just going to kind of go through that process really fast. Um, so I'm gonna click on here, And by the way, we also photographed a color checker passport, and you can see that that is right here, Which does? It's no good, really, when we're doing black and white, right, Because the colors don't have to be accurate now, but if I were in a position where I was doing a color photograph so you can see that I've got color here, then what I would do is I would actually go in to the file export menu, and I would just find the photo of this. I would name the profile that I want to use for the lighting. So I would say creativelive so I'd say cl, uh, pro photo portrait session. So it's very specific to this. Set up those lights. This set up all that this camera and then what I would do is, I would hit export and what it does. I don't need to do it right now, But what it does is it just makes a profile for you for that camera on those lights or that lighting condition, and then it puts it inside of the develop module in the camera calibration area. Right here, inside of the adobe are the profile section you just dropped down and find that profile that you made and apply it to all your photos, and then you'll have dead on accurate color. But in our case right now, we don't necessarily need to profile the colors because we're in black and white constantly. Does that make sense? Okay. All right. So what we're gonna do is we're gonna quickly go through these images and find, uh, the ones that we want to use. So we're just gonna go through and look at him together like this and just just kind of scan through. I like that one a lot. So let's just Yeah, that sharp. You pick that one, and then we'll go to the next set. We're going to go to I like to look at a set of images. All at once so that you can actually compare them. Um, so let's say I like this one. I think so. I'm gonna zoom in. Yep. It looks good. Pick that one and notice that I am very, um, willing to let other ones just drop off. So I'm not I don't scrutinize images. I just look for things that pop out at me. So this is a dreamy one. Very dreamy, like, you know, looking off into the stars. That's nice. We could actually put, like, a another side face of you right here, like in the eighties, you know, So or your dad could be looking on longingly kind of ghost, like love it. Okay, so I'm gonna just kind of I don't like that. That's pretty creepy. This is really dramatic. I think it kind of like that one. Somebody gonna pick that one? Keep moving through? Yes. Like that one. And you can kind of tell if something sharp right now it's if you build the one for one previews, then when you zoom in, you don't have to wait for it to build like that. But you can tell it sharp. Just based on like the structure of the of the bigger pixels. So often times you don't have to wait for that. So I don't like any of those. And the last set here, a little bit of a smile. We're gonna go. That's that's a nice soft one. And then we'll give you a smile. So all right, so now problem. I took more pictures than this, didn't I? So the pictures I took, I unplugged. And then I started shooting. Right. So now what we're gonna do is we're just gonna go back over to that large raw folder we're gonna right click it, and we're gonna synchronize that folder. So now it's gonna look in it realizes, Oh, there's 55 more photos that you took that we're not seeing Simon ago ahead. Synchronized the folder. It's going to bring in all of those extra photos, these air, some tests from last night and here. These are the photos that we weren't seeing. So we're gonna go in here, highlight All of those were gonna turn all of those two black and white, and then we're going. Teoh, choose some of those I like that one que on and I like the laughing. That's cute. Obviously was funny at some point. See? Maybe Look at this one in comparison to these. I was funny a lot. Like she's laughing again. All right, that's cute. I like this one a lot. Okay. And then in a second, she's going to start looking there, right there. Love this one. All right, so now we have our photos. So we're just gonna sort by those photos? Uh, just the selected ones. Oops. Well done. Go back to her large raw folder. And they're so there's all of our selected images. So now what we're gonna do is we're gonna just take one of those images. Let's just start with kind of the final image that we got of Chris. We're gonna highlight all the rest of the images because anything I do on this one, I want to happen to all of them, some highlighting all of those and going into the develop module. And then let's start working on this image
Ratings and Reviews
rorofot
This course is a good overview and I love the way Jared teaches. But the course mixes basic lightroom handling with intermediate portrait photography and really expensive gear. Which person, that doesn't know the basic importing and editing in lightroom, has three studiolights from profoto with grid or a calibrating system for the inkjet printer?? And be aware, it's only about LR-editing and nothing about photoshop. But over all it's a good overview for beginners - alas not for intermediate users.
TIm Smith
I usually don't write reviews, but thought Jared did a great job presenting the material. Clear, concise and didn't talk excessively fast. Material was well organized and reasons were given for why something was done a certain way. The fill lighting technique was something different and plan on using. The discussion on tones, textures, clothing and background were also helpful when discussing black and white.
Amy Vaughn
I haven't shot much with the intention of turning the photos black and white, but this class piqued my interest in trying it. This class isn't just about how to turn any photograph black and white, but how to think about the photo as you're shooting for black and white. I especially appreciated Jared's explanations about the importance of texture, creating drama and carefully targeting lights.