Lessons
Lesson Info
HDR Workflow Best Practices
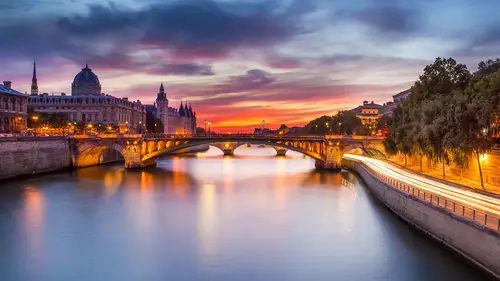
So sometimes you want to go away from Camaro, and it's beautiful a G I feature because, you know, it's kind off on automatic, you know, you can't remember. You know, this Hollywood photo the first photo I had of downtown l a where the cars were blurry. Maybe it would have loved to keep the car blurry. Maybe I would have liked to, you know, I want to pick what I want. So I'm going to select the three photo one amazing sunset in Paris. You know, on 40 l a Paris. You don't already have like crazy sunset, but when you do, you're happy. You know, that's kind of like for a photograph for sunset is like a drug is like I want some said So this is younger exposed photo where I get a little You know, I got all the details in the sunset, and again, this was shot years ago with five d mark to this is your over exposed photo. You know what I like about the Everywhere Express for? I love here. The lights, you know, and funny anecdotes is that this photo cannot be done again because the mayor of Pari...
s has turned this whole road into a walking street now, so cars are not lots. You would never able to get that straight off light. Unless you take that photo on, your foot shall fight back. But it's finished. Been like this for a couple of years now. We just kind of cool. But, you know, you won't be able to get a latte effect, and that's the normal exposure, which is kind of like I don't have the light effect I get. You know, I'm kind of missing some things here. So what if there was a way to blend his exposure? So what I usually do is I think my normal exposure and I and I just retouching like if the other ones didn't exist. So I'm going to open up the shadows. You've seen me. Do we see one thing is look on Nice in the over exposed flow of the water is I love when itself was a bit of more loan exposure. Here we get all the small peoples. The problem is we pulls is what I call I invented a term called high frequency texture. You have that, you know, with water was report sometime it's so small that it kind of, like, hurts the eyes a little bit. It just it's just not pleasing to see when it's more smooth. It's nice. It's just nicer. So I want to get that back. Give that back to me, please. But again. So I'm gonna do my black point. I'm gonna do my white port. Okay, so now I got a better contrast. Gonna add some more contrast? I'm gonna boost exposure. But you see, uh, the highlights. I don't like to bring the highlights down there because I know I've got the under exposed photo and I want to get a more natural look on this. What I'm really interested in this photo is a long exposure. The Inter exposed photo has got a lot of noise. Has got more details in this guy, but I might use just a little bit of it. What I'm really interested is this one. So I'm just doing a little shopping. What? I'm getting out the best out of each photo. So what do I want here? First, let's look at white balance. So daylight they, like, brings a bit of magenta because it was a lot of magic. This guy. It was a special sort remedy. Sunset with a lot of magenta. Some skies do have them. It's actually a cooperated thing. So just so you know, if you see magenta, think about me cloudy, even more warmer and shade. Yeah, I like the blue look, I like the blue with magenta. Maybe add a bit of mention ever. That's for stays between us. Uh, you know, maybe not that much, because it was a really a lot of my John and a photo and them. And while I think I'm happy with that now, I'm going to do the double development, Tiki, meaning that what I'm interested in is blending this exposure first. So what I'm going to do now is this is my base photo. I want to make sure that at least the white balance is the same on all three photos. So I'm gonna click here, select old, but I don't wanna you know, they're complete different exposures, so I don't want Do you know the white and black is going to go in a different in photo? So I'm gonna go here and I'm gonna click on sink setting. But instead of having all these options. I'm going to take on Chek Non and I'm gonna juice choose wide balance and what you have to click. Also, it is process version. It's just the way camera with deals with your pixel has there is different, you know Al Gore in over the years. So process version. Just make sure that wolf I was gonna be taken care off the same way this other world file. So white balance and process version is really all I care on this one, and I'm gonna take okay, and it's gonna take the white buttons that indeed here and gonna put it here and here. So remember, you know, a bit of Banchetta, and now I'm looking this photo. I'm like, Okay, what do I want? I really want the bottom part, but it's gonna be too bright compared to this one. So maybe I'm going to lower the overall exposure. That's kind of good enough for me. And on this one I want I love like how much red there is here. But this is really too dark. So I'm gonna go a year and because I know it's another exposed photo and I know it was always kind of five d mark to I know that might be so No way. So I'm gonna go into the noise reduction, going to zoom in on 1% and you see here there's a bit of know if there so I'm gonna I'm not gonna do the sharpening. I'm just gonna take out a lot of noise. I want this to be very soft because I'm going to use very little of that photo. Very, very little fit into view. So now I've retouched in Camaro in front of your eyes. Minimum issue, the under exposed photo just to get a bit of details here. The over exposed little for this part here. And the noble photo is kind of like in between. What I'm going to do now is I'm just gonna click on Done, and it's gonna update all three. And then I'm gonna go to tools, photo shop and load files into photo shop layers. And that's what that's going to do is open up one Photoshopped file. Oh, foot ship is really busy with this task. Okay. Thank you so much. What is a community race that Why are you saying this Okay, let's do it again. Tools, photo shop and lo fuzzy for shoppers Layers. Okay, well, that filed with open. And it's gonna basically just put them on top of each other. And it's kind of cool because I could open each file and drag and drop them on top of the advantages. Takes forever. So they invented that tool thing. You just have to think of clicking on Done. So you're going out of Camaro and going here, So I mean, two layers and I've got my three exposures I usually always liked. I'm gonna rename this. I'm gonna call this under for under exposure. You would have gives that over for over exposure and this woman to call it normal. And I always put the normal in the middle. Put this in the middle. And, uh, now you have to make a decision off whether you're going to use a lot of the information of that layer or not. In this case. No, I I know it's way too dark. I'm only interest. Maybe be a little bit of here, so I'm gonna hold on the option Keen click here on the mask, and that's gonna make a black mask. And what happens when you do black mask? It becomes invisible. Black conceals white reveals so that masks now is complete. Invisible. But if I go in here and take a little brush, then make my brush pretty small. Ah, and I'm gonna have a free low, maybe like around 40. And I make sure white is a foreign color and I brush here, I can come back and bring more of the details that I've had here. And I'm doing it layers by layers. Maybe a little bit bigger here. Oh, I forgot one important step. And that can happen to you too. So I'm gonna right, I'm gonna shift click here and I'm gonna take on the lead layers. Before you do that, you need to align all the photos. And that's why I forgot. If I do that mistake, you will too excited all the time. So I'm sitting on my three years I'm gonna go to edit photo online layers photo, and that's gonna even so with on a tripod, you need to make sure they're perfectly perfectly aligned because when you start blending exposure with layers, if they're not, it's gonna look and we're So you want that good is he moved that they should be perfectly aligned. You can see they're perfectly in line. And now I'm gonna go here again. Option and mask. That's the beauty of life. You make me steaks and you can show You know how many steaks are taken Care off. So I remember What is my foot? One color well past 30 35%. And I'm brushing. I'm brushing away. I'm brushing. I'm just bringing back some of the under exposed photo. I'm only really interested in this spot here because I know this one's got lots of details and because I'm a 20% I'm doing and you can zoom out, you know, make a big brush, hold on the control and all key to do that. Just bring back a bit. The under exposed social before, after we just get a lot more details. And sometimes it can make Hollows libit here and sometimes cannot. If you go with a slide brush. Usually it blends in pretty well now. So that's the mass. That's hollow mass. Look, you won't see on mass. Look. Ever seen a mask with your own eyes? You President option. Can you click on it? And you see it for your wife. And you can see it with just white is gonna be transparent. So you see how it's like a nice great in here. So I'm bringing back to the under exposed photo, and now here I'm gonna do the opposite and create a white mask. I'm gonna take a brush. And this time I really want I love the loan exposure look of the water. And I love the fact that, you know, there was some light streets here. I'm gonna close this. So I'm gonna make this a little smaller, and I'm gonna put the the power off my brush 100%. And what's this in black? Of course. Because I want to hide this. I want to hide this from the normal photo and bring it. And boom, I'm bringing by the highlights and boom, I'm bringing by the silky nice water at 100% for the bottom. My photo. And I like that because it's the best awful words you know. So again, with this one I bought a bit of, you know, off the details here of that red and with this mask your I brought the bottom of the photo, which I really like the loan exposure. So that's the good thing went especially at night when you do bracketing you can with the power of masking in photo shop you can choose the best of those worlds And now I'm ready to do a double of development and using the most crazy keyboard chocolate off all time. Remember? So I want to create a layer that's taking too. I called older. We've done so far. So it is command option shift E amazing common option Shift e. And now I have one layer that takes into account all we've done so far. And I couldn't go to the good old can borrow and I could do a double of lemon. I got all my three exposures and so don't want crazy on the double of room because if you do go crazy, you will be put away. Now, if you do, we're crazy. Opening shadows and bring on the highlights is going to go look really hdr Lee looking and it's kind of cool, but this class is called a natural SGR. I'm gonna live up to the title of the class, so I'm just going to bring down a big toe, highlights a little bit the shadows. You want to bring a little bit more contrast And here, you know, I want to do a great end here. Oh, I'm going to delete that. I'm gonna click here on minus so that everything, cause I got a whole bunch of sliders going on their old down to zero except that one exposure. And I'm just going to do with something here like this and something again, sort of closing the photo. Now, when you have NYTPhotos usually have a lot of dodge and burn, which is naturally with all the city lights. So I don't do that much, but I still think that this beautiful building called like in American likened surgery. Ah, that's how you said in in California liken surgery. And French is like one surgery. It's different. And, uh, I'm gonna make a little circle here and remember, never forget inside of outside further, 1% inside, and I'm gonna boost a little bit exposure. And I just want to break the tones here on this concierge early so meaning that instead of being the same darkness in his case. It just goes from dark to a little brighter to back to a little dark. And, ah, I'm gonna go here and duplicate, and here I want to make maybe a little bit bigger I don't want and I just want to add maybe not brightness because I took a hard time getting back all the information from the under, exposed my baby a little bit off yellow because I got a lot of blue there and let me the meat of much entire and maybe a little bit of saturation off the three for the price of 13 sliders in one Rachel Circle. Who could ask for more? Really? So And I'm gonna go to brush, and I want to do something with the brush. You know, I want toe chicken little brush and do something. So I'm gonna go here before I do anything with Russia, I'm gonna click on. Plus, all the slide is going to go down to zero except the brush. And maybe, you know, at a bit of mawr, make sure flow in densities are on 70. So you don't want to see the brushwork too much and maybe a little bit here. I'm just trying to weigh on people. Maybe I go crazy numbers like I'm gonna brush here and burst there and went on. Don't overdo it. Overlay before the brush after brush. It's very subtle, but it's there, okay? And I'm basically done with this photo. I just want to click here, maybe do one last crazy contrast. And you see, here I have something that's dead. That's kind of weird that comes from the alignment of the photo. I'm gonna take on location. And remember, I'm not in Camero. I'm in the filter in photo shop. So that's after the camera. I really, you know, added some drama, some people would stop here. I don't not on my watch. And ah, so I'm gonna go here and I'm going to take the crypto, and I'm gonna crop this because not from the alignment I lost, You know? You know what? I'm going to zoom in more crab because more using that to crab Mauritz. Hard to be precise. I don't have that much. I just have that much. Rubs a C for crop up a little bit here maybe a little bit there and this and this just because from the alignment you was get this transparency a little bit. And you're gonna get that all the time. Yes. So I noticed that you crop rather than trying to fill the areas that are transparent. Yeah, that's because I'm lazy, but I could I mean, that's like a really, like one pixel. So it doesn't really matter to me. I mean, honest to cry, because sometimes when you print, you have to crop for very precise pretty size. So in this case, I would, you know, enter the preaching signs and do my cropping for that. But in these cases for Facebook, whatever this is, I don't what that is. I believe it's a bird and was a loan exposure bird sometime makes like sensor thus try to, you know, do competition. We sense it. Us but their birds, it's natural dust. It's, you know, complete organic. It's nothing. Nothing. Okay, so I do that out, and voila,
Class Materials
Bonus Materials
Ratings and Reviews
Dean Salman
This was a good course if you want to know how to improve your photos using post processing features in software. He does show you how to combine a HDR but that is all. Very little how to take the HDR photos and what to look for in the photos when taking them. There was only about 10% HDR. The tips on how to bring a photo to life was good, but I was hoping that the HDR was more covered since that is what it was about. So I recommend it only because of there is good information on post process, not about HDR.
renee Akana
This is not a beginner's class. It's not an automated process where the program spits something out, but it's a great approach to using photoshop to give you a fabulously realistic approach and his personality is A-okay... I enjoyed listening to him and seeing things I didn't think to do when I was working in photoshop hdr. Photomatix, Nik, et al, can spit something out, but in Photoshop, you have more control with the outcome and it will be more realistic.