Shoot: Position of Light
Lesson 5 from: The Starter Portrait Studio: One Light, One ReflectorChris Knight
Shoot: Position of Light
Lesson 5 from: The Starter Portrait Studio: One Light, One ReflectorChris Knight
Lessons
Class Introduction: What are you going to learn?
03:16 2Directing the Eye
03:27 3Light: Hard, Soft and In-Between
12:11 4Shoot: Controlling and Shaping Light
08:14 5Shoot: Position of Light
08:22 6Shoot: Distance From Background
03:11 7Shoot: Contrast
31:01 8Shoot: In-Studio Lighting Demos
18:19Lesson Info
Shoot: Position of Light
Position of light, another thing we have to consider, I'm not gonna demo this, because it's very straightforward, but basically moving the angle around your subject changes what the shadows look like, okay, now position of the light also affects contrast, let's go ahead and move this out of the way, so, thank you, the more you move the light to the side, the more you introduce shadows, more shadows, more contrast, right, that's gonna help tell some kind of an emotional response, obviously to the front, a little bit flatter, a little bit brighter, to the side, darker and more mysterious, but as you saw a second ago, I did something called feathering the light, can we throw the four six on that for me, please? So this feathering the light can affect the quality of light on the face and know that round and rectangular modifiers do this separately, so what is it? Basically I had the light pointed at her first, but it was also, hey there, (audience laughing) also light in the background, by...
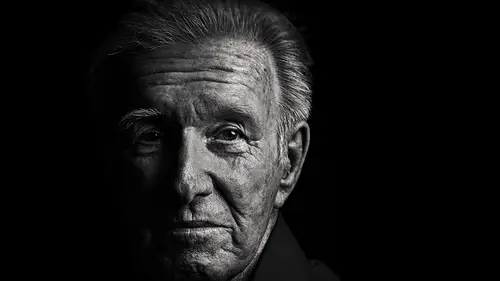
turning the light, we're using the edge of the light to light more specifically her and not the background, because light's conical, right, it comes out in a spread and when you point the light right at someone, they're getting the middle, the brightest part, but as you start to use the edge of it, what you end up with is still nice light, but there is an area, where it just gives you a whole lot more control and that's the edge, using the edge of the light and so it can not just, whoops, here we go, not just affect the light on the subject, but it can also affect the light on the background and this is a very quick and easy way to give yourself a whole lot of control, so to show this, a little bit, can you come forward for me just a scooch, a little bit more, perfect, alright, so... we're gonna start with this and I picked the three four here, because hard edge, square softboxes will create a more defined edge on the falloff, than a rounder light, which tends to wrap around a little bit more and so this just helps illustrate the concept a little bit more successfully. If it's possible, can we dim the studio lights for just a second? Yes. Okay, awesome. So the modeling light's really gonna help you out a lot with this, so I'm gonna start from the front, we're at seven? Yeah. Okay, that's fine, okay, great, so I'm gonna angle this down a little bit and this is basically pointed right at her face, okay. Now, we're gonna meter this, it's very close and it's very soft. 11. Okay. (camera shutter clicking) You know what, let's actually back you up a little bit, so we can illustrate this a little bit more successfully, back up a little bit more for me, 'cause the background's already dark, a little bit, that's good, great, okay, come just a touch for me, please, come a little bit more, great, 'cause it's very dark in the studio. Ready. One more time? Nine. Okay. Let's try that again. (camera shutter clicking) Okay, that's a little bit better. So we have the light on the background, it's a great background, we have light on there, it's lit, but if I start to turn this off the background, not just on her, we may lose a little bit of light. Seven one. Okay, we lost a little bit, but there's no light on the, there's not as much light on the background (camera shutter clicking) and so it gives you a very different feel and obviously the more space you wanna give yourself, the darker you can make that background, okay. Now there is a fine line between this and what you can do is you can create something called the checkerboard effect, you see this a lot with Irving Penn's work and it's kind of creating this sense of depth by alternating and using one light to switch, so this is pretty flat, it's light to dark and this is light to dark, but if we change the feather on this just so, we can make this side dark and the face light and then the face dark and the background light and it creates a light, dark, light, dark, which helps us illustrate depth and this is a little bit easier when you have like a really dark studio, so I'm gonna do my best to kind of fake it a little bit here, so this may take some trial and error, 'cause I usually when I'm trying to do this, I turn off all the lights, except for the modeling light. Okay, great and so what we're gonna do, (camera shutter clicking) again I'm gonna guess here for a second. (camera shutter clicking) That was a little bit more successful and if she's a little bit closer to the background, we can see it in reverse, let's back you up just a little bit, okay, it's there, just subtle, okay, Seven one. Okay, John's on it with the light meter. (camera shutter clicking) Come forward just a touch, great. (camera shutter clicking) There, that one's a little bit of a better concept, illustration and so what you have is this dark, lighter area over here, it's a little bit subtle in here, 'cause we had some lights on, but... that's, actually what's the power setting on that? It's six. Bring me up to eight, please. Two stops. Great, we'll try that again. (camera shutter clicking) (camera shutter clicking) It is a little bit hard to see in here, that's a little bit better. Okay and what we have, I'm on a higher contrast Black and White, so it's a little bit more easily seen, but you can kind of see how we have that difference and when you see this in a high contrast Black and White, what you end up with is something that feels like that, okay and that's when you start getting into that more Irving Penn sort of a... sort of a sense, so let me try that one more time, turn your face just a little bit more for me, turn your shoulders as well, perfect. (camera shutter clicking) Great and so what you can do, let's see if we can get the same setting, let's get something that kind of feels like that, which is really quite nice. It's all about control of that singular light and so we create the sense of depth, right and it goes dark and it goes light and the face goes dark and then this goes light again, okay, it's a little bit more visually interesting, but it is a little bit trickier and so you just have to really pay attention to what you're looking at.
Ratings and Reviews
JennMercille
You can never learn enough about light. I loved this class! I recently downsized from a huge studio with multiple strobes and every kind of modifier, to a small home space with one large window and a few reflectors. This class was very informative and helpful with that transition. Chris Knight is an interesting and very knowledgeable instructor, and he was a joy to watch. I highly recommend this course!
a Creativelive Student
Chris's style was excellent straight to the point, I picked up what he was putting down and at the end, I loved seeing all of the different looks I could get from one light. This is my kind of tuition. To the point, full of great info, rehashed at the end. More like this, please.
a Creativelive Student
You should teach a course on how to teach! This course gets to the point, and gets the job done. I loved it. Thank you.
Student Work
Related Classes
Studio Lighting