Lessons
Class Introduction
12:46 2The Early Years
24:31 3Entrepreneurial Spirit: Risk & Reward
08:11 4Developing Your Style
12:57 5Creating Your Brand
11:03 6Confidence
11:20 7Personal Work
08:21 8Marketing
12:14Location Lighting Set Ups: Image Review
05:38 10Side Lighting
08:30 11Hollywood Lighting
10:27 12Dancer Lighting
08:50 13Editorial Lighting
09:06 14Tunnel of Light
12:24 15Back Light
06:09 16Image Review
06:03 17Creating a Series: Setting Intention
07:19 18Connection
09:31 19Provoking Reaction
11:11 20Physical Contact with Your Model
15:16 21Raw Series - Image Review
08:57 22Image Critique
1:01:29Lesson Info
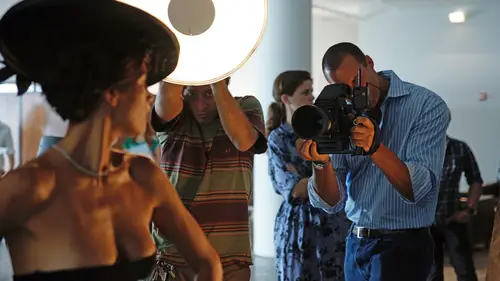
Tunnel of Light
Wow, this is gonna be like mystery shoot today. Let me see how far along we are, how are we doing, Tobes? Do we have the other light on the other side too? We do? Yep, we have umbrellas in the background. So we have umbrellas lighting the background. We're gonna make this white background nice and white, poppy white. Normally if you've got the budget to do whatever you like, I would do two heads here, one top, one bottom. We call those trees. And if you've got a really big background, and sometimes we have huge ones, we'll stack six heads up on C-stands, sometimes on multiple C-stands with umbrellas. This one's quite a small background, so we're directing it right at it, but you can also turn these around and get V-flats like that, and bounce the light off the V-flat and that makes it even wider again, and also it helps diffuse it. It can be a little hot sometimes when it hits the background directly. And we have one on each side, so we have an even lighting on the background. What...
we've done here, which was one of the things I love to do, is build a tunnel. A tunnel of light. Tunnel of love. And so it's black facing out here, but it's also black facing on the inside of the tunnel as well. Yeah, it is, making sure before I say that. So it's black on the inside. Now what that's gonna do with our beauty dish in the foreground, is beautifully light her with the beauty dish, which is called a beauty dish, some people call it, what do they call it, soft light reflector as well? I've only ever called it a beauty dish, I don't know. Soft light reflector I think is probably the technical term, beauty dish in the fashion business because that's what we do. And there might even be another word for it, depends on who manufactures them. They're great light sources, the light comes out, hits a metal surface and comes all the way round this white interior and creates a very white, pure light. You can also get silver beauty dishes, which are even more speculative and create a harsher light source, but most beauty dishes have a white. We've also got a grid on it to really make it very directional. So it hits and creates those, you know where the lines are, little shadows, and you really see it ripple across the face. It's very, very popular in fashion. Not used as much in portraiture, 'cause it's more hardcore, but when you're shooting portraits of actors for covers of magazines, and athletes and things like that, and you want a little bit, and I, you know I like drama, it creates a little bit of drama and kick. And this tunnel is creating, making it super nice and dark and black around the edges, and it's stopping so much, too much of the kick from coming back. So otherwise, if I didn't have that, the beauty dish would go all the way around it and start to wrap around, the light from the ground would wrap around, and be creating this tunnel. Helps give that look. And it's used quite regularly, actually, this sort of setup, very popular. You don't have to have these V-flats. We often, we use flags, big floppies rather, I think, actually, big four-foot floppy, which is, do we have one on set, a floppy? We don't have one, no. Well maybe we'll find one and bring it in later, or show you in the next segment what a floppy is if you don't know. They're basically big bits of black cloth in a frame, and you have Velcro on the top which you can peel off and make a four-foot piece of black cloth become an eight-foot piece, and then you put that on a C-stand, and you create a wall, and that's really nice too because the cloth itself actually soaks up the light, whereas V-flats you can see they're slightly shiny, even though it's black, it reflects a little bit of light. So different things, it depends how much dream you're trying to get. How are we doing back there? I think we're ready. And where do we have her? Just right, I had her right here. You had her right here. Okay, again, mystery shoot, you have no idea what I'm gonna be doing back here (Tobes laughs) (shutter clicks) In your face. (audience laughs) All right, come on Rhonda, not like that please. Probably got to turn this up a bit, right, make it a little bit more powerful. All right, yeah, you're good there. That's good. And we're just tweaking and just bringing them in even tighter. That's good. Did you go up on the power? Ah not yet. There we go. Go, go just right there. (shutter clicks) And voila! Shot one. And you can see, right, how the darkness is coming in on the side here. Clean background, and actually you see we are still getting a bit of kick, which is really, really nice, but it's just a little element that comes down here. So the previous light setup, I highlighted her cheekbones by having the backlight, and that was the key light, actually. And in this instance, I'm highlighting it with the shadow, by bringing it in, and it's still just one main light source on the foreground. You know, you can do this also with sunlight in the background, it doesn't have to be lit. You have someone in the window frame and do very similar thing, but by bringing in darkness, and also, I'll tell you another thing. The models, there's something about it when you're in a small area, it's more intimate and you feel kind of protected, you're secure, and it's funny how there's a different kind of reaction that people often get when all of a sudden it's like a secret, you know, and it's funny, but that's how it feels that way, and even for the photographer, 'cause you're both in there in this small space. And I think that with me, Rhonda you can step out for a second while I talk, don't want to have to leave you in the.... (audience laughs) important to think about what they're doing, what your models are doing. But because I started shooting in my apartment as a kid, I was used to being up against the wall, up against the back, and being in small spaces and that's how I developed my style, actually. I didn't have lots of space, and I was in a city like New York, so even on a sidewalk, unless I was in the street shooting them, which I wouldn't be, I would be on the sidewalk. So I was never really more than about sort of six to eight feet away from anyone. And that's kind of become a part of the way I shoot. I'm often quite close and tight, and I'm in the picture with them, you know, or I'm trying to get to that kind of crop. I find myself even in these huge studios really tight up against the wall, you know, and it's just the way it is. Okay we'll do a couple more shots in here to get another feel for this. Beautiful light there. (shutter clicks) The back V-flats, can you just move them out a tiny bit? (Tobes walking) That one too, yep. There you go. I'm just opening it up a little bit in the background so that I don't see them in the background like you're seeing them there. Okay. (shutter clicks) Gorgeous. (shutter clicks) It's really pretty. (shutter clicks) Breathe. (shutter clicks) Gorgeous. Breathe, that's something I say all the time. Thank you very much Rhonda. It's important to breathe, photographer and your model. You'll find people are being photographed all the time hold their breath, for some odd reason, and then they let it out and it's (exhales loudly) you know. So anyway, let's do another light setup. Let's do it. (audience laughs) Hopefully if finance doesn't see me I won't have to take it down. The stuff that Jason brought it, is that the floppy over there? I think Jase, sorry this is Jason, and he's also been working with me, he's from Creative Live and been assisting us, he's been amazing. Yes it is, I can go and get that. Oops, sorry, I'm gonna jump in here. You're good, you're good. This is Jamie, who you may or may not know, I don't know, but she's been fantastic as well helping, and she doesn't normally assist me, but she is today. Just you. Just me, I feel very lucky. So this is a floppy, four by four, and the material helps suck up the light and you normally put this on a C-stand other way, but the great thing is, is obviously as I mentioned, it has Velcro, so (Velcro rips) you can open it up. (Velcro rips) And you would insert that into the back of a knuckle of a C-stand. And the great thing here too, is not just is it a wall, a wall of black, but because on an arm you can do what you like. So you can actually create a room, and one of the things I love to do, just that thing you just saw just then, is do one on either side, or if you can you have more, and you create this sort of black room, dark room all around the model, and it's put in the studio, really good in daylight. If you're by the ocean, and you have that huge big sky, by doing this, all of a sudden what you've done is you've created like a soft box. 'Cause the light's gorgeous when you're outside, right, but it's everywhere. So everything gets kinda over-lit. By doing that, you use the sun, you have the beautiful color, texture, feel of the light, and intensity, but you're controlling where it is, and so all of a sudden you bring in these shadows, but you've got that massive sky. So the eyes are lit with the huge sky, but then there's all that shadow in there, and it's the simplest thing, and you see it being used in magazines like Sports Illustrated and things on a regular basis, and you wonder, how does this model on the beach look like that, when I take a picture it doesn't look like that. And sometimes it's super-simple, all they're using is actually not more light, but taking it away. So if you were shooting like that outside, would your background be blown out? Because you're exposing for a little bit shaded. It totally depends on what's behind you, obviously, right? So you know, you have a forest behind you, then no, right, but if you've... And I don't... So to go with your question, I did a whole series of shots, test shots, and I used to have, I found an area, and you probably all do this, do you have places that you love to shoot? Like little locations that you've scouted where you know the light is good, and before you have a studio you're like, okay, this is my go to place, I'm gonna drag everyone into here 'cause I can get safe, great shot. If I shoot at this hour, when the sun does that, and you've worked it all, we all do that, and I did that too, right. And it was this white wall of a building, and across from the wall, was a huge, another massive white wall. It was on the West Side Highway in New York, and on the other side of that building, so if I'm the model, behind me is this white wall, in front of me is a huge white building, and on the other side of that wall is where the sun was setting. And if you put the person in the direct light, you'd get very contrasty, really harsh light, and quite editorial. But what I like to do is have the back to the light. So wherever the sun is, actually put your background on the sun. So it's almost like a north light scenario. And then you bounce the light back in again, and having that huge white building was a massive bounce, so I didn't have to have a bounce. So it was one less thing I had to carry, I realized I didn't have to have a bounce, the light was the sun, it was behind there and it created this beautiful, even, white, crisp light, and it was very simply the sun behind the person. I had to shoot at around four o'clock in the afternoon,, was the only time you could really make this happen for about an hour you had that perfect moment. But yes, if you were to put that black frame around the person, the background blows out only if it's brighter. Otherwise you expose for it, 'cause it's the same, you're exposing for the sunlight.
Class Materials
Bonus Materials with Purchase
Ratings and Reviews
Michael Spatola
This is one of my favorite Creative Live classes so far. The storytelling and human interaction parts were my favorites! The ability for Nigel to get such amazing expressions in such a brief time shooting was amazing. Everything he demonstrated seemed almost effortless, and all without a shred of ego. Great class!
Margaret Lovell
Nigel is a wonderfully engaging instructor. I like that he walks his students through his photoshoots. The set ups. How to interact with the models. Even though there are a couple of genres I'm most active in, I appreciate that Nigel says that you can have different photographic interests, so long as you brand yourself properly. I like taking photos of lots of things, although my outdoor photos generate the most interest. I highly recommend all of Nigel's classes.
a Creativelive Student
Passion, personal, inspiring! Nigel, thanks for amazing class and a lot of great advices.