Graduated Filters & Spot Tool in Lightroom®
Lesson 23 from: The Professional Photographer’s Digital WorkflowMichael Clark
Graduated Filters & Spot Tool in Lightroom®
Lesson 23 from: The Professional Photographer’s Digital WorkflowMichael Clark
Lesson Info
23. Graduated Filters & Spot Tool in Lightroom®
Lessons
Class Introduction
08:17 2Shooting Workflow: Set-up The Camera
15:43 3Shooting Workflow: Histograms and Exposure
18:14 4Shooting Workflow: Sensor Cleaning
32:50 5Overview of Color Management
17:31 6Color Management: Monitor
11:49 7Color Management: Workspace
03:40 8Color Management: Monitor Calibration
25:52Color Management: Do I Need This?
03:42 10Introduction to Lightroom®
05:44 11Download & Import Images With Lightroom®
06:32 12Lightroom® Preferences
09:09 13Six Ways to Speed-up Lightroom®
14:02 14To DNG or Not to DNG?
06:47 15A Logical Editing Process in Lightroom®
08:56 16File & Folder Naming in Lightroom®
08:39 17Batch Renaming in Lightroom®
05:51 18Entering Metadata in Lightroom®
03:35 19Managing Images in Lightroom®
07:39 20Introduction to the Develop Module in Lightroom®
04:45 21Lightroom® Develop Module
24:01 22Sharpening, Chromatic Aberration & Vignetting in Lightroom®
12:34 23Graduated Filters & Spot Tool in Lightroom®
09:59 24Converting images to Black & White in Lightroom®
13:01 25Creating Panoramas in Lightroom
07:46 26Creating HDR Images in Lightroom®
09:29 27Lightroom® to Photoshop® Workflow
07:04 28Export Images to Photoshop®
08:54 29Finalizing Images in Photoshop®: Basic Adjustments
36:49 30Finalizing Images in Photoshop®: Retouching
15:16 31Finalizing Images in Photoshop®: Saving Master Files
09:45 32Make Fine Art Prints: The Cost
15:37 33Make Fine Art Prints: Ink Jet Printers
05:23 34Make Fine Art Prints: Ink Jet Papers
10:14 35Make Fine Art Prints: Understand ICC Profiles
08:44 36Make Fine Art Prints: Sharpen Image
18:26 37Printing From Photoshop®
09:11 38Printing From Lightroom®
05:07 39Compare Monitor to Physical Prints
06:33 40Printing Black & White Image
09:10 41Extended Workflow: Back Up Images
35:19 42Extended Workflow: Storage Options
18:32 43Extended Workflow: Archiving Images
15:55 44Submitting images to Clients
28:32 45Prepping Images for Social Media
08:44 46Alternative Workflows
08:49 47Final Q&A
19:56Lesson Info
Graduated Filters & Spot Tool in Lightroom®
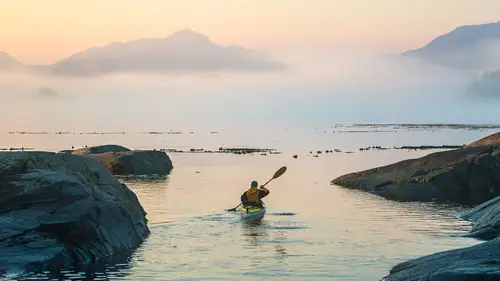
At this point, I'm gonna speed all the way back to the top, and I'm gonna look at my settings because I might need to open up those shadows a little bit here again. And I see on the TV they're a little more open than they are on my monitor, so I'm not gonna go too crazy there. But I'm gonna now think about how I want the viewer to see this image, because you may or may not know, but the brightest thing in an image is the first thing you're gonna look at. Hands down, doesn't matter what you're looking at, and this image, the first thing you're probably looking at is right here in front of the kayaker or somewhere up here in the sky. And I'm gonna take care of that in a second. But I'm looking at where people's eyes are going to go to on this scene and thinking about how their eye is gonna move around the image, because if their eye stays within the frame and moves around the image, they will look at it longer, and they will like the image better. And this is something you can think abou...
t while you're shooting, but it's difficult to fully comprehend while you're shooting, you know in terms of thinking about your images and critiquing your own images. What I'm doing here at this point, and throughout the entire editing phase, is I'm trying to massage the tones in the image without taking anything in or out at this point to get my subject where I want their eyeball to look at as quick as possible. So first thing I do a lot of, is I use these graduated filters up here, and for these localized adjustment tools, you just click on them and they open up. And I'm gonna choose exposure, and understand that exposure adds gray to an image while it's darkening it. So I'm going to draw a graduated filter and if I hit the Shift key it'll actually stay parallel to the horizon here and that's way too dark I realize that I'm going to back this off massively. But you see that color come back into the sky really quickly, if I do the highlights that actually darkens it without adding gray and it's darkening just the highlights, I can actually pull back some of that information in the sky. I don't know with all the lights on in here that you can actually see, if you're at home viewing this do yourself a favor and turn off the lights while you're watching this video and you'll be able to see more color on your laptop or on your phone or whatever you're watching this on. So I can adjust that I might even draw one in from here and you know on the TV the shadows don't look that, let me undo that, so when you draw a new one and don't do anything it actually keeps your whatever adjustments you made so I'm just going to these boulders and this is probably not the best way to do that I should do that with the adjustment brush, but I might also go into here and just draw straight up and I'm not going to darken anything I'm going to open up some shadows and maybe the highlights just a little bit. Here in this (mumbles) and I can go back and I might even go in here and add a kiss of saturation right there. And basically I'm massaging where your eye is going to go because I've darkened down the sky which is kind of where it went before. If I want to go in and adjust these guys right here the boulders on the side I can use auto mask and paint and if I click this show selected mask overlay it'll show you where I'm painting and it's kind of finding whatever I mouse over and painting that selection, it can either darken or open up those shadows whatever I want to do that's obviously darkening it quite a bit. And I'll have to unselect my mask here and this is quick and dirty understand and maybe open those up but looking at the TV they look pretty open already so I'm going to cancel that. One of the cool things you can do, let me just do a crazy adjustment so you can see this, is there's a little light switch down at the bottom of each of these and you can turn it on and off to see before and after for just that panel and then you're going to hit reset. So we're getting pretty close on this one to where it probably should be, this radial filter is another filter you just draw a circle and you can move the circle and everything outside the circle has the adjustment or you can invert it, you can adjust the feather here. So let me do that again just so you can see. So you can make it super crisp or you can make it really feathered, whatever you want. And you can sit here and manipulate this so if you really wanted to zone in on just the kayaker here, I can pull this back and I can really, that actually looks pretty good. It's a very simple adjustment. I'm going to undo that and you can also hit delete, this is kind of fun and you see the little puff of cloud the engineers had some fun there to delete that. We can also go in if you have (mumbles) spots which I may have on this one and we can increase the brush size. I'm using the (mumbles) tablet this is where the tablet really comes into its own when you're dusting or doing dodging and burning it can go over here and take this out and that may or may not look great and it doesn't look as great as I want it to be, so I'm going to undo that, I'll take that little rocker whatever that is out in Photoshop and I typically leave the spotting or stuff in Photoshop 'cause that's why I clean the sensor so I don't have to spot images, but I'll definitely go check in Photoshop to make sure there's not some giant dust spot or something on the sensor here. And it was shot at five so it's not like this super small aperture, but for me that's about as far as I would take it here in Lightroom. Hopefully you can see the subtle ease of that adjustment. I think on my monitor here the sky still looks a little brighter than I want it to, and maybe on the TV I would probably pull that back a little bit on the sky just to see those colors come in. I'm also looking in the histogram like there's a giant gap over here and I can take care of that in Photoshop. If I try and take care of that here, I'm going to mess up some of the other adjustments I've made. Like if I just try and take this white slider all the way over wow that's way too far, but it's kind of blowing out this part of the image a little more than I want it to. So I'm going into Photoshop and tweak these on a more local level than I can here. I can do it here but it's a little more painful than it is in Photoshop for me personally at least. Go for it Tony in terms of questions. Yeah it's been bugging me since you brought up this image and looking at the original, it looks like you're one or more stops underexposed there and in the beginning you talked about how that right hand side of the histogram contains most of the photographic information. So is that done on purpose or is that just happenstance. That relates, well it could've been a mistake on my part 'cause we were (mumbles) all over the place. The clouds were moving, I might've been protecting the highlights 'cause when you look in the before image there are some pretty strong highlights in that upper right part of the corner of the image. It also could come back something that we did not, the can of worms I did not open when we talked about histograms and that is since we have time. Sorry to fling this on you, that histogram that you think is the holy grail on the back of the camera is actually a jpeg histogram that's in eight bit, it's not a 14 bit raw histogram and so technically there's a stop or two on either side of that histogram on the back of your camera 'cause it's not accurate for what you're doing. So whenever I get a new camera, I go out and I take pictures I download them into Lightroom or Photoshop or whatever, I open them up and I put the card back in the camera and I compare the histograms on the back of the camera to the histograms here in Lightroom and they're not going to match. They'll have the same peaks and valleys and all that, but they may be farther to one side or the other. So you have to gauge your camera and if you have it far to the right, when you open it up here it may not be as close to the right as you thought it was. So technically if you want it to look really close to the right here, you might have to overexpose it and even have a line on your histogram on the back of the camera showing that you blew out stuff, but you've just got to do this analysis and know that I haven't really blown out stuff because I'm shooting raw and this histogram's lying to me. So this is another thing. Like the sensor cleaning, like come on people what is the deal, why can't we show a true raw histogram in 14 bit for the color space we're shooting in? Like come on. Maybe someday we'll get there that would be so great, I mean this is why pro photographers shoot tethered too. Because then you can see your true histogram. I don't know on the (mumbles) and medium format if it's a jpeg image, I kind of think it's different I think it's not a jpeg image 'cause I don't have that problem on that camera. It's the other beauty of mirror less cameras too is that you can see a live histogram in the view finder so you don't have to play this game of take a picture and look at your histogram on the back camera, take a picture look at your histogram on the back of the camera. You can just see your histogram and just adjust it until your histogram's where you want it and that's beautiful that's a major benefit of mirror less cameras. So here I might have been shooting, I think you came by at this point, since you're the kayaker and I had it maybe stopped in a little bit 'cause we're closer to where the sun was behind us somewhere and you came by and I didn't change the settings since I was in manual so I might have underexposed a little bit. Not the end of the world but there is a little extra noise because of that and how I'm working it up. Great question.
Class Materials
Bonus Materials with Purchase
Bonus Materials with RSVP
Ratings and Reviews
a Creativelive Student
Michael is a true professional and readily explains all of the nitty gritty issues of a photographer's digital workflow, including important things like Color Management, Lightroom workflows, Printing, and more. He is eager to answer your questions and has a thorough knowledge (after all, he worked with the original engineers at Adobe and wrote a book on it) and passion that he loves to share. He can get way deep into the subject, which I found fascinating. You can tell Michael has great experience in teaching and also likes to learn from his students. He is very authentic, honest, and direct. I highly recommend this class, and look forward to another one of Michael's courses in the future!
a Creativelive Student
This is an excellent course. It reinforced what I already knew and enhanced my spotty skills with new knowledge. I really like Michael's explanation of saving the document for print and web and the importance of doing these differently. Using the histogram to show this was terrific. Each session there is some valuable gem.
Elizabeth Harrigan
This class is fantastic and is just what I was looking for! The teacher knows the subject WELL and he makes it understandable and easy to follow along. In each segment, he gets right to the point explaining just enough content to make it understandable. He doesn't waste your time. I highly recommend this class. It's the best tech class I have watched on Creative Live.