Lesson Info
9. Capturing Atmosphere and Space
Lessons
Lesson Info
Capturing Atmosphere and Space
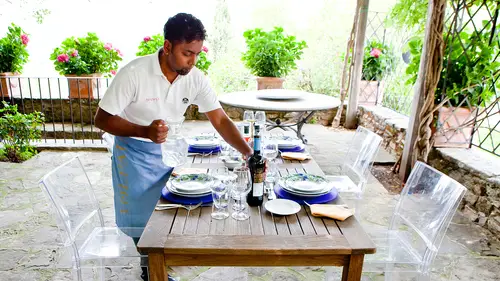
We just spoke with Ken and learned about the character of the restaurant, and now I wanna do a loop through this side and get a better sense of what other opportunities I might be overlooking. Ya have to really continue to work the whole scene, every little detail from the forks and knives, to the pots of coffee that are brewing, to the menu and the board. Cause ultimately, a photo essay and a design will rely heavily on having many, many different images. If you've ever opened a magazine before, you might have seen spreads where sometimes they put postage sized stamps all the way across the opening page. Well where do you get 65 photos from? You have to have a large quantity of images to really fill out a full editorial story. So, it's important to just keep working the scene. Make sure you capture all the details, and bring them together. So, walk with me as we go down this path, and take a look at what other opportunities there might be to take pictures of. So, in general, it's alwa...
ys great to think about the interior, thinking about foreground and ways to maybe have a little bit more of a shallow depth of field. Show the booth environment. And the only thing this is really missing but I like it, cause in a way I'm almost kind of scouting the location out. I like the way it looks, I like the light, I like the foreground here. And the table, but it needs people, and so, I'll kind of bank this in my memory and then keep working around, and look for other detail shots. Menu board, you know it's one of those things good to just grab, and I forgot one key thing. Which is, I didn't actually pay attention to my settings, and you always wanna make sure you pay attention to your settings, every time you reset. So, I'm at ISO 100, cause the last thing I did was with Ken, and I wanted to show the background and movement, and energy of the restaurant, but now I really need to make sure I freeze the frames. So, I'm gonna go up to ISO 800, bring my aperture down. Since, I'm shooting, essentially a flat subject matter, and I'm just capturing, almost like scanning it in, I'm gonna go all the way down to 4.0, I don't need a lot of depth of field, and now I'm gonna re-shoot that, much better, even just hearing it. I hear it's fast. Paying attention to the sound is really important, because you'll get used to that, and you'll know hey, without even looking, you're worried about your composition, and you're not looking at your shutter speed, but you'll hear it, and know that you've probably got an out of focus image. So, take a look in the corner, ya know, this could be interesting. It always helps to get extra details. Maybe grab something that's up on the wall. This particular area in general, I basically avoided, the entrance is darker. You have so much to work with in this restaurant in general, that you have all this light, and you have these colors and tables and people, and stories and food, and bar and bar stools, that you probably just don't need this. In general, start to think about how you can edit out, really, really, save time, and elements in general, that you don't really need. So, the entrance way, again, kinda dark. These tables over here, over my right hand shoulder are also a little bit more dark, and when you have options, like what they call a hot tub way over here in the corner, ya know, this nice big round booth that's well lit, you might as well, keep your focus on that, and then avoid this darker area over here. Well, you are gonna be focused on capturing as much as possible, you don't need to capture things that are very obviously easily eliminated, maybe based on lighting, or any other reason that you may see fit, so, usually, it's gonna be lighting, that's gonna be the greatest challenge. If you're hand holding, going on the fly, you're not gonna have a tripod, you're not necessarily gonna wanna work in low light. In a place like this, where you have so much light. It's easy to quickly rule out a darker booth, over a brighter booth, especially, since the idea is to keep this very light, very airy, I'm shooting this with the idea, that I have a magazine, or someone on assignment for me, that sent me out, and so I have maybe a look and style, that keeps it clean, modern, bright and easy, but the details are still something, you always wanna capture. The location is as much of a character as the people that you'll encounter, and so it's important to tell, all the different facets of the location's personality, and that's done through the details, and managing the light, paying attention to the kinds of things, that you're photographing. We've narrowed out the fact, that the entrance and the stable in the corner are a little too dark, and why shoot that, when the idea is to keep a general bright area feel to the shoot, and so, the corner booth is the best, and we've got Jamie joining us from Creative Live. She's sitting in, so, I can actually demonstrate, how I would do this in a normal circumstance, but she's gonna really take a long look at that menu, right, that'll give me plenty of time to figure out exactly how to do this, but essentially, we haven't shown the turquoise, or this side of the restaurant on a wide level, and I wanna make sure we capture it. It's obviously part of the character of the location. So, I'm gonna start by actually, going on the other side, I think to get a wider shot, and take a look at what this booth looks like from across the restaurant will be an important part of adding to this, so, I'll use, the wide shot will still be zoomed in, I'll be at 35 millimeters, and I will walk over here, and I've already kind of been testing this out, walking around, looking at different ideas, essentially scouting it out, as I do a walk around, so, I like the fact, that the grasses are in the foreground, I like this other little booth here. So, I'm gonna focus on my settings, make sure I always double check those, and I'm gonna shoot shallow, because I want this to be out of focus, at least for this shot, and I'm gonna shoot a variety of different things, but, I'll go with an F4, I'm still at ISO 800. I should be able to get no problem with a hand held shot, cause there's plenty of light over there, and I'm just gonna take a shot, take a look, and when I take a look, I notice I'm still getting a lot of the detail and cars in the parking lot, and I don't really wanna see that. I wanna keep it clean, and really narrow down the focus to be about the restaurant. So, I'm going to use the exposure compensation wheel on the back of the camera. I'm gonna recompose, and then using my thumb, after I push the button half way down, I'm gonna over expose by a full stop, and that'll make the shot a lot brighter, and I'm still getting the cars, but not that much, and that's something that I can fix in post later. We're trying to work the exposure and highlights, and the shadows a little bit more, but generally speaking, the inside looks a little more well lit, I could probably go even a little bit more, don't be afraid to try it, it's digital, if you're not sure, just get the whole range, and make the decision later. So, see, each time I push it, I'm adjusting the exposure compensation wheel. So, this is just way too bright, but I do love the look of it, in general, on the back of my screen. So, I feel like I've got pretty good raw material, but now, I'm starting to pick up salt and pepper shakers, and I'm looking at the bottom left hand corner of my frame. So, I'm gonna try and rule that out a little bit more, by just simply altering my composition, gonna keep over exposed about a full stop, and fire a couple frames, and now, I'm gonna make sure I don't forget to have a veritcal option. So, I'm gonna try and get that, and I'm using the light on the ceiling, and the pole in the corner of the restaurant to center, create the center point of my frame. So, I've got a lot of extra space, and actually, and this is why you do this, the vertical looks a lot better than the horizontal. I like that fact, that it's narrowing the focus, and keeping everything kind of going, all the energy is going this way. The table's triangular, it's going into the corner, the windows are going into the corner, and actually, the tiling of the roof is going into the corner. So, everything's moving this way, and so the vertical lends itself more naturally, the horizontal's bringing in elements from this booth, and this booth over here on this side, that's distracting, might work in a layout, might work when you lay text or design elements over it, which are a big part of the editorial process, but I personally I like this, and the goal is to have options, at this point, the whole goal is to have options. So, that worked pretty good. I'm gonna try, and get a little more depth of field this time. Since I identified the shot as something I really like, just to have it, and it looks good, I'm getting way too much depth from the outside window, but we'll keep it, and save the editing for later. Now, I'm gonna go back, and focus on just the booth. So, rather having foreground elements, I'm gonna go wider, instead of 35, which, actually, let's get a 16 here too. I probably should get a real wide shot, and see how that looks, and if the restaurant were a little, busier at the time, which we've limited a lot of people to come in here, so, we could do a lesson, but if it's busier, then we're able to get people, and all the different booths, and really show the action of the scene. So, it's good again to have options. I wanna make sure I'm over exposed, when I go wider, I'm picking up more of the darker areas I talked about earlier. So, I wanna make sure that I have the shadows opened up. Now, I'm ready to go back over there, and shoot at 16 millimeters. So, I can start here. Maybe, actually, I'll get real low, and shoot across at the table length. I'm gonna shoot at shallower depth of field, and reduce the exposure compensation from one to pretty much camera choice right in the middle, no exposure compensation, looks pretty good, I'm picking up the roof a building, I might try a little lower, and It's okay, I'm not in love with the composition. So, I'm just gonna move, gonna stand up, and get a composition, looks pretty good, but again, all the energy seems to be pointing this direction. So, I'm gonna go very wide, bring the viewer in with a very wide, sort of ranging goal, or wide ranging composition, and looks a little dark, and I'm getting a lot of detail out here. So, now I am gonna reuse the exposure compensation wheel, and it's because you have bright highlights, and a lot of dark shadows under tables, that it's contrasty, and so, you kind of have to fool around with that, cause the camera will proceed, when picking its metering of shutter speed aperture, based on the ISO machine, it's gonna pick different things, and you're gonna need to just simply pay attention to what it's picking, and of course, don't forget to use your histogram. If you're really never unsure you can take a look at that, on the back of your camera and see how balanced it really is, but that might even be very off, especially if the goal is to over expose your window, you're gonna have to try a little a bit, try and error, trail and error, and see what you actually get with that, I'm mostly gonna shoot a vertical, which is harder, cause she's on one side of the booth, but if she was centered, might be easier, but I'd have to be then designing the shot, but could work pretty well if I did that, with the menu, and have somebody in the middle, could be kind of a fun shot. So, maybe you could actually help me out, Jamie. Yeah. And move right to the dead center. Kay. Do the same thing, menu up, and we're just gonna have a little fun with it, especially, with all, the silverware here, just to show what the difference in position looks like, give us a little variety, that's cool, I like that, and seeing her face is gonna be helpful, because in general people are gonna automatically connect, and see how I'm moving in closer and closer. People connect with people, when they see them in the shot, they make eye contact, you don't wanna see the back of the head. A side is great, but you really wanna avoid seeing the backs of people's heads where possible, and so, I'm gonna get lower, kind of fun, with her peaking over the menu, and that's with a wide angle, and now I'm gonna zoom into 35, and see what I get, and generally speaking, it looks really good. So, I think I'm satisfied with this, and in general I feel like, I've captured all the different pieces, details and elements of the restaurant, the restaurant's a character, it's a fun character, it's a delicious character, but now I'm gonna sit down at the booth, and talk about where I can actually take these images, if I wanna bring em out to the marketplace, what kind of magazines, what kind of places, would be interested in a story like this, that's about it, here at the Salmon Bay Cafe. The amount of time this lesson lasted is probably about three times as long, as an actual shoot would take minus the actual talking and meeting people, generally speaking, when you're on a location, you wanna be fast, you wanna be respectable to the patrons, and to the business in general. So, a shoot usually for a location, on a travel assignment could take anywhere from about 20 to 30 minutes at the most. So, you need to be able to think quickly, get into the situation, figure out what you do want, what you don't want, and come away with a least enough images to have that assignment complete, what does a complete assignment look like? I usually tell people, you don't wanna submit less than 75 images to someone if you wanna have a full spread. You could definitely get away the less, and generally speaking, a magazine won't run more than six to eight, but it depends on where you ultimately see something like this going. It could go on to magazines. It could go to places like Sunset magazine, or via magazine, which are both places I work with regularly, and we do stories like this for, and they love the classic road trip travel story, but you never know. You may actually wanna just do something online for yourself. I could be something you slowly roll out over time on social media, and you could do very different ways of presenting the information, if you do it on your on versus if somebody else is editing your work, but typically, I would say about 75 images is a good target to have, for every location, that you're gonna go to. Now, if you're going to a place like a pier, or some place where it's very limited, maybe there's not a lot of businesses, or it's more scenic, and it's part of that travel aspect of the story, like a city skyline, then you would maybe have a lot less to actually show for it, but you're still looking for the bigger hero shot. Here, it's less of a hero shot, and it's more about how all of the different images come together, to tell the story and character of the location, the place, the people, the food and everything else, that is here on the location. So, ultimately, when I get back, I'm gonna edit this pretty wide, because 75 is a lot of images. Especially, on a 20 to 30 minute period. If you're even there a little longer, even let's say, you get a full hour, that's still a lot of images. So, the edit will be wide. If I have a lot of redundancy, I might have different versions of the French toast. I might have different versions of the portraits and people. I'm not gonna do a super tight edit, like a magazine would do. I wanna have enough options for somebody to choose what it is that they want to represent the story, ultimately in their publication, or wherever it may be. So, that's my plan for editing this particular project. Post production technique will be probably be pretty minimal, has great lighting. So, I'll just be looking at color, balance, color management, making sure it's bright and airy, when I look at my exposure, and other elements like that, but for the most part, a lot of the hard work is actually done here on location in camera. Overall, we've had a great shoot here at the Salmon Bay Cafe. We've had a lot different pieces come together, learned about the importance of talking to people, hearing their stories, how to get candid, authentic imagery of patrons in a location to understand how to build the character of a restaurant through details, analyzing the scene, and figuring our what details you want, what elements to leave out. We also had a chance to take to Ken La, and that's this is his place, and talking to Ken was great, because we learned even more about the location, and what areas to emphasize, that we may have otherwise never have known. We never would have known about the toast boys that come every morning to photograph and talk to without his insight. So, the importance of talking to people to figure out what the story is before you photograph it is important. So, photojournalists, a lot like a writer or a regular journalist out doing some sort of investigative reporting. You have that same role as a photographer. You have to investigate, and figure out what stories there may be, that you may not be aware of, that help you tell, all about the location and the place. We certainly went through all of our settings. I understand the use of ISO, especially when working indoors, and working handheld. It's a very different process to shoot a lot of images, and a very different process to be hand held the entire time, than it would be to be outside shooting a landscape, which might have a much slower process, and can physically be a lot more intensive. So, overall, I think we learned a lot about how to bring a story together. We told the story of this location, I think very well, and I hope you got a lot out of it as well.
Ratings and Reviews
Black Fender Productions
If you are interested in shooting a travel story for publication, this is a helpful class. Ian breaks down the elements of storytelling through photography. He shows you what to look for in building that story and how to shoot it. This is a journalistic documentary viewpoint, not a go on a family vacation and take great photos class. In addition to the story-telling education, I also found it helpful to learn about the technical details; how he uses ISO, shutter speed, Aperture priority (Av), how to shoot into windows, and the importance of shooting both in portrait and landscape. If I were to add to this class, I would include segments on how to pitch your travel photos to publications and perhaps an interview with an editor to find out what they like to see from photographers. I would love to see more locations as well. I've taken some of Ian's other classes, and I think he's a great instructor. This class was definitely helpful.
Chris Miedema
I guess travel photography means different things to different people. I understood exactly where Ian Shive was coming from in this presentation and I found the information was extremely useful. I guess if you are looking for a video on how to photograph the Eiffel Tower, when traveling with family, this is not for you. If you wish to take back a deeper memory of a place, or wish to submit an article for travel publications, this series of videos would be more to your liking. I enjoyed watching Mr. Shive go through the process of documenting the cafe, its owner and its patrons. His general advice and strategies were useful to hear and see in action. He did provide some technical information on settings, although I did note he was in a well lit establishment. It would have been interesting to see how he would handle a place with less than ideal light. Overall, that is a small criticism. I very much enjoyed the flow of the videos and recommend them to anyone who is interested in seriously documenting the interesting locations they come across in their travels.
Marwa Elchazly
as the title is "travel photography" what came to my mind is walking through the street of a city, but it wasn't ... Ian Shive took "Salmon Bay Cafe" as a case study for traveling photography, through which he gave good tips for traveling/ magazine essay / telling a story in general. I've learned a lot about the effect of ISO and "handholding" the camera, tips for how to get the authentic story of a place and tell it with photo... It's not all you need about traveling photography, but it gives a good start and lots of valuble tips