Nate Quilt: Simple Log Cabin
Lesson 4 from: 10 Ways to Love Improvisational QuiltingMalka Dubrawsky
Nate Quilt: Simple Log Cabin
Lesson 4 from: 10 Ways to Love Improvisational QuiltingMalka Dubrawsky
Lessons
Day 1
1Ways to Love Improvisational Quilting
21:40 2Building a Square with the Rotary Cutter
30:58 3Building a Square with Scissors
30:03 4Nate Quilt: Simple Log Cabin
36:43 5Building the Cabin: Adding More Rows
18:15 6Building Housetop Blocks - Part 1
31:14 7Building Housetop Blocks - Part 2
34:54Log Cabin Variations: Courthouse Steps
23:00 9Improvising with Triangles
33:40 10Using Triangles: Zig Zag
17:26 11Using Triangles: Star
26:43Day 2
12Improvising with Triangles: Flying Geese
33:18 13More Triangle Fun: Pyramids
26:09 14Creatively Combining Blocks
25:42 15Piecing Curves: Drunkard's Path
33:54 16Circle Variations: Half Moon Rising
23:58 17Improv Lines & Stripes Block
28:36 18Piecing the Stripe Blocks Together
17:46 19Improv String Diamond
32:33 20Finishing Your Quilt
22:03 21Basting & Binding Your Quilt
32:45 22Single & Double Fold Binding
26:51Lesson Info
Nate Quilt: Simple Log Cabin
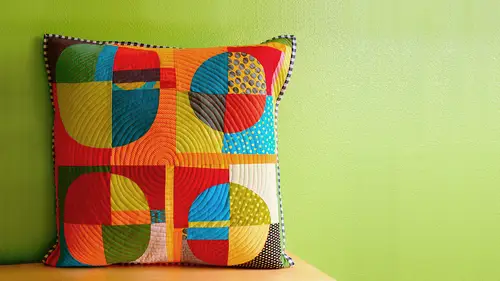
We are going to talk about this quote that's on the screen on dh it's called the nate quilt, and I have made many, many versions of it, including the one that's in my book fresh cool t and it is kind of a takeoff and, uh, of the basic log cabin but it is all improvisational e made and we're going to make ah block a block is nine of these patches on dh so here's a block here nine patches and over here it is. This particular quilt is made up of four nine patches on dh. When I spoke previously, I mentioned that you have to make some kind of parameters some kind of rules for yourself this so that you can put this together without having total chaos in this particular version. What I chose to do was tio go warm and cool so blocks were either warm or they were cool on dh, then also toe alternate warm and cool block so you had a warm cup block or my main focus was at the edge of the block ended in a warm strip sat alongside where the edge of the block and it in a cool strip there there are ot...
her design programs and you know what I name are just a few you can come up with all sorts of other ones I did another version of the one that we were working on previously where we just kind of divided up in the block in tow have where they were both warm colors, but they were pretty close and value to each other. So you could do that here, too. You could have blocks that, you know are primarily oranges next two blocks that are primarily reds. You could have blocks where you've got a lot of dark colors and a lot of light color so you could have one block that's. You know, dark colors browns and blacks and deep blues and one that's primarily made out of yellows and pale colors. You can even have this is from a tamale container. I'm going tell you s o my daughter by sees them packages of frozen tamales and they're made out of fabric fabric bags. Can you believe that? And it is a culture all I could think about was oh, wow, you know, forget the tamales, let's talk about the fact that they're in case in these great bags, and I told her from that point on that you must save all these bags for me on dh. So you could make them out of what I call ah, low volume. So what I did here was I started with the tamale container bag in the center and all these other prince and they are prince, they have a little bit of information on there, not very, uh they're not very loud, they're not very there's graphic, but they're very, uh kind of they're not super colorful, they're not even very colorful at all. And then on the other edge, I used neutrals I used a little bit of blue I could see putting a pale gray, but I used fabrics that really had no imagery on them whatsoever. So there's, those is just a couple or a few that I came up with, but I'm sure you all could come up with others. The other thing that I did was that I decided that I would instead of dividing the block and half half warm have cool, I would do concentric squares. Ok, so my log cabin would be in concentric squares instead of instead of being, um, divided up half and half, I'm going to show you all a slightly different version it's just a pillow cover, but it's the same principle it's entirely in solids and that's, this little pillow cover here so here too, and there's even less kind of concentric there's only one outer ring that's another decision to make how many outer rings do I want or how many rings from the center and so here tio all I decided was a was all going to be solid and that it was going to be primarily though you know you can see place so I broke that or I had to break it because I needed to make two blocks fit together where I you know, so I put those together on dh even when I wanted to and we'll talk about adding fabrica and deleting fabric to make things fit. When I came to the end of making this quilt or pillow top, I felt like I wanted to be just a wee bit bigger so I just added a strip I mean it's that's how you're making decisions all the time you are the designer all the time so that's the beauty of working this way least that's what I think so I thought we would make this kind of log cabin takeoff and I've kind of started by making a few a few blocks so here I've got a block that it's going to be one of my cool colored blocks and what I've what I've done is, you know, just free cut ah blue and then these kind of pale short truces and I did use a print you know, as I told you all you want to focus on solids, but it doesn't have to be primarily solids. Well, actually, does have to be primarily solid. It doesn't have to be exclusively solids, and then I even broke a little bit of that rule about kind of, you know, sticking with the same color as I work out in concentric squares by adding the blue, so, you know, rules are made to be broken, but you want tio, you want to keep them in mind, at least you don't want to just kind of come in without any kind of plan. Um, I could certainly I consider this another cool color block, not because it doesn't have any warm colors in it, because it does, but because it ends with a cool color blocks. If I was going to put it next to something else, I would put it next to a warm colored block, even though yes, it does have some warm colors, but the parts that are going to be touching each other, the block edges that are going to be interacting are there. They're on opposite sides of the color wheel. So that's, what I'm hoping we can do is make I want us to make a single block and then make a second block and then put those two blocks together and I'm going to go ahead and talk about putting those two blocks together right now before I set it all off tio making your own so I'm going when I work I would love to say that in my own home studio things are always organized in the basket like this but that would be alive the way things are always organizes there's a pile and then there's another pile and sometimes you know I have no space to cut so I make it into a bigger pile and but that's the way I work I know some people are way more organized and in other parts of my life I hope I'm or organized but I need lots I need lots of strips I can't work from just a couple things so I will go ahead and cut myself lots of options so that as I'm working I can just pick out stuff um and what I'm looking for right now is I'm looking to finish this one so I want some some warm colored strips but I don't know exactly what didn't cut all the way through um so let's see let's see what else I've got in my little my little treasure trove here that's the great orange or is this one of my favorite colors I would never in a million years where and actually being from austin, texas I really would not wear it okay burnt orange is just about the ugliest color in the world and I can say that because I am a longhorn but yeah, but I think it's a great color for a quilt and it's a great accent color it really plays off other colors really beautifully you don't have any of this, so I'm going to go ahead and pick a few and then add my next concentric ring, which I think I'm going to do in this in this kind of zigzag e fabric and to me it reads as primarily a warm color I mean it's got a lot of yellow in yeah it's got some great but but it reads us warm so I'm going to ring this block in that color and I'm gonna intentionally make it too big so you all can see what happens when it gets super big so I'm gonna go ahead and cut my strips and this fun and this should be enough and even if it wasn't, it probably just go ahead and and sew them on and you look and go ahead and get started on on your blocks. As I said, I mean, the fabric that I that's provided really leads you in the direction of making the same versions, but as we saw previously with jenny and holly, if you don't that it isn't that often times makes wonderful surprises, so it's it's recommended but not required all right, I don't even remember the order sometimes when I don't remember the order all just kind of put it next to the block and uh just because I don't want to accidentally end up with a strip that's too too short I mean, if I do there certainly ways to deal with that but I went to the trouble of cutting them I want to make quick work of making out a ring now marco, we have actually a question from ash from meghan help megan is megan's being an instructor here on creative life herself so welcome megan great to have you watching today and making saying what tension settings are you using on your machine for this stitching on how far apart are the stitches? S o I always do what they call at least I've always heard it's standard standard tension which is two and a half into two and half stitches per inch if I'm not mistaken so somewhere between two and three on dh then I'm assuming that this is it's standard tension here too on the machine I have at home you know their standard tension is denoted by, you know, like a a little bar that says all of this is standard tension that doesn't mean it always work, but here it's set to four you know so for is standard tension on my machine to its it's ah it's not especially loser tight, you don't need, you don't need to set the stitches particularly close together far apart, it's just straight seeming like you would any quilt. That is a great question I personally do not backstage because I feel like I'm going to go over the speech is multiple times, but if that's your ah a lot of people learned how to sew and that's the way it like, you know, one of the rules that they learn and I don't think there's anything wrong with that? So it's your way to baxter that's fine too for me back sitting in my back if I need to rip a seam and they're inevitably wealthy seems and I need a woman now it's a little harder both of the beginning of the end, but it's sort like something else that there's, like different schools of thought of is whether or not back stitching is really a necessity here's something else that I probably break the rules? Well, I know I break the rules on, but I don't really mind because I know it's going to be quoted in the end, but if you notice on this piece I actually used part of the salvage edge, you know, which I know is just in the industry would say it's a shonda it's, you know, it just crazy crazy but I think this is going to be quilted and I quote my face is pretty intensely so the odds that you'll see that they're in the selva angels here in my opinion are pretty slim but if it is your your tradition tio cut the salvage is often by all means you know do what's good for you so here too so I got my two blocks I'm actually not going tio like I'm not going to make it so that these two points made I want tio center um I want to center I want this block to feel centered with this block um and so I'm going tio add my fabric so that their their sized essentially the same yeah just like that I mean if I wanted to kind of continue this idea of the concentric colors going out from the center then yeah I could um I could add you know, some some of this kind of short truce color over here um I could also force myself to add a little bit more over here I mean it could go on and on but my goal here is to is to uh size this piece to this piece and then make a third one so I'm going to do that mark good question here from glad he's saying how about how long does it take to complete a quilt in this improvisational style um that's a really good question uh I don't I don't think that it takes well, ok, in some ways, it could take a little bit longer than so if you were making a traditional quilt, you would potentially cut all the fabric ahead of time. Let's say measured quote, it doesn't have to be a traditional, but you would cut all the fabric ahead of time and then you could even just basically kind of chain piece all your all your patches together. Um and you're not going to do that here, you're going to have to kind of cut and peace, is he? So, um so it could take a little bit longer to do it this way. Um, I can certainly see that, um, but it shouldn't take a substantial amount of time longer. I mean, you still gotta cut fabric. So anyway, you're going to spend some time cutting and sometimes sewing. So mallika, I actually laid out two blocks at once, and then I started chain pc from one after the other. There you go. So, alison, tell folks what what chain piecing is because folks that are building might not know what chain piecing it so change policing is you put two patches together yourself and then you don't break your thread, you put two more patches. Down and you sew them and you just keep going and then you don't have all those little bits of threat at the end that get caught sometimes and actually in another segment we're totally going to use that technique to make a series of strip so yeah so I'm gonna add on this last piece of short truth I lost my thread I'm going to add it on to is I reclaim my friend all right? I've been very heartened to see how much how well I've only had to do it twice with the fact that I could, uh, thread the needle without getting my glasses but someone told me that they made me look smarter so maybe I should wear them more often all right, so I think I'm ready to sew up this last side and put the two together than make a third strip and make an entire row so our goal is to basically make nine of these, but we're going to make them a pair and put those that pair together and then make a thirds to make a trio make a row make a second row using that same kind of process we did in the first place on then uh put the two rows together okay still hanging on to somebody ok something's gonna trim this real quick and press it to one side and yes, this block is now bigger than in the first flush but that's okay because I'm going to make them um I'm gonna make him fit each other but before I do that I'm going to show you all what happens if so what happens if my my edge here instead of being all nice and relatively straight like this comes out more like this what do I do I mean I guess I could straighten it you know but what if I really like that edge well that's no problem I don't have to lose that edge on dh this this applies when when we talk about piecing curves I'm gonna make it just a little list when we talk about peace and curves that supplies there to what I'm going to do is use this top edge is my template and look at that in that beautiful they're going if I do that I'm going to have these two points meet I love stuff like the um what I'm gonna do is have used my top edge is my template of sorts for my body image so I'm going to trim those even meaning they're going to be the same uh size top to bottom ok and then I don't want to I want to lose his little fabricas possible so I'm going to kind of back and forth until oh I see that there's a raw edge okay so I'm very carefully going to trim the bottom edge to match the top edge and then I'm going to take it to my machine and this is this is where I need to kind of employ a little bit of ease and eases where you just kind of gently move the fabric around I mean, even though this is cotton fabric and like jenny pointed out we're working on the strait of grain um where we still it's still got some some give it still could be moved its not steal otherwise we'd really be up a creek um so I'm going tio basically so this this particular seem I'm going to so pretty darn slow because I want to keep track of what my fabrics doing, so I'm going to sew a couple stitches and luckily for me, this needle dropped in the in the fabric I whenever I kind of reposition the fabric, I want the needle to be in the fabric because it holds it and I really want that seem to match up, so I'm going toe move that over I'm going to show you on this very same technique but using pins instead because I just realized that maybe some people want to use pins and I totally understand why I'm gonna match that edges thie ends and see how I kind of I'm moving the fabric so that it will it will meet up I'm teasing it that's really what it's called it's called easing it into place this machine is great because every time I every time the needle stops, it stops in the fabric, which is just ideal in my own machine at home even though I do love it, sometimes I have to stop to sink the needle all right? And now we have I've maintained that curve I haven't lost that kind of nice organic edge and that only helps to add to the kind of wonky feeling of of the blocks, so I'm going to make another block this time obviously it's going to end in cool colors because it's supposed to go over here or I guess I could put it over here and it would be, uh, warm colors let's see what I want to do because I already have a couple of a couple of rows made, so I want to do um yeah, I want to do another cool color block that worked fine for me um and I'll do that again, but this time we'll pin will pin that kind of curved edge so that you can see um, how you would use pins in that situation. But that's essentially how we're going toe we're going to deal with kirby edges not only block to block road a row, we could do it section to section, so um all right, you know what? I'm going to build on this one so here though, you know so for a second I thought I'll go ahead and use this this is some k facet stripes which I love his his fabric and I love it strikes they're made from a much more woven kind of fabric so there are a lot more stretchy in this situation where I know I'm going to create a curve scene I don't think I want to use it I want the solidity of a cotton that scott is not quite a cem ahs uh stretching now the questions from meghan and she's joining us online marco, do you recommend any particular type of threat when you're saying for quilting? Yeah so I really like guterman and there are other great threads I just I find that it doesn't catch I really, really like it is a thread I can't say that I've done a lot of, you know cross across the field research, but that's the thread that I use and I really like ladies is there any particular threat to you're familiar with you like I think just depends on the nature of the material as well? So you go for something fine a cotton obviously it's a good point? Yeah, but do you use cotton thread to when you so depending on the nature of the business? Ok, if you were so in just these with your concert because the guterman that I broad and then were you all using is just their standards going for is just polyester coded but I like because it's really strong you know? But if I was doing like, say, hand quilting, then I definitely use hand quilting thread and to tell you the truth, I'll not only use this maybe not in this color but ali's guterman is my selling throat I'll use it it's my machine quilting for thiscause they're good, but my point is that I don't necessarily use cotton thread and I do different kinds of sewing different kinds of those if I was sewing silk, I would definitely use a thread that was appropriate to it, but I think I would use this all purpose kind of thread for so in cotton for sewing linen for sewing ray on even, you know it's to me it's more important, like if you if you're making a a garment out of mit, then you want to use a jersey ballpoint needles, you know? So to me I feel like I get more get more specific about the needle I'm going to use for a particular kind of fabric than necessarily the threat I'm going to use it also depends on your machine as well what type of mission you have? Oh yeah that I think most standard machines khun so all these different kinds of of ah of of fabrics you know you probably were sewing leather so I have some leather on my standard machine you know and nothing exploded but um but yeah it does it does matter you want you want you know anyone you need a machine though that does a lot stuff it can just do the basic things and uh I do not own a computerized machine I do not for see myself owning a computerized machine in the future I don't really need all the all the bells and whistles but some people use all those bells and whistles so you know it's good for them all right so just to change things up I'm gonna have this blue alright I'm said I and just to get rid of the salvage to just quell that that the particular poor um all right and then I'll add that to so the cool colored block to my center warm and the other cool and I'll curve that edge as well but this time pin it so that folks can see what that looks like no harry all coming along good I'm alan you're quite so yourself in your company is frustrating for you watching rather than about you being in that what sort of projects do you like to work on like god home sewing but I also like garments owing to it all depends on the time of year you could maybe around the huddle holidays is more gift giving for my bacon good so that's what I do around the holidays ceo dressmakers yes when I first started sewing and made all my clothes through high school yes testing stuff all right so I've got two sides on I'm on my way three all right I really like this blue there's some incredible collections of solids out these days I think that for the longest time there really wasn't that much election but there are a lot of wonderful designers who are making conclusively solid collections um elissa high carlton smith on dh motta has a wonderful kind of their own brand based solids bella solids they're just beautiful I mean I get that I get to color cards you know and it's it's like you know it's like this big you open it up and it's like if he's seen those color cards and it's in every color it's even beyond what imaginable it's it's it's unbelievable you know and it's just a tiny subtle variations between the two colors it's great stuff all right let's press all these seems open all right trim this down and actually already have a conveniently it's I've already got an edge here that's ah curvy so I don't even have to make one so here we go all right so now actually I have a decision to make because this's they don't match up they don't they're not the right lane that that's not true it's not that they're not the rightfully they're not the same link so I think this is a great opportunity for me to add a little bit of blue where it didn't exist before so I'm going to add the blue and then I will put the two together because I don't know that I would want to lose I would lose all this down here if I trimmed him to fit rather than adding to it all right? This is a lot of these came from and I don't know who the designer is I think it's a little high carrollton they're called modern solids too I love them because they have a kind of a woven look too, but they're not so they pete's up really beautifully but the color of her just there's just so wonderful, very contemporary feeling, which I guess is appropriate because they're called modern solids too. All right, so what about this kirby edge wantto loses little is possible so gonna mark that so I know hey that's that's a piece I have toe trim off um of my cool colored piece of the end on very carefully turn this edge a multi also being quite careful here but it's still free hand and it's still using your eye in your judgment what have you do make a mistake is there any going back at that stage why would you want to go back if you make a mistake? You know it's called a happy accident yeah that's what I'm really what I'm asking is that nothing is nothing is irretrievable well, you can always add more fabric you can always you know, nothing is irretrievable that way it's just going to be it's going to be a little bit better than it was otherwise had you not I mean it's sort of like, you know, the universe stepped in and made it just a wee bit better so you know, embrace your good fortune so the first thing I'm gonna do is pin the outer edges ok? And then I'm going to take it at the outer points and I'm going to hold them together so I can find the midpoint of the two pieces of fabric the two edges I'm going to hold that with my finger and pin it and then I'm going to kind of ease along and this is really where you can see easing like I'm going to find the midpoint between that the midpoint in the edge here and pin it together and then probably do it I'm not probably do it on the other side as well and I do have this wonderful kind of um intersection which again is another wonderful happy accidents I want to take advantage of that intersection and then at that point maybe a couple more and it's going to make the peace and go much faster because I don't have to say slow I don't have to stop and ease it into place it's already there I did that with the pinning so either way I mean there's this extra step but if it makes you feel more comfortable and I think it's a it's a perfectly fine extra step to go to um when I make my little spiel about how I try not to so over pins um I try not to so over pins that doesn't mean I've never so known for a pin you know there's some people say there's no harm in sewing over opens but I've heard some really loud noises tells me otherwise but um if it's if you feel comfortable doing that is it possible you might break your needle? Yeah it's probably my break your needle then your needle come flying out you know on then you'll wish you'd warn those safety goggles so I just try to stop before I get to a pin and take it out. How is it just a basic needle you're using or yeah especially quilting needle no it's a special machine uh no it's a standard machine sewing needle same as I was used if I was sewing in garment there are on some machines and I don't know if the singer has it it's entirely possible it does there are what they call a patchwork feats of the bottom piece of of the machine is a but it comes off and on you could on this machine if I wanted to make a buttonhole, I need a different foot and it just slips often on and so it's possible that this machine comes with patrick foot again a cz well, it is just going to have a very clear indicator of where the corner and seem allowance it is that's really kind of the function of a patchwork foot. I don't have a patchwork foot from my machine, even though my machine does come with a pat with a patrick foot because once you've sewn, it doesn't take very long before you can identify the quarter inch on your machine, so I just kind of found it to be a super poulos um, attachment, as evidenced by the fact that I do have a couple of needles left I obviously sewed over kids, but I made a little boo boo I some of this fabric got caught here, which is a fine opportunity for me, teo demo um, ripping a theme which I don't seem to have a seam ripper right here in my little, uh, tool oh, here it is, it was just hiding, so yeah, here, let me show you some of this fabric god kat so what I'm going to do is rip the same and I even have a a cute little technique full for ripping the same rather than go through and rip every single stitch I try to cut through every third or four stitch on one side and this is another reason also to maintain a standard stitching a lane stitch length because otherwise you're gonna have stitches that are so close together it's going to be impossible to teo rip them apart on so I'll just do that on one side I won't take them all out I don't need to I'll take every third or fourth out and then I'll flip it over the other side and just pull on the stitches to hopefully release them then I'll be ableto kind of reposition that fabric so it doesn't get caught like that yeah I just got there we go that's what I think is I'm going to open it up so I can see where he got caught all right might even press it a little late night he says the one that I did without the pins I actually had better luck at than the one I did with the pins it's okay it's very easy to fix wait right there we go all's well that ends well um and there you have it so now we got a whole row of this patchwork all done
Class Materials
bonus material with purchase
Ratings and Reviews
Me F
Another great class. I love the approach that encourages spontaneity and decision-making throughout the process! I was not at all put off by Malka's speaking style -- I found her informative, articulate, thoughtful and funny. I would, however, have appreciated much less time watching her sew, although I realize she likely did that in this class to allow her in-person students to have time as well. A bit tedious, however, when it's not live or you're not sewing along. I loved the idea from another reviewer to have samples of Malka's quilts hanging in the studio throughout all the sessions so we could refer to a finished piece that demonstrated the skill she was teaching. I would recommend this course to anyone who loves quilting or wants to learn.
user-5fbbc1
It was interesting to see how Malka goes about improv piecing and making her design choices. She makes visually interesting quilts with wonderful use of color. On the down side: 1.Technical issues need to be worked out. Chat did not work for me. I use Apple products. 2.Malka needs to find alternatives to "um" and "kind of". The course was too long. We do not need to watch Malka sewing so much...some is ok. More samples partially done would cut way down on sewing time. I would prefer to see examples of Malka's work hanging on the walls behind her, so we could see where she was going with her demos and give us some fabulous quilts to admire. I believe the sewers on the set would also have benefited from seeing samples hanging on the walls.
Sarah H
I have only watched one session, as I live in the UK and I did not watch it live. I have a busy schedule at present so will take awhile to work though them, initial thoughts were very good, I do like Malka's engery and free use of pallet. I look forward to watching them over the coming weeks and get back to you. I do like the concept of these classes and find them very useful. Thanks