Lesson Info
22. Desaturate Image in a Picture
Lessons
Class Introduction
01:56 2Understanding the Basics of Color
04:10 3Color Contrast and Hierarchy
15:18 4Saturation or Vibrancy of Color
09:27 5Ground or Surface Color
07:32 6What is Color Harmony?
11:00 7Color Palette
11:11 8Set-up Chalk & Charcoal Demo
03:40Demo: Sketch Simple Still Life
05:48 10Demo: Establish Value Structure
09:06 11Demo: Find Temperature Balance
09:47 12Demo: Shadow & Highlight Placement
17:10 13Demo: Establish Dimensional Form of Object
04:49 14Set-up Watercolor Demo
11:50 15Demo: Establish Color Ground
05:26 16Demo: Establish Colors for Object
05:30 17Demo: Sketch Object onto Watercolor
03:20 18Demo: Color Subtraction & Value Range
04:42 19Demo: Color Blocking for Composition
04:25 20Demo: Establish the Shadow Tone
05:11 21Demo: Utilization of Opaque Color
11:51 22Desaturate Image in a Picture
05:37Lesson Info
Desaturate Image in a Picture
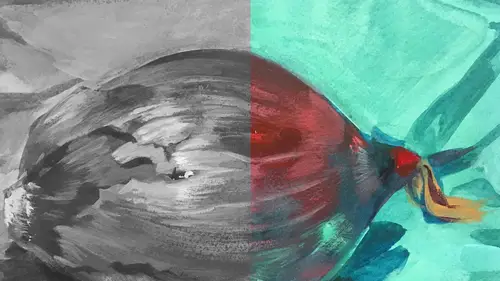
You can see the relationship. I could keep going on this, but I want to actually show. Just because I want to relate it to the digital stuff. I want people to see two things. I wanna see if we capture the value structure ... Nevermind that. With this, and compare it to the other. Then I wanna also show the same method done in Adobe Sketch. I'm just gonna grab my iPad. Back up a little bit. Now I'm going to take that, and I'm gonna de saturate it. Where's my edit? I would also crop it. Let's crop it. Just because I don't wanna see all that white there. Bring it in a little bit here. Then that'll be done. Edit it again. We'll edit the value. And we'll make it black and white. You asked before which where do I go. I'm gonna probably land ... That's pretty good. I didn't finish this over here, but it's okay. So we can see what I did, which was to exaggerate the opacity. Is I actually made the value of that cloth too close to the pepper. If I were doing this I would make sure that there was...
contrast there, but I did that for the sake of seeing the vibrancy of the purple. Its much more kicked up that we see over there. The other thing that I wanna show you here is in my photos, my Adobe Sketch. There it is. So here's some examples of the same method used with really simple tools. I laid down a green ground with the watercolor tool. I made is super vibrant. I then did the whole complimentary relationship test. The same way we just did, and it worked out the same way. I also played with texture of the mark making. Which is super fun. I did one on purple, because purple is fabulous. I used the dry tools. I used more of the ... I think you'd call it pastel or something like that. You can see the color reaction, light and shadow. I used a very limited pallet. I did exactly what we just did. Exact same methodology. The highest level of attention is really on the temperature of that really warm space in the top ... It's an apple pepper. I was making it up on the plane. It was sorta landing between pepper and apple. Then I used some of the blue that I used in the shadow in the background, and some of that green that's in the stem is also in the background. But it's more neutralized so it sits back in space. The highest level of warmth, contrast of value, and light, and temperature is all landing in the stem, and the upper part of that heart shaped apple pepper. Now let's just see one more. This is one that I did all with dry tools, and I did a really neutral ground. So you can see, it's kinda almost the color of the paper that's behind the pepper in our setup. It's a reddish brown tone. One thing I wanna mention here, which I think is kinda interesting, is I made sure I chose a ground that was warm enough to react to that apple. I left that shadow shape. You can see the shadow of the apple is not only the color of the paper itself. It has a little bit of green in there. A to darken it, and B to relate it to the color of the apple. Shadows always reflect the objects that are casting them. People often make shadows black or brown or blue. No, pay attention to the color of the object. That color's always in the shadow in a neutralized form. Again, you can choose the paper texture in this program. This is like a textured paper, much like the canvas on paper. Which is kinda fun. Those are just fun little exercises. I don't work digitally, but you can translate what we talked about to digital really easily. Thank you so much MJ. What an amazing condensed class. Where we're both learning about the theories themselves. All the elements that make up color foundations, and then seeing you put into practice to truly understand how it all comes together. Thank you. Any final words of wisdom to folks out there who are feeling a little bit intimidated by color, but just starting to trying to understand more? My advise would be to play with color. Think of it like a game that you're just exploring. It doesn't matter if you've never picked up a paintbrush. You've never used pastels. It really doesn't matter. This is an opportunity to experiment with these things, and see what works and what doesn't. The best thing you could do is make some mistakes and be like, "Oh man, that's not working." But then ask why. So, play and then ask yourself questions. Why is this working or not working? What do I know now that could be leading to the reasons why it worked or didn't work? It's being inquisitive and playful. Two best things I think to be.
Class Materials
Bonus Materials with Purchase
Ratings and Reviews
Anna Kotzè
I really liked the informal demonstrations and I also liked the way she set out her pallet with warm and cold colors. This was not only an informative class but inspiring. The casual and relaxed working style, encourage playfulness. Thank you for an awesome class.
Laura
I’ve had foundations in many of the color instruction that was presented here so the information was a very good revisit. I also think it was explained better in this presentation than in the other training I’ve had. I enjoyed listening to the lecture, thankfully they weren’t drawn out until you want to stop listening. The demonstration was best after we moved off the charcoal drawing (although that was interesting to watch) because using the paints really brought home to me the application some of the lessons learned. I wish that part would have been more robust so that all of the elements in the lecture could have been directly called out in the demonstration. The instructor was most effective when not trying to multitask too much. Overall, I recommend this course.
Robin B.
I had previously learned basic color theory, but this instructor took my knowledge beyond with layered instruction about value-contrast-complements-hierarchy, etc., and she does it in such a fun way with her own examples of work and great stories! I like her poise and confidence and think this series is a terrific value.
Student Work
Related Classes
Illustration