Lessons
Lesson Info
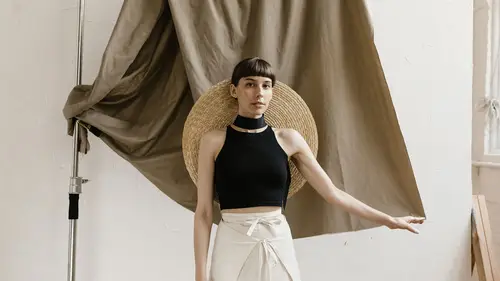
Seamless Paper
Seamless paper. The photographer's best friend. Quick show in the audience, how many of you have actually shot with seamless paper in the background? Oh, my goodness. Literally almost every hand goes up in the room, a few of you haven't. Seamless paper is fantastic because it's so useful and you can use it to create a perfectly clean, smooth background surface. Hey, you know what, while I'm doing this, I'm gonna have one of you untangle my tether while I'm talking through this. I've lost some working distance. Seamless paper is generally studio-based. In other words, you'll see here in just a second. It's usually on a stand or it's on some back drop stand without wheels. It's hard to move that around, so you gotta be thinking studio-based here. The stand that I'm using today has a gear drive system where you can pull down the seamless paper. Most photographers, most people in the room, me included, I don't have these gear systems in my own studio where I live. There's a lot of technolo...
gy, some of these they're actually motorized. You can spend money to get these things motorized and push a button and the white comes down, the black comes down, the red comes down. Today, though, I'm gonna be doing it manually. Clean backgrounds, what I mean by that, the backgrounds are perfectly smooth. They don't take a lot of effort to get that nice, smooth look. Whereas a muslin, that first thing we showed today, we spent an hour steaming it before you all arrived today, before we started the class. The cool thing about seamless paper is you just unroll it, you shoot with it, we're gonna step on it, it's going to get beat-up, you literally just chop it off with scissors, recycle, you don't throw it away, you recycle the paper, and then the next time, you just pull down more seamless. It's a disposable product. It's meant to be disposable. It's easy to light. There aren't a whole lot of things you have to worry about. With muslins, a lot of times, you have to think about cross lighting because the muslins can be wrinkly and you don't want that to show up on camera. These, it's simple. You just shine a light on the background and you're good to go. If you wanna go simple, I recommend that you go with a white seamless. In fact, if you wanna buy two types of seamless, I recommend just straight white and straight black. The reason why is 'cause with white, you can modify that background with color gels. You can do blue, red, yellow, green, what ever you want and now your white seamless becomes a different-colored backdrop. Super cool! If you shooting with a black backdrop, we can make that gray just by the amount of light that you put on there. You can make it black seamless gray, you can make a white seamless gray, a white seamless white and a black black. Anyways, you get a lot of mileage outta that. Enough of me yapping. Let's go ahead and take some pictures with the seamless. In fact, before we do, let me just talk through the system here. (metal clinking) Can you guys see me all right? 'Kay, cool. What we have here is we've got a wheeled stand, so these are on wheels, so if you've got a studio at home and you're a one-person show, if you're a one-woman photographer, you don't have help on the set, wheels make a huge difference 'cause you can literally just wheel this around to wherever you're shooting. These are traditional C-stand type scenario. We got a cross bar across the top. This is holding three different seamless rolls, so today I'm gonna shoot with the black. This works just like this. Basically. (Mike groans) Rotate it. It's pretty tight right now. It is pretty tight. Trust me, you can rotate it. (Mike laughs) Then they come down, they come up, you can rolls 'em out on the floor, what ever you wanna do. A three seamless paper stand is very helpful if you're a commercial studio. They make 'em even more if you want to. For me, Mike Hagen, I actually just will do 'em one at a time 'cause I haven't spent the money on a three seamless set up. Today, we got creative lives, which makes me happy. I'm gonna have you, for this first one, I'ma have you stay right here. Okay. Cool. My goal here is to make the background look black. Think through your mind, how would I get the background to look fully black? I have to move the subject away from the background and I need to turn the background lights off. That's where we'll start for this one. I'm gonna pull this off to the side, bring this one in here. Yeah. You're positioned well. You know what, because you're fairly tall, I am going to bring an Apple Box and have you sit. Go ahead and grab a seat. Point your feet off that way. Great. If you want to cross you legs, if that's more comfortable, you can do that. Sweet. Now, she's sitting down, so I go ahead and drop these. (metal clinking) Mm-kay. To make this even more dramatic, I think I'll just do one light. I'll just start with one light. Let me turn this one off. We just got one key light there. Nice. Go ahead and bring your hands up to you thigh, one hand on top of the other. Pull it back a little farther. Perfect! Thank you for untangling that for me. All right, tether good to go? (mumbling) 'Kay. Here we go. One, two, three. (camera clicks) Let's see if that background went black and if our exposure overall looks good. Very moody look, aye? It's a little dark maybe. How does it look on the laptop? Bright enough or should I brighten up a little bit? (mumbling) 'Kay. Let's go ahead and bring this up. We're currently at 16th. Let's bring it up a full stop. Now you can see how dramatic this looks. If you want that background to be fully black, there's a few things that we can do: one is we can move her farther away from the backdrop, another is we can shoot at a higher aperture, which causes the light to follow even quicker. I'm shooting at f10 now. I'm happy with this look though. I kinda like a little bit of gray in that background. All right, one, two, three. (camera clicks) Since this is a serious shot, let's work on serious. That shot was pretty serious, but I'm gonna have you maybe look off towards the audience a little bit, nose down. Yeah. Let's keep your nose where it's at, but move your eyes to look more over towards the, yeah, right there. Perfect! What I'm doing is I'm getting the whites of her eyes lined up, so they're symmetrical to the camera. (camera clicks) I'm gonna come in a little closer. Nice, tight head shot. Horizontal. (camera clicks) Hmm. Cool. Black backdrops, love 'em. What I wanna do is I wanna show you how to make that black backdrop gray. Let's just bring in one light. Left or right? That one you're at, it's perfect. What power is that at? Eighth. Eighth power? Okay. The front light's at eighth power, the back light's at eighth power. Let's just see what happens. My goal is to make that black backdrop gray, again, to show you the flexibility with the seamless paper. Okay, same look. One, two, three. (camera clicks) (camera beeps) Okay. Let's physically move it back and then rotate it. Yeah, perfect. That's great. All right. Let's look right at the camera for this one. Go ahead and turn your nose to the camera. More, nose towards me. Perfect. Here we go. (camera clicks) I think we got your eyes open. Did it feel like you blinked? All right. I moved the light a little bit too far back. Let's move it forward again and then, Jamie, could we bring in that light as well? Go ahead and turn that one on and we'll set that one, too. Let's set it to 16th power. 'Kay. You can see we're getting a little bit of a wash, a little bit of a brightness differential from the left to the right, which is good. If you want it to be equal, then you gotta put the same light on the left as you do on the right. All right, this one's on 16. Okay. Here we go. Nose towards me a little bit. Great. (camera clicks) Nice. (camera beeps) Super. A little bit hot on the edges, so with a little bit of finesse and finagling with the lights, I can get that to look fairly even. It really depends on the angle of the lights to the backdrop and how far in front of the backdrop those lights are. Black backdrop, can make it fully black, you can make it gray. Let's now go to the red backdrop. Pretty much the same thing overall. I just wanna show you a different color to get a feel for what that looks like. This is red. Everything else is basically the same. No difference on the brightness of lights, power. Although for you, just to mix things up, let's go ahead and have you rotate your body towards this light. Super. Like it. Since I'm not doing black, I don't want this one to be as deep and dark and moody. I might end up adding in my second light for some feel. We'll see what this one looks like though. Go ahead and put your hands on your thigh, bring 'em back. Yeah, right on. (Mike clearing his throat) Super. One, two, three. (camera clicks) Let's see what that looks like. (camera beeps) Ah, (Mike chuckles) what a difference. That's pretty cool. I think that the background looks a little bit too bright, a little bit too hot overall. You can solve this a few way. Let's show everyone how to solve it, not with power adjustments, just with distance adjustments, so go ahead and pull it back about three feet. Yeah. Watch the spillover from the umbrella, so that it doesn't shine onto her. Yeah. Super. I'm not gonna change the power of the flashes. Rather, I'm just gonna change the distance of the flashes and that'll make that red just a little bit darker overall. 'Kay, here we go. (camera clicks) Because I like to try vertical, we'll do this. One, two, three. (camera clicks) (camera beeps) Mm-kay. You can see I've got a little bit of the right side of the seamless is reflecting a bit of light, so I'd have to work on that a bit, and that's generally light position for the background, probably moving that background this way. Yeah, that's gonna be better. Let's go ahead and drop the power on that one down. Is it at 16th now? No. Eighth. Eighth. Let's go to 16th, maybe even a 16th minus a third. Minus a third. Yeah. Ready? Yup. Super One sec. Okay, go ahead. Oops. Okay. One, two, three. (camera clicks) Right on. That's red. There's a lot of stuff you can do with your lighting in the background. I wanted a evenly-lit, red backdrop. I think that looks great. You can also use a snoot-ed flash. A snoot is like a, you can just use paper 'cause I'm a DIY guy, you just use paper and tape to make this snoot and make a pool of light behind her head. That always looks pretty good. You can also use little tiny reflectors to make a cone of light. There's a lot of different options. Shall we go with white? Let's do a white back, white seamless now. (backdrop rustling) Go ahead and pull that white out, so it comes out about three feet from the background, maybe even four feet. I'm gonna have you go ahead and stand up. Why don't you come over here and stand over here while we do a little bit of studio change. (Mike clears his throat) I love white. White's great, but white takes a lot of effort. It takes a lot of skill to illuminate that background just so. A lot of times with white, I like to do full length shots, so that's one of the shots we'll do today. Show you how that works. We'll have to position these umbrellas in the background, so we get even illumination, not just behind her head, but even almost down to the floor, so we may have to bring in four background lights. We'll see what it looks like. All right, we got about three. Let's come down a little bit more. Let's give it, so we can come out. (backdrop rustling) There. Should we throw in a sand bag? Let's throw in a sand bag wither side. (backdrop rustling) Okay and then get it as far to the edge as possible. All right, cool. You ready? Yes. Go ahead and stand on the front of that. (Mike clears his throat) Right on. Now, she's wearing heels and she's already pretty tall, so I can see that I might run into a limitation on the heighth of this. Again, heighth matters with a lot of your backdrop stuff, so these little six-foot backdrops, like I was showing before, sometimes don't cut it for full length shots. I recommend the top of that bar in the background being a least nine feet, maybe even ten feet, to do full-length portraits. Let's go ahead and stand on the seamless. Watch your heels. Yeah. Okay. Pro tip: gaffer tape. Tape this stuff down. You don't want people tripping. (Mike chuckles) Tripping is no good in the studio, so a lot of times, I will actually tape it down just knowing I'm gonna throw it away, or I'm sorry, recycle it when I'm done. (Mike chuckles) Tape matters in the studio. Okay, cool! I think we're good. The goal here is to get that background nice, bright white to be about a stop to a stop and a half brighter than her. Because it is white, I want everything to be bright. We'll see how that goes. The background lights on? Yup. And what are they at? 16th? Eighth. All right, we'll try it. See what we get. Let's do something fun. Fun meaning cross your arms. (Mike laughs) Yeah, there we go. I like the sass. That's cool. Shot number one. (camera clicks) Let's see what that looks like. (camera beep) (Mike clears his throat) (Mike chuckles) Okay, I don't need to do much more. (Mike laughs) We kinda got it. Again, my front lights are about an eighth power, but they are some distance away from her, so there's a lot of light fall off. My background lights are at 16th power and they're closer to the background, so the brightness is looking pretty good overall. I'm pleased with that. Let's move this Phottix back a bit, so we get a little more cross lighting. What I'm looking at is the catch lights in her eye. A lot of times having a single catch light's cool, having two catch lights is a little bit awkward, so I'm trying to just move that off a little bit. 'Kay, take that show again. Let's go ahead and do the same sass, but let's look off that way a bit. Cool. Go ahead and bring your left shoulder towards me. Yeah. Looking away. (camera clicks) Look at the camera now. (camera clicks) Right on. Hand on the hip. (camera beeps) Super! Before we move on from this shot, I'm gonna do a full-length shot just to show y'all what that looks like. I probably should have pulled that seamless out farther in front of her now that I look at it. It's nice to have about two or three feet in front of her. Again, nothing Photoshop can't fix. All righty. (camera clicks) Let's put your other hand, like pretend it's in a pocket. Yeah. Oh, perfect and let's try to bend that elbow just a tiny bit. Yes! Like it. Full length shot here. (camera clicks) Let's turn those hips towards me, pick a hip, and go ahead and rotate your feet also. Pretend like you're at a party and you're standing there feeling pretty comfy, weight on that back foot and go ahead and back up, so both feet are on the white. Huh, right on. Bring that hip towards me a tiny bit. Perfect. (camera clicks) (Mike exhales heavily) You notice I'm shooting a little bit loose? You know I'm not cropping it super tight and what that allows me to do is it allows me a lot of flexibility in Photoshop and Lightroom after the fact. Typically, a shot like this, maybe it's gonna go on a magazine, maybe it's gonna go on her modeling portfolio site, but you just wanna have a lot of working room around it, so you can composite in some more white if you need to. You can crop it, put in on social media. I like to shoot a little bit looser, especially with these newer cameras. There's a lot of resolution in these newer cameras. This is 46 megapixels, I don't worry a lot of times when I'm using these backdrops about getting the stands in there. Everybody knows, typically, that all these photos are gonna be reworked anyways. As long as we get the general concept, I'm good with all of the other clutter that's in there. Let's go ahead and over-bright the background real quick. Go ahead and bring 'em up by at least a stop, maybe two stops. Go ahead and come forward. Right there. Super. I wanna show you what it looks like with the white seamless when you over light the background 'cause that's important to know. They're at a quarter right now. Quarter power? Right on. I hope that blows out the background. I love making mistakes on camera. This is a deliberate mistake. All right. Here we go. Bring that shoulder towards me, this one over there, rotate. Right on. Oh, yeah. I like that. (camera clicks) (camera beeps) Okay. It's maybe a little bit hard to see, but there's no texture in that white anymore. It's just literally solid white, no data, so when you go to print this out, you'll find a problem with her hair. You'll see her hair, where is separates, it'll be all crispy and crunchy. Doesn't look right, so be careful with the brightness of that white backdrop.
Class Materials
Bonus Materials with Purchase
Ratings and Reviews
Mr. Baggins
This class is pretty basic for the most part, but I definitely got some good ideas from it.
a Creativelive Student
The thumbnail on this video is very disbelieving. The video is very basic, where the thumbnail shows sort of an advanced type of backdrop. Dissapointed.