Lessons
Class Introduction
05:10 2What Defines a Dramatic Portrait?
06:07 3Camera Settings
09:24 4Lighting Equipment & Styles
24:24 5Lighting For Dramatic Shots
09:04 6Shoot: With Light On-Axis
14:53 7Shoot: With Butterfly Lighting
06:20 8Shoot: With Beauty Dish
17:31Lesson Info
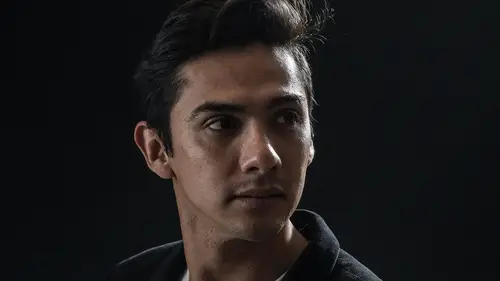
Shoot: With Butterfly Lighting
What I'm going to do here, I'm looking at my notes and making sure that our first lighting style is set up. Yeah, so we're gonna do a softbox and do what's called butterfly lighting in the traditional term for, the traditional look for butterfly is the shadow typically falls beneath the nose, okay? We're just going to use one light for this. One softbox, and as I take that image, I'm going to work hard to get that shadow to fall beneath his nose, but above his lip. This works for men and for women. And typically that light needs to be up high shining down on the subject. So we'll pull this flash off of my big old umbrella. Move this over here. Now I gotta be careful. What would happen if I left this over here sitting like this? I'm gonna get a lot of reflection from it, right? I don't want that to happen, so I'm gonna just turn it. Try not to knock anything over. Here we go. Always paying attention to the surrounding areas and make sure we're not getting any other brightness contaminat...
ion or color contamination. Okay. Simple lighting set up. This is a Profoto softbox. You can also, this is very expensive. I bought all this stuff on my own. And why? Because I love Profoto gear. It's good gear, it's very solid, it lasts forever. High quality stuff. You can also buy other brands. There's a lot of other manufacturers out there. I think this was I'm gonna say $250. Somewhere around that range, maybe $300. And then there's lots of other softboxes I've seen recently that you can buy for $100-ish to $150-ish. Cool, so I got this all set up here now. I'm gonna shoot pretty much on axis with my light stand. And I've got my power set to 1/64th, cause that was your question, so I need to raise that power up. I'm going to go back up to 1/8th. There we go. So I'll start at 1/8th as my starting point. Now he is pretty close to the backdrop. Think through what's going to happen. You all know we're going to get a little bit of spillage. Spillage onto that background. And that's okay for this starting point. All right. You ready? Yep. All right. Here we go. One, two, three. (shutter clicks) Let's see how that works. Inside of Light Room. Okay, go to... There we go. So, see that shadow underneath his nose? Actually it's not really, it's not too pronounced. For this next photo, I think what I'm going to have you do is I'm going to have you turn your nose right towards the camera so that it's straight on. Cool. And we'll just take that one more time. I'm gonna go a little bit higher. And then I'm going to angle the softbox down, because I'm trying to get that butterfly look. There we go. Okay. All right, bring your nose down a tiny bit. Oh, gravity. Might be time to upgrade my brackets here. I've been using these for a long time. Getting a little bit loose. Loosey goosey. Okay, there we go. Great. (shutter clicks) And let's take one more with your nose down even a little bit more. Perfect. (shutter clicks) Nice. I like the serious look. Okay, so using a little bit more specular lighting modifier, maybe like a beauty dish, or a smaller umbrella, we would get more definition under here. We'd get that what I'd call the butterfly look. But the whole goal is that the shadow kind of falls down beneath the nose. So we look at the catch lights in the eyes. It's a nice square catch lights, one of the things that I like. And then we have some good sense of depth here with the background being gray. So what do we do if we want to make that background black? What's the solution? Farther away. Everyone in the audience is doing this, so let's do that. Just gonna basically keep the same distance, the same position. Nice. And we're about, I'm just gonna estimate here, a little bit less than six feet away. This is about five feet away. And ideally, it'd be even farther away. Okay, here we go. (shutter clicks) Great, one more. (shutter clicks) Notice I had to wait til that beep goes. I don't know if you can hear it at home, but here in the studio we can hear it. It's important when you're shooting with your flashes that you wait for that beep to return. That means that the capacitor in the flash is fully charged and we can take the next shot. Good, that looks a little bit better. I like that compared to, we'll compare the that one. C. The one on the left is the current photo, the one on the right was the previous photo. I like that little bit darker feel to it. And again, remember he is wearing that black shirt, so I still want a little separation and we've got that. The one on the right gives us a little bit more sense of place and a sense of depth. So that's not a bad photo, not a bad starting photo for a first dramatic image of the day. When we go into Light Room or PhotoShop later on, I'm gonna show you how we can even kind of intensify the look, and make the shadows a little bit stronger, the background maybe a little bit darker, his shirt a little bit brighter. Just to kind of get a little more separation there.
Class Materials
Bonus Materials with Purchase
Ratings and Reviews
user-182390
Another great course learned a lot about flash and the different modifiers. Very informative and easy to understand looking forward to the next one.
a Creativelive Student
Student Work
Related Classes
Lighting