Lessons
SPECIAL: Evening Light Painting Session
48:10 2Introduction to Light Painting
17:34 3Shoot: Objects on a Tabletop
22:43 4Shoot: Using Gels
14:55 5Editing: Objects on a Table
25:37 6Morning Q&A and Timing for Light Painting
23:22 7Students Shoot: Vase of Flowers
25:02 8Editing: Student Images and Composites
21:28Review of the Special Evening Shoot
08:25 10Shoot: Scooter Composite
27:07 11Compositing the Scooter
19:39 12Shoot: Light Painting a Person
18:19 13Student Shoot: Iris
05:46 14Light Graffiti
14:10 15Light Painting Example Review
20:09 16Fun and Unique Light Sources
27:42 17Sparkler Painting
10:20Lesson Info
Fun and Unique Light Sources
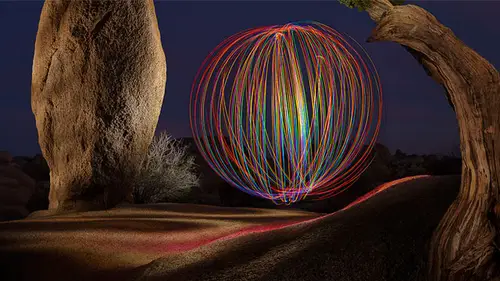
Well let's look at some of the light sources we might end up using I have a table full of stuff that I use you don't need all this junk you really don't the way I end up collecting this stuff is I'll be waiting in line at the hardware store the cash check out and they're gonna have this dumb glow sticks sitting there tempting me and it only cost three dollars alright I'm buying fifty bucks worth of stuff at the hardware store on what's three bucks gonna hurt and then I end up buying it and that's how I ended up with these two I have with this one at a rv rally people that live full time in rvs which is what I do and some guy bought a case of these and he was selling them cheap so I was like well that looks like it could be an interesting light painting source so I bought it I mean everything that's here most of it is acquired in that kind of way with very few exceptions the main exceptions is my led laser my favorite flashlight the em seven are which is a rechargeable one one thing tha...
t's great about the rechargeable one is it recharges just the magnet sitting there and then you khun grab it it comes with a little stand as well where khun screwed to the wall so I come home and I just go home and it's charging I have another charger like this for the car in the back so I just pop it on there when I'm done and I always know I haven't charged this charger is even us be so when I bring it on the road it's plugging in my laptop I don't have to bring a brick you know the charging brick um so that was great but I just keep collecting things people give me light sticks because they know I do like painting and they'll you know, find some given to me so fine used them somebody else gave me this one this does all sorts of weird light effects these could all create really interesting results. I paid nothing for this. Somebody gave it to me. I think it might have been at burning man, but let's look at a few of the things that I use on regular basis and that could help you out when I was out the other night shooting the car with the car. Sometimes it might be difficult to get my flashlight above the car because I can't reach up there with without getting too close. I bought this yesterday at the hardware store, not the hardware store, the pharmacy it was four dollars at the checkout, you know, they always tempt me sitting there with gum and everything well, they had a back scratcher so why the heck would somebody buy light painter by a back scratcher? Well, if I take a flashlight and I take a little bit of gaffer's tape or electrical tape, if you don't have gaffers, then I can put this up here on tape it on, and now I have a flashlight that could go way over my head, and so I'll buy dumb stuff like that, okay, but it's just always experimenting because it's so you can create such interesting effects with such simple things. It's a four dollar back scratcher. So one of the things that I used the other night that some people have some questions about is something called e el wire in e l wire stands for electro luminescent wire, just letters e l and if you search for it on the internet, you can find out information of that. I have blue, I have orange, I have green and I have white, and so if I want to create interesting effects with that, this could be water or fire looking, uh, by moving in various ways love it. So one of the things we did the other night with some of this stuff is we made an orb, I didn't make a perfect orb, but I want to talk about that a little bit now that we're in lite where we can actually see what I'm doing so I happen to use a dog leash it doesn't have to be a dog leash the one that you see in if I can find a good orbe all right, this one here that I have on my screen is one where I didn't know I wanted to make an orbit the time a friend of mine had a bunch of colored lights and I said, all wait, can I use those? And what I did is I had an extra cable released from my camera, and I took his lights. I used some gaffer's tape and a gaffer taped it to the end of the cable release for my camera, and I was spinning my cable release. It was my spare cable release, okay, so you don't need to buy exactly what have you just need something, anything like this, and I don't know if a metal leash is the best because if I do this a lot is shapes my hand and so that's, why you see a little glove here was just a glove out of my rv, but let's talk a little bit about orbs because there's some interesting things we can do can I walk closer? I'm gonna mess you guys up, but I'll get on this surface and to do an orb all you need is string or anything that's flexible in on the end of it. We want to put some lights here. I have some lights and I'm just going to turn on one of them. This light I got at the hardware store checkout area and its cycles, different colors. What I liked about it is it had a large surface area, and it can also see a little bit out the back because a lot of light sources have to limited of arranged as faras what direction they point. And I like that this could go in many different directions then if I want to do an orb. First thing I want to do is get something on the ground is a reference point, and oftentimes it'll just be a coin that everybody has a penny or a or anything like that, something that's real small for me. I'm just going to grab a piece the gaffer's tape, so I have a piece of gaffer's tape about the size of my simple, my thumb. I'll put it on the ground and you need a reference point on the ground because what you're going to dio is you're going to start spinning this like this, and you want to keep that right above that point. And so what you're going to do if you're not going to do the following if you watch my feet and if you get my feet in it but if you watch my feet I don't want to do this looks I'm messing up but I don't want to spin around myself like this I don't want to do it instead I wantto pivot around that point, which means if you wash my feet I'm going to be doing this in the bottom of the rotation of my light source is going to be sitting above that point the entire time now since we didn't orb thie other day I'm going to try to do one that's a little bit different this time what I'm going to dio is take other lights and I'm going to attach them a little ways up my chain and by doing so, I'm going to end up with an orb inside of an orb inside of an orb. So now if I end up spinning that it's going to be a total of three circles is john handy? So we're going to try an orb uh why don't we turn off the, uh main lights and can you looks like mike's already making sure that's prepared thanks mike and just in case you need some help near the camera, do you mind do that or why don't I give you the remote just make sure the little button doesn't get pushed and you mind if I move this a little bit just yeah just put that way a little so to do an orb you only need to go to rotate one hundred eighty degrees when it comes to your body because this part here has two sides to it it's got the side that's going to my right the side that's going to my left so by the time I get halfway to a quarter of the way turned around it's going to be filling in the area close to the camera and at the same time behind the camera you know further away from the camera so as you go around you don't need to go four hundred are three hundred sixty degrees you only need to go one hundred eighty and so I'm gonna get this so it's right over that little spot and I can get it down however far I want close to the ground just make sure doesn't hit the ground because if it does it's going to no longer be going in a nice smooth circle and then I'm going to get it started spinning I'm just staring straight down at that spot on the ground, making sure right above it and I'm trying to get my swing to be pretty consistent before I open the shutter then john would you open the shutter one hundred eighty close and see what the end result looks like see that that's because the light on the bottom of my chain is one that cycle's colors and then I had a green led in a white led. Now I could tell that I was bumping it around a little bit because if you look at the actual lines that make up the white one in the middle, you see they're not really straight there little scraggly, and that means I may be using the metal dog leashes, and the best may be using something like a thin string or something where it's easy to spin it without having it distorted shape, but overall that's how you do an orb and I like the color changing if one other suggestion is if you want an orb that is more filled in than that, usually what you'd have to do is rotate around more than once, but instead what you could do is just attach more than one light the end of the strength. So what I did the orb that I showed you previously, which is the one, by the way, here's an order like that one and then he'll wire at the bottom just experimenting here is an orb inside of something, which there I was doing an angle, you see how diagonal the lines are, I think that looks pretty interesting but when I did the one that was multi colored that I showed you previously which I'm failing to see at the moment uh I had about six different colors of l e d's on the bottom of one cable really serious? Yeah, there and that's why it's multicolored and it looks very much filled in there's no big gaps in it because there's six or seven lights there and I splayed them out so they're spread out when I taped them to the cable release uh with that now one other thing we can do that's related to this would be this. Look, how the heck do you do that? Can we turn on one of the lights again? Is it easy to click on to do that? We're going to use the same dog leash take a light off the end of it, so I have the same dog leash I now have a was just called a whisk whisk whisk that you use in your kitchen this whisk came in a set of three for about three dollars, and what I've done is I've spread apart the little pieces of metal makeup, the whisk and I shoved into it steel wool when you buy steel wool it comes in various grades in the grades will be listed as a number in any of the grades that are all zeros uh can be used for this see what you can find in a hardware store and I just spread apart the middle of this and shoved it in here and then tried to get the medal back to where it usually is that cliff to the end of the dog leash then usually I would use a lighter and I can like this in still will actually starts melting and it just looks like it's kind of disintegrating and then if you start to spin it like we do to make an orb, the air that's coming in doing that is kind of like using air to pump up a fire if you see somebody using, I think push oxygen into a fire it just gets a lot more and it starts flying office chunks of molten metal and so that I would wear my glove in and in this case I would usually wear a hat so if any little piece comes down and hits me in the top of the head it's not going to burn me, I usually wear sunglasses and I would usually wear long sleeves, long pants, and I would make sure the environment that I'm in is not flammable. If you look at the image that I have here I found a tunnel underneath a like a train bridge and there was a stream coming through so everything there was not flammable concrete uh, rocks in water and that was my environment. So I like this, and I just see it start to kind of seems like it's kind of just disappearing when you light it and then start spinning it, the harder I spin it, the mohr, those things of metal will fly off of it. Have you spent it really hard, really go far in, the faster you spin it, the more oxygen is getting to it. It goes really fast, though this thing is only gonna last you, uh, maybe twenty seconds, that kind of thing. And if you find you're having trouble getting it to really have stuff fly off of it or even lighting it, you can get some lubricant if it's the kind of lubricant ous a brand that I won't show you but is a standard household name that, uh, on it says danger, flammable good thing just spray a little bit on it, and it makes it so it's going to be disintegrating faster and more prevalent, lee, with that, so, uh, end up doing that with this. When you're used to doing an orb, you're used to looking down at a little point on the ground. Don't look down because you're going to show up the this is going to be very bright and as it goes around, you will be enough light where you'll be able to see yourself with an orb. You're inside the orb in the bright lights that are creating the orb are obstructing the view of you in the lights are dim enough that it's not liking you much this is going to light you, so look straight into the camera when you're doing it and look cool because it's going to be a pretty cool shot, I would not suggest doing this casually. This is something where if you have your camera too close to this in one of those little pieces of molten metal flies off and hits your camera lens. It's it's, molten metal it can mess, you'll ends up so keep your lens away from this thing as they say, don't try this at home, don't try this at home, you can stay and they was home try this only if you are not clumsy with fire in other things. Okay, don't try this with your fifty one point two yeah, not with your with your seventeen till shift that you have to be like three inches away with now you notice how far away uh here's, another shot of a buddy of mine doing it this one I cheated on, he went out there and spun about four times but because these air rocks and a stream that really, really shallow stream he always stood on the same rock and so I just happen to look between the different exposures I did and he was always in the same spot because he's sitting on a rock you know, there's not many places to be there and because he stayed in the same spot I was able to overlay about three shots and light mode and then I just had to mask them so the three shots didn't affect him in all three spots, otherwise he'd be a little different, but that way I was able to make it look as if there's a lot more of those things flying off like here is more like one spin and there's three of them put together if you want always to the same area all right, well, before we get into some final shooting, do we have any questions? Certainly do we have any in the studio audience for starters militia? So we talked about lighting, moving things being harder. What if you were tryingto light moving water like there's a park near me where you can actually go behind a waterfall? So what? I was trying to light the waterfall from behind? Well, yeah, the I haven't tried to live like pain waterfall that I can think of, but in general because you're doing a long exposure in order to do the light painting, you're going to get the silky look on the waterfall so it's not going to be the individual droplets and things so it's going to be that and it's just a matter of getting it lit properly. I don't think it's going to be a big technical challenge necessarily it's a matter of getting your camera the right position and figuring out what's the best angled light it from the waterfall itself is most likely going to look like a silky affair as long as you paint the light back and forth across it. Um so be an interesting thing to try glasses got questions don't always has questions you guys duke it out get it out with okay question from sam cox from love in colorado could like painting techniques be used with close ups and macro photography subjects would you need some very small lights to be used in close up in macro stuff? I'm not sure when it comes to, if you mean macro like the size of ah, a dime or something, you know that kind of small never attempted it you could possibly use fiber optics is with five rockets you could get a fiber where that light comes out in a very small area in so there's a possibility there, but it's something I haven't attempted so I could only make guesses but you can work on very small things in general it was the picture of like just that little camera I had on the table it was just the size of my hand you can easily do that kind of stuff this small light source also got and another question do you ever use more than one lady at a time maybe a sharp light in one hand and a diffuse light and the other yeah, yes, I do um I will commonly have more than one flashlight now just so you know, this spread of stuff on the table is ridiculous, meaning that I never have all this stuff once by but if I'm going to teach the full thing of like paying, I just looked around for every flashlight I could find and I brought them most of the time usually have about three light source is with me I'll have relatively powerful one most the time my led lens er is what I have for their I'll have a medium powered one which might be my with jacqui is called inaba bolt and then I'll have a small light source which might be that one that's on the flexible stock and having those three guessing the versatility getting really nice and tight in one area and if I needed a soft light from one of them I might have a piece of tissue shoved into one a little bit a shark diver shark diver from charlotte, north carolina how about using a blowtorch? Uh if you put the blowtorch, did you put the blowtorch in the way words light meaning it's not how do I describe where is coming out the longest uh it could you could do some interesting things. The main thing you have to be concerned with is you'll have to close down your aperture quite a bit so it doesn't show up as white instead you can see the orange or the blue of the flame that's coming out but a blowtorch could be interesting, especially a blowtorch on a string that you could two oh, that reminds me of one thing um when I'm doing things with this one idea I haven't mentioned is that if I'm spinning something like this imagine that's a blowtorch don't if I'm doing this and I want something interesting, I do this and then all I'm going to dio is I'm going to stick my finger out and when I stick my finger out instead of letting this freely rotate it's going to start wrapping around my finger and then I could close the shutter about there and that would be a spiral that makes sense sometimes I find it interesting to do things like that I've done one that has a model in it and she ended up being almost a total scylla watch was just standing there and behind her I did this with a glow stick so that it had just this would be thing and then I had her in front of her spin this and put her finger out and it was a loop but the two put together you could still see the silhouette of her but it was his green weird looking like scott and it was interesting so it's always experimenting don't always do things straightforward another question is from who's that question from I'll tell you this is from yangon ng again okay if you wanted a complete object is lightened the only method of blending these images in photo shop or what are some of the other things that you might use well the main one's that used for blending or lightning screen mode other than that I could leave the layers set to normal mode and then rely on masks to isolate one area from another but those are mainly lightning screen mode and masks usually combining all three if I start off with light mode if the end result is not bright enough for one particular layer I'll switch it over to screen mode which will be a little brighter if it's still not right enough you can duplicate the layer when you're in screen mode it'll double up the brightness doubling up the brightness is probably going to be too bright so then you could lower the opacity that layer to have just a um a bit brighter. Okay, one more question this's from pam hawkins from newton, new jersey how do you do words? How do you do words? Words? The main thing is you're gonna do like graffiti so for lycra fee, that means you're going to grab a small from here I can use a small light source like this usually I don't have one this big but it's nice to have it and this could be just a little penlight kind and you're literally just going to draw your like your text. The main thing is when you're pointing a camera, you have to do it backwards so let's see if I can not sure if I have it here. I think I do though here is text we had to do three tries though before we got it because this was saying thank you to a friend that we just had dinner with from hawaii and so in this case, I'm just taking a flashlight in this case it was a flashlight and I'm going to go let's see if I'm going the opposite of usually and have to go oh, turn it off oh, a h you know each time pushing the button on the back a like that and you can get it to be text or if you're doing layers it's much easier, right it normal way where you could read it from your position and when you put it on a layer in photoshopped that you said to lighten out just choose edit, transform, flip, horizontal and it will flip it around for you so spoken like a true photoshopped expert you have done that many times surprised you're also like painting expert that you don't know the alphabet backwards just off the top here? Well, I don't do that much text graffiti when it comes to that so oh, and I do have another thing I could tell you about on both my phone this might be a little easier both my phone and my, uh and on my ipad if there's my let me grab my ipad quick and then just so you know we've got about ten minutes that's ok, there are a couple aps you might want to know about especially person asked about text see if I have it in here the there's tuapse I'll try to get them can you guys put him on something where they can find out the names? One is hollow paint that's h o l o dash paint the other one is holograph ium s h o l o g r a p h I m with both aps they're similar concept you can you can go in and tell it what text you want yeah just type it in and you can tell what color you wanted to be. And you can tell how long or how many inches you'd like it to be. And when I see what you can see this but I've typed in creative live and there's little, you can choose the text, you can choose the color, you can choose the amount of time and when I click okay, it tells me, set your camera shutter speed to at least fifteen seconds, tap the screen to begin. The countdown is set for nine seconds and, uh, it says, drag it out, watch what this does. This is if you want texting your photo, it'll start in a second it's drawing text for you right now in what you would need to do to get your text, too. Actually appear is all you need to dio is wow it's doing this is walk across your skeen in a consistent speed, and it's literally gonna come out like text it's crazy. So those are the two aps you might want to check them out.
Ratings and Reviews
Julie Coder
I've been interested in light painting for awhile, so I was thrilled to see this included in Ben's bundle package, since I'm learning Lightroom as well. Really enjoyed it! I appreciate the "trial & error" approach of the class so we can see the thought practice behind the photos, not just the final images. Really helpful tips for editing as well. I love the images on his website, which gave me ideas for things to try on my own. Fun, fun, fun!
Paul
Really cool class so far. Just wanted something to get some inspiration and this is fun class but it's gonna force you to exercise. I don't work for creative live but I don't have to say that the quality of the few classes I've just started in photography is very good. I once was a professional photographer and I've taken lots of live classes and I feel the value of these is good. I am looking forward to watching the Clay Blackmore class.
Student Work
Related Classes
Lighting