Lessons
Class Intro
00:52 2History and Overview of National Parks
11:07 3Case Studies
14:07 4Scouting Locations From Home
10:55 5Day Scouting Locations
12:36 6Organizing Your Info
04:10 7Tools for Scouting on Location
16:06 8Preparing for Wilderness and Plant Life
08:00Lesson Info
Case Studies
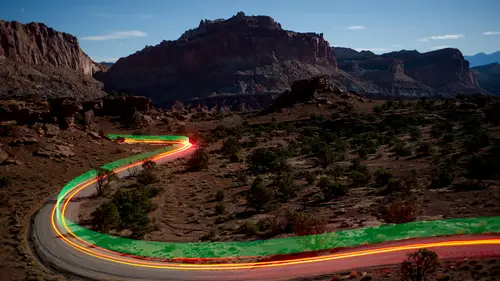
I'm just gonna go through a few case studies. These are just some photos that I've done over the years where scouting played a role, a role big enough so that I probably would not have gotten the photo without having employed some of the techniques and some of the strategies that we've talked about so far. This is in Capitol Reef National Park, and this was on the trip that I did with Gabe and Matt a few months ago. The reason I'm starting with this photo is because it really shows, you know, do what we say and not what we do, because we did this completely wrong. This is one of the orchards in the Fruita area of the park, these orchards that go back to, there were Mormon settlements there a century ago, and the orchards are still growing, and they're beautiful, and we had the idea that we wanted to get into the orchards at night and photograph. It was a great idea, but we didn't scout the location. We kinda drove by and we said it looks cool. We'll come back tonight. We got there, the...
re was no moon. The moon wasn't coming up for a couple of hours. It was pitch black, so we ended up wasting 45 minutes just walking around with flashlights trying to find something to shoot. That was the wrong thing to do. We did, eventually, find some things too shoot and it worked out fine, but again, we wasted time. Fortunately, we did it right in other places of the park, so we had stopped at this point. This is Chimney Rock. We had stopped there during daylight. We were able to figure out where we were gonna shoot from. We used the apps to find out where the North Star was gonna be, so we knew how we could do star trails. The three of us had our own ideas for the work we were gonna do, and we were able to plan it 'cause we did the scouting ahead of time. Another spot in Capitol Reef, the same day, was we found this spot, you know, with the rock formations in the foreground, we had this road with this beautiful S-curve, and we had the idea to take the pixel stick, and I was the lucky one, holding it out of the car in 40 degree weather, my hands freezing, while Matt was driving and Gabe was up on this ridge that we had found. We positioned our cameras up there and Gabe was firing the shutter. It was good teamwork, and we pulled it off because we scouted the location in daylight. We had this all planned out, so by the time we got there in the dark, we knew exactly what we were gonna do. In Everglades National Park, again, the techniques I talked about before, if you've shot in the Everglades, you know how challenging it can be to do landscape photography, because it's just so flat and featureless. One of the things that helps is finding some trees, whether it's a whole hammock of trees, or even just individual trees that look interesting. This is one I had found on the road that leads to Mahogany Hammock. I liked the shape of it, and the light wasn't great at the time, but I said you know, I could do something with this, particularly at sunset, because you know, from the angle I liked of the tree, I could tell, I could look at the app and see that that's where the sun was gonna set. A couple days later, I saw the conditions for a great sunset coming up. All the weather was perfect, and I could tell it was gonna be a good sunset, and I said look on the map. I had circled it, and this was where I wanted to be, so I got this. Again, it was just from taking notes, knowing a good place to be when a certain condition happened, and I was able to get there and pull it off. In Olympic National Park, I love the rainforests, the Hoh Rainforest in particular. Everything is green growing on top of green growing on top of green. It's like something out of Tolkien's imagination. It's really like another world that you're walking into. The first time I photographed the Hoh Rainforest was in 2011, and there was this one particular grove, there's two loop trails. Quick tangent point, if you're ever scouting a loop trail, go both ways, so go clockwise and then go counterclockwise, 'cause it looks different, you know? You go clockwise, and then when you back the other way, now you're seeing everything that was at your back before, so it's a good way to maximize and find all the possibilities. So, on this loop trail, there's this grove, and when I was first there in 2011, I wasn't happy with the work I did there, and I was really disappointed 'cause it's such a beautiful spot, and I felt like I could have done something nice. So, when I was back earlier this year, I had the idea, I wasn't really doing any light painting at the time, and now it's something I do a lot, of course, with doing the night photography workshops, so I had this idea. I knew it wouldn't be easy, but I had this idea to do light painting in the Hoh Rainforest, so I found this spot. It gets very dark in there at night, so there's no way that I could have effectively set up a composition at night. It's just too dark, so I got there during daylight and found a composition that I liked. I made a spot to note. I got everything set up. I noted where the tripod was. I marked on the lens where I had focused. I even walked around the scene so I knew, okay, I'm gonna use a flashlight on this tree and this tree, and I'm gonna have to light the bushes. I wanna light the path. I had everything set up during daylight, exactly what I wanted to do, so when I went back at night, I was able to do it and pull it off. It took me about six tries to get everything right in terms of the light painting, but again, there's no way I would have pulled this off effectively or as quickly without having scouted it ahead of time. In Acadia National Park, one of the subjects I really like there is the Carriage Road bridges. Rockefeller built these packed gravel roads that go through the whole park. They're a great way to get around, but they're also a beautiful subject themselves, and on the roads, there are 17 uniquely designed stone bridges, and they're a great photography subject, too. This is the Stanley Brook Bridge, which is one of the more accessible. We did a workshop there this spring, and one of the nights, we did a whole light painting tutorial, and we got everything, everybody lined up and got their composition and everybody took turns doing light painting and everything. But I wanted to go back after the workshop was over, 'cause I had some ideas. I just thought it was such a great idea to do this photo at night, and I wanted to go do it myself. I don't shoot when I'm on the workshop. You know, I save my ideas for after, so I went, and I found this composition that I liked with the curve of the bridge leading to the trees and you can see the road and all this, and I walked around the scene, and again, I knew, so I wanna light paint this. I wanna light paint this. There's basically four spots I needed to paint to pull it off, and then I went back at night. I knew it was gonna be a new moon. I had no light to work with, plus it was overcast. I knew it was gonna be dark, so it was critical to do all the scouting during daylight, so I went back that night and was able to do this. So, like I said, four spots I needed to light paint. There was a little bit of skimmed light in the foreground, and then I had to walk around the bridge and down a hill and light paint in the tunnel and a little bit on the road, and then I had to come out from the front and then light paint the front of the bridge. I didn't know it at the time, but the scouting was extra critical here, because right as I started to shoot, it started to rain, and I don't mean like a nice little trickle that, you know, is like romantic and fun to walk around in. It was pouring. You can't see it, 'cause it's a four minute exposure, but there's rain constantly, just heavy rain, and so I didn't abandon the shoot, 'cause my theory is once I'm wet, I may as well stay out, 'cause you know, I'm already wet. And I was set up and I wasn't going to abandon this now, so I did the whole thing in the rain. I did fall at one point. I lost a flashlight in the dark. I had to go find it, but I pulled it off, and there's no way I could have pulled it off if I hadn't scouted it in daylight and had the whole thing planned out ahead of time. This is a photo I did in Mount Rainier. This is at Reflection Lakes, which is commonly a spot to shoot in the morning. It's a very popular spot to shoot to get the reflection of Rainier in the water before the morning breezes come and kick up some ripples and waves in the water, but I thought it would be a great spot to do a night photo. At this point, I had never been there before, so I knew I needed to scout it. I scouted the composition. The focus wasn't too tricky to figure out, 'cause I was just going to infinity. So, when I got there at night, you know, I came back and I already knew what I was gonna do. I had the nice surprise of the mist, but I already knew were I was gonna light paint as well. I was trying to walk around there in the dark, it's a very environmentally sensitive area. They really want you to stay on the trails there, so it could have been hard to find my light painting angles in the dark, but during daylight, again, I was able to plan out everything, so when I got there in the dark, just execute it. Here's one I did in Acadia National Park. I love going up on Cadillac Mountain, 'cause you got these big boulders, these glacial erratics that have always captured my imagination. You know, just these huge rocks that were dropped there by glaciers, and I kind had this idea of how many night skies have they sat under, you know, while people and generations just come and go? And so, I wanted to do a night photo up there, and again, I went during the day and I found a boulder that I liked that was facing the direction I wanted it to face. Beautiful night skies in Acadia. You can really shoot any direction, and I knew how I wanted to light it and everything, and one of the reasons I like this photo was 'cause I think it's very rare in photography, we have an idea, and you just nail it. You get exactly what you had in mind, and this was a case where I was able to pull that off and so much of it had to do with scouting it ahead of time. Here's another photo where scouting was involved. This is in Death Valley National Park, but this wasn't my scouting so much as Lance Keimig, another of the National Park at Night instructors. He had been to Death Valley a few times and had photographed here. This was actually in a resort, in the Furnace Creek Resort. I would have never thought to go into a resort and do night photography, or any photography at all, but he said no, there's some great locations back here. There's kind of some displays of western memorabilia and all that, so again, this was talking to somebody else and trusting somebody else's knowledge to help me cut through the gluttony of ideas that you can be faced with on a park shoot. And then, Lance also helped me out with this one. This is in the Rhyolite Ghost Town. Death Valley had a ton of ghost towns. A lot of them aren't even on the map. A really good opportunity for off-map exploration, but Rhyolite is pretty out in the open. It's easy to get to, but I don't know if I would have thought to shot there, but again, Lance said, no, you know, we gotta go shoot this. It's a good place. You know, you should come. In Everglades National Park, again, great night skies, but one challenge you're faced with in Everglades is if you're facing east, you get the light of Miami in the background, some light pollution. In this case, I actually wanted the light pollution. As I mentioned before, shooting landscapes in Everglades is difficult because it's so flat. You have to really work to find a way to give depth to your photographs, but this was at Nine Mile Pond, and I had scouted it during the day. You know, I knew where to focus, and I knew Miami was gonna be in the background, lighting up the sky a little bit. There's usually some kinda clouds rolling in over the Everglades, so the light of Miami is lighting the clouds from underneath and I still get some stars up in the sky, so there's a lot of nice depth in the scene because of the lights, so again, this is scouting. Another thing that happened while I was shooting this, you know, the Everglades are synonymous with alligators, right? So, generally, it's very rare for them to bother people. In fact, I think the park has a statistic that nobody has ever been attacked by an alligator on a trail. I think the only people who have ever been attacked are people who went swimming, which you're not supposed to do. So, they're not interested in people, but again, it's kinda like this primal fear, right? It's this instinctual fear, and I'm thinking I'm out at night. It looks bright here, you know, 'cause it's a 30 second exposure. It was not bright out. I can hardly see anything around me, and I know the water is right here, so it's in the back of my head, you know, alligator, alligator, alligator. It's fine, Chris, there's no alligators. They don't care. All of a sudden, big splash right in front of me. It was probably a frog, but in my head, it was the largest alligator in the park, and this was the last photo I took of the night, needless to say.
Class Materials
Bonus Materials with Purchase
Ratings and Reviews
Donna
This class was a tremendous help. It is definitely a "tool kit" class and not a "how to" class. With that said, it is worth every penny just for the amazing scouting tips, safety tips, and national park app suggestion. I downloaded one of the recommended apps from this class for a trip I'm taking next month and was thrilled with the information. There are definitely a lot of great tools discussed in this class.
Gaily Cowart
This class was incredible because I wouldn't have gottent this info anywhere else. It's basically a lesson in common and not-so-common sense while shooting at night. No, you're not going to get a whole lot of techniques for working your camera, but you will get strategies for making sure you're actually able to shoot once you're ready. With night photography, there are many unknows that can ruin your chances of getting good shots. Without this class, I never would have thought about how to make the most of daylight hours to plan and prepare a night shoot. And, I wouldn't have known much about how to be as safe and prepared while shooting in the wilderness. I found this course to be very interesting and helpful in the grand scheme of understanding how to get the best from your efforts while shooting at night-time in a park, or secluded area.
Robert Reed
If you understand the purpose of this class, you will get a great deal of benefit from it. It is NOT a photography class in the sense of teaching technique, gear, or artistic considerations. It is a class on scouting and preparing for landscape photography - particularly night photography. While the instructor works heavily in the national parks, his techniques would be valuable anywhere. I especially benefited from the section on various resources. He mentions several books and gives specific insights into apps designed for photographers. Most of which I was familiar with, but he even covers their basic use and function. Those not accustomed to spending time on trails or in the back country will also appreciate the very practical advice that he offers on safety, clothing, and general considerations. A nice concise package that covers a lot of ground.