Creating Environment
Lesson 19 from: Portrait Photography: Creating and Styling your EnvironmentJohn Keatley
Creating Environment
Lesson 19 from: Portrait Photography: Creating and Styling your EnvironmentJohn Keatley
Lessons
Class Introduction
20:10 2Creative Photography Path
22:57 3Importance of Personal Work
15:25 4Concepts and Inspiration
12:04 5Choosing Your Environment
05:03 6Research and Mood Boards
06:58 7Finding Your Style
09:34 8Establishing a Team
10:44Jobs on Set
28:38 10Production Hurdles
13:45 11Working with an Art Director
07:01 12Pooling Resources
03:43 13Casting
17:26 14Wardrobe
11:24 15Set Design and Props: Interview with John Lavin
35:06 16Gear
09:59 17Lighting
29:10 18Technical vs. Flexible Lighting
07:56 19Creating Environment
07:59 20Gear Essentials vs. DIY Solutions
07:02 21Lighting for Your Subject
04:10 22Lighting for Your Environment
05:17 23Q&A
08:36 24Directing Your Subject
34:03 25Tips for Directing Talent
09:58 26Pre-Lighting and Test Shoots
05:08 27Shoot: Stylized Portrait - Close Up Part 1
49:55 28Shoot: Stylized Portrait - Close Up Part 2
20:19 29Shoot: Stylized Portrait - Close Up Part 3
17:19 30Set Tour and Lighting Set Up
05:41 31Shoot: Building Environment & Lighting Adjustments
33:13 32Shoot: Building Environment Part 1
18:45 33Shoot: Building Environment Part 2
18:39 34Photo Critique
26:06 35Shoot: Row Boat in Fog Set Tour
03:54 36Shoot: Row Boat in Fog Part 1
42:19 37Shoot: Row Boat in Fog Part 2
28:34 38Shoot: Row Boat in Fog Part 3
24:34 39Shoot: Row Boat in Fog Part 4
04:10 40Shoot: Scuba in the Hull Part 1
44:27 41Shoot: Scuba in the Hull Part 2
21:50 42Shoot: Scuba in the Hull Part 3
16:40 43Image Selection: Stylized Portrait
30:53 44Image Selection: Building Environment
10:52 45Image Selection: Row Boat in Fog
11:53 46Image Selection: Scuba in the Hull
06:38 47Next Steps: Create New Work
05:44 48Next Steps: Share Your Work
12:03 49Next Steps: Marketing and Branding Consistency
12:52 50Final Image Reveal - Concept and Casting
13:20 51Final Image Reveal - Retouching: Communication and Direction
14:13 52Final Image Reveal - Final Q&A
34:52Lesson Info
Creating Environment
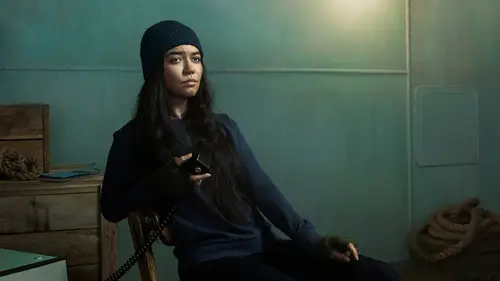
So we're not actually talking about creating environment in the sense of sets and props. I'm talking about creating environment with light. So kind of taking it one step further. How do we use light to create an environment? This would be in the very simplest, most subtle of ways. This is an example again of, we talked earlier about using your key light on your subject and your background versus lighting them independently. Here we have the subject pretty close to the background and you can see there's like that shadow behind them. It's very simple and very subtle but that's a conscious decision. It allows you to create another sense of depth. You can get a sense of this person being up against a wall and you see their shadow. That's, everyone's going to respond to it a little differently, but that's going to feel a whole lot different than if we, again, lit the background independently from the subject and just made it all even. Where they're, kind of, just sitting out there in nowher...
e. Here, for me, I love shadows and things like this because it gives me a sense of placement. I like to imagine what's not in frame. That's where an image gets exciting for me. Just like John was talking about earlier, John Lavin. I just think less is more. I think what you don't see is just as interesting as what you do see. It's allowing your imagination to think, like, what's off camera creating that shadow? Where is that light coming from? It feels like this is a really big open space or whatever that narrative is. Here is another example and this is where, I don't use them all the time, but if I use gels, it's got to be for a very specific reason. I think earlier in my career I used them just to experiment, and that's great. Like, that's a good way to learn. Now I'll use them if they're necessary. Not just because they look different or interesting or something. So this is our most recent family Christmas picture. And basically we wanted a creepy Santa. You know the song He Sees You When You're Sleeping? You know, so we wanted him to watch us sleeping. And I thought that would be kind of fun and creepy. So if I had used bright strobe and just lit the room up and it's bright, it's going to have a completely different feeling than if I try to make it feel dark and moody. I think at night, at least for me, you feel a little more vulnerable. That's kind of what darkness brings. So I wanted to create this nighttime scene. Also, kind of thinking through the whole concept, why would we be sleeping in the middle of the day? Like when do you sleep? You sleep at night usually. So kind of thinking through that whole concept, we wanted to create light that is going to allow that environment to make sense and feel believable. So we have, we have this bulb and this light hanging there. That bulb is not bright enough to actually light me. And to do that would, again, require a really long exposure. So what we did is we took an exposure on tripod again of the bulb and of the light on the wall. And then we hung in a light with a gel on it to light up my legs and to mimic, kind of, that, what that light bulb would actually look like. And then we have lights outside lighting up the edge of creepy Santa. And then we have lights with a blue gel on the room to give it a cooler, kind of like evening feel. And I always try to be very subtle with it. I don't like to feel overly blue, but I wanted to give it a feeling of coolness. And then again, a lot that's accentuated also in post, through retouching. So, and this was another one of those composites like I showed you guys in the kitchen where there's lots of different elements that come together. Especially since I'm, kind of, taking the picture. It's like, it would have been really hard to get us all perfect on the couch and then get the dogs and also get Santa. And so I like to just chip away in manageable, bite size pieces. So I started with my framing and got the room. Then I got plates of Santa. Then I got plates of the family. Then I got plates for the light bulb. Then I shot each of the dogs individually because you're not going to get two dogs, you know? It's just, trying to do all of that at one time. No one can do that. So that's kind of how I try to approach it. I try to think about all these little pieces and break them up into their own chapters, so to speak. Here's another example of motivating light. This is, again, I did three images from that, starting with the kitchen one of people drinking nasty coffee. And this was just, again, to try to build my advertising portfolio. And so, thinking through, I mean we'll talk about light but even while we're here thinking through some production hurdles. I wanted to get a guy on his morning commute. He just started driving and he discovered his coffee is disgusting. You know, it's going to be really expensive to get a permit to park a car on a street and get lights out and stuff. And maybe stop traffic and get a cop and stuff. I don't have that kind of money. This is self-produced. So what we did was we we shot, I shot the neighborhood. I got a plate of the neighborhood at sunrise to get that light coming through. And then once that plate is set and we know where the light is coming from, we lit this car in a parking garage, just like in my friend's parking garage in her parking spot. And we can, you know, take all the time we need there and put up lights and stuff, and nobody is going to bother because she lives in the building. So we put up lights in all outside the back window. You can see the light hitting the back of his head and light hitting the back of his seat. We're basically just trying to motivate that natural light. We're trying to make the natural light we see in the outside look like it actually is lighting him. And so, again, that's, it's-- Light has the power to, if you don't do it right it's going to just read false. Like if it's, if the light is clearly, the sun is rising over his back shoulder and the brightest light is coming straight on here, something's off, you know? It's not going to make a lot of sense when you see it. So thinking about light in terms of creating environment. Thinking about light in terms of the color and the mood that it sets. Also thinking about light in terms of motivation and where is it coming from. Where should it be coming from? Now if we shot him like, you know against a freeway wall or a big tree or something and there's no light visible, you can make the light go from wherever you want. But if you're going to show light, a light source, you've got to tie into it somehow. This is an early image from when I first started, kind of, experimenting with light. But, this is an example of sculpting light. Or maybe hiding things with light. This was a shot where, again, I showed up and it was like you work with the hand that you were dealt. Now if I had known better maybe I could have scouted and picked a location and maybe talked to him about what I wanted him to wear and that sort of thing. But this was a profile piece on a writer and so back then, again, I just showed up, told him what time to meet and we just, kind of, scouted the building that he was working in and this was the most interesting to me. I really liked the light hanging overhead. It kind of reminded me of this, like, interrogation room kind of thing. So I thought it would be fun to experiment with that. And so I wanted something very dramatic. But I used these very small, gridded reflectors. And you can see, you know, there's that hard shadow on the wall behind him from the key light. But also, trying to be dramatic in an all white just flat room is really difficult. So this was, and again, this was more accident. Like, I was just throwing lights around back then and seeing what happens. But this is an example of sculpting light and sometimes and deciding what to cut out, you know? Like letting the other side of the room go really dark. It's what you don't see in there sometimes that kind of gives you, you know, your mind the ability to, kind of, be curious and wonder and build a narrative around that kind of thing. So we've talked about light in terms of creating environment, color, and the importance of setting mood, motivating your light and also, kind of, sculpting, or, you know, changing your environment with light.
Class Materials
Bonus Materials
Ratings and Reviews
a Creativelive Student
What an amazing show. I'm so happy that I could be a part of it. It was so great to see John at work and in his element. I learned so much from watching his process from beginning to ending. So many questions have been answered. I feel more confident, to get myself out there and create and make work that comes out from my imagination. I will definitely be keeping a journal/notebook with me at all times. I would also like to suggest that we have another course for John Cornicello, home studio. I'm curious to see what John is working on in his studio.
Doppio Studio
It's amazing to watch and understand how this great creative professional work. There's a lot to learn about with his production process. For me, that lives in Brazil, is a major opportunity to enjoy this class.
Vitamin Dee
Wow! There's just so much great information in this class. If you've ever wondered what it takes to produce an environmental portrait, this is the class for you! John did a superb job of taking us step-by-step through his process. From model casting to set building, lighting setups to culling; it's all here. He even wraps up the class with next steps and how to put it all together. He gives the knowledge so you can take it to a place you can create your own magic!
Student Work
Related Classes
Portrait Photography