Lessons
Day 1
1Calibrating Your System for Accurate Results
40:07 2Shoot Prep: Workflow & Lighting Setup
17:07 3Shoot: High Key Beauty Portrait
19:13 4Shoot: Hollywood Glamour
17:54 5Student Shoot: Colleen
13:48 6Student Shoot: Andrea
12:27 7Image Review and Q&A
15:46Skin Tone and Black & White Points
27:01 9Image Selection
25:20 10Global Color Correction
21:02 11Retouching Basics
46:12 12Advanced Skin Smoothing Technique
46:36Day 2
13Luminosity vs. Color
14:44 14Shoot: Low Key Dramatic
28:43 15Student Shoot: Ian
11:54 16Student Shoot: Michael
11:20 17Student Shoot: Colleen
03:41 18Shoot: Beauty Light
12:57 19Luminosity Blending in Photoshop
16:07 20Applying Luminosity
12:19 21Color Correction in Lightroom
23:57 22Detailed Retouching
23:55 23Color Space Discussion
19:16 24Darkening and Lightening Skin
21:10 25Spot Treatment
12:20 26Sharpening
29:57 27Compositing
54:51Day 3
28Introduction to Shooting Movement
11:41 29Shoot: Dancer Leaping
10:52 30Students Shooting
44:15 31Shoot: Dancing
14:59 32Student Shoot: Ian and Colleen
08:57 33Shoot: Dancer Portrait
15:49 34Dancer Session Q&A
11:30 35Figure Retouching
10:52 36Liquify Filter
10:16 37Masking and Edges
13:22 38Importing a Background
16:47 39Color Change and Motion Blur
24:45 40Enhancing Color
17:59 41Removing Tattoos and Adding Effects
21:30 42Lee's Photoshop History
21:56 43Final Portrait Edit
19:03Lesson Info
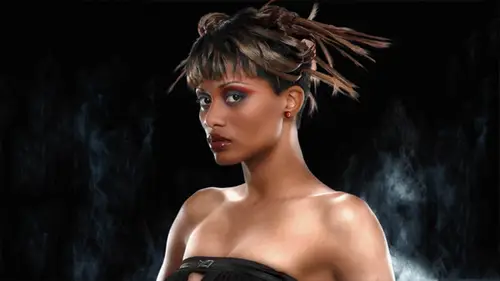
Masking and Edges
So now we're going toe now, let's, just do some masking let's. Uh, let's put this figure on another background, so I'm going to use the, uh, let's. See if today is the quick mask tool quick selection tool um and let's see if quick selection tool is a brush gonna you can increase the size of the brush by normal brush a modifier keyboard modifiers on and I'm gonna pick a brush size that's um, fits nicely inside the smallest area so it should fit inside the arm like this for sure and try to run it close to the edge and what happens is it sort of it finds the edge and snaps to it and we have a pretty good edge here because the way we lived it, they've got a dip down into the hair here. This hair is going to require a little bit of work, so I'm just looking for a quick selection now see what happened? I it's selected mohr of the background. I'll fix that in a minute, but I'm just dragging this around and it's snapping to the edge and if I'm lucky I can get pretty much the whole figure selec...
ted, I'm actually zoomed out, I'm going to probably need to zoom in now. I haven't finished selecting so I need to add to a selection I'd hold down the shift key so I'm doing that now and adding to the selection just dragging over the figure now I have gone and selected too much so now I want to subtract this election I'm going to use the option key toe you could see the minus thing happening here on dragging in here subtracting ok, we'll do we'll zoom in a little bit to fix this up here ok? So you see how here the brush sizes is bigger than the fingers it's going to work better if I shrink it down now for this detail and I want to subtract this ok and then add the finger sold on the shift key at the fingers back and what I'm looking for is getting close to the edge doesn't have to be perfect because we're going to fix the selection in a minute looking around maybe make sure I get all the things that are easy enough to to get so get that nose in there this hair edge is going to require some finesse and we're going to use the refining edge tool for that but it looks like I've got a pretty reasonable selection zoom in and just on this area just a little bit here I'm gonna add and into this area just a little bit I got kind of a furry edge there but okay so this this tool is sort of largely replaced the magic wand tool because it's much better at finding and locking on to the edge, but we're not going to have a good enough master just using this tool our but I can put a mask. And now just by clicking on the layer mask icon while I have the marching ants here in this election active and once I do that, I now master that we're seeing the figure underneath if I turn that off, you can see the transparency in this layer. Now, um, I'm gonna show you a tip here. It's a part of the photo shop preferences settings, this is the default view of layer transparency thiss checkerboard pattern, what people don't realize is that you can change what that looks like, and I'm going to show you why you would want to do that so well going in and here in tow preferences, we're going to look at the transparency and gamut. Okay, so these are the transparency settings here. The default is this medium grid. I'm gonna move this other ways. So you see what I mean? Medium good, we can pick small grid, the other thing that people don't realize, although you, you know you can pick light dark whatever we're using light but you can also change the colors of the actual checkers so what I like to do is I click on the white checker and great down until it's almost the same shade of gray is the other checker in the transparency and this is one preference setting that I would change and I'd make this to default because isn't that much easier to look at uh that that horrible contrast the checkerboard pattern makes it hard to look and see anything going on in the edge so you know, now I can look and see detail around the edge and I can see oh yes, I've got some some problems here that I need to fix ok? And in fact there's a there's a thing here if you have that loud checkerboard pattern going on is really gets to really be hard to see these sorts sort of subtle details in the transparency, so I know I can I can fix this thing very easily just by brushing over with brush and weaken hide it completely here by brushing with black uh we're going tio now do going to refine edge because I'm going to need a better mask around this hair okay so way have the mass selected in the layer this is the properties of whatever is selected and so we're going to look at the mask properties this is what happened to the refine edge in in c s six in c s five you had a mask panel? Uh, they've now moved the mask adjustment stuff into the property's panel, which is kind of changes, depending on whatever you've got selected. So we're looking at the mask properties, and we're gonna work on the mask edge, so I click on mask edge here and weaken choose to show this on different backgrounds here. This is this thumbnail allows me to show what the image would look like on black, what it would look like on white. Uh, we can reveal the underlying image, or we can show it the way we were looking at it on transparency. So you've got a bunch of options here for how you want that mask displayed. Um, I think we're going to see the most it's most useful for me right now to see displayed on white because we're going to see where the darker gray shows up, okay? And we have this thing called smart radius and the radius slider. Let me show you, let me check the show radius here we'll put a bit of a radius in there, so I've got two point seven pixels, so what photo shop is doing now, it's a defining an area around them? The mask that I've already created that it's going to look at for the edge and see if we can refine the edge uh we can use the smart radius button and then when it has a sharp edge you'll stay a bit sharper when it has a furry edge if it will it will kind of expand a little bit um way have for the most part we have pretty well defined edge in this in this subject but uh it took me a long time to realize that the way you use this tool was not just this using this radius but you can actually redefine the radius of the edge detection by just brushing into the image so I'm going into the image here and I'm just going to brush around in the area of the hair to find all the areas inside that that work their way inside the hair that should be transparent so you see and hear we've seen through to some of the gray background and did you notice that it's sort of re calculated and it's stripping away some of the gray so I just want to make sure that I get into the interior of that hera's much as possible and it finds it finds the hair wisps and throws away everything else all right now I know I had something issues over here let me just over in her hand yeah so I can just brush over that little part of the where the background was showing through her fingers and clean up from the mass sort of autumn it automatically cleans up around that. Ok, so let's zooming in on this to see there's sort of like some noise here around the hair uh if waken smooth the edge a bit and get rid of some of that that noisy nous calling him question your refined mask and then you just did be insulted brushing your way to redo back up and we do that no, no it's okay, I just I didn't know you could do that. Just be your fault. You have this brush things selected when you enter the dialogue, okay? And so now every time I kind of brush into the mask over over something I want photoshopped, like, you know, pay and pay more attention this area and then it sort of re calculates and finds an edge uh, this smoothing it's actually blurring the edge too much for my taste. So I'm gonna, uh maybe used contrast. Yeah, so I'm taking the noise out with contrast, which is actually making the edge of the mask a little sharper um but I think that's getting rid of some annoys you see how it's you know the edge here stays really sharp edge around the hair is re calculate related to get some of that subtle transparency, and it also can dig in to find the areas inside the hair that were the background chose three. So that does a lot of work for us here again. If I just brush into it, it re calculates and gets rid of that a little bit of gray showing. So that's that's, kind of how you use the little bit of work there, that's, how I used to refine edge tool. Now here it seems like there's, a funny little thing going on, so I may have to manually fix this little defect here. That might have been something that that happened with the, uh, with the liquefy tool we see for show the original. Yeah, I don't know, I think that's, probably some mistake and liquefied tool. Um, so I'll have to fix that. Looking around the edge. I think I've got a reasonably clean edge, okay?
Class Materials
Bonus Materials with Purchase
Ratings and Reviews
Luis
Skin tones correction and portraits editing are new to me. This course provides a set of tools for me to improve my portraiture work. Lee doesn't just show you how things are done, but also the reasons for the corrections. The delivery is a bit dry because the topic is quite technical. You can have a break between lessons, if it becomes too overbearing for you. I highly recommend to take this course, if you are planning to do portraits, head shots, or even senior pictures.