Lesson Info
11. Retouching Basics
Lessons
Day 1
1Calibrating Your System for Accurate Results
40:07 2Shoot Prep: Workflow & Lighting Setup
17:07 3Shoot: High Key Beauty Portrait
19:13 4Shoot: Hollywood Glamour
17:54 5Student Shoot: Colleen
13:48 6Student Shoot: Andrea
12:27 7Image Review and Q&A
15:46Skin Tone and Black & White Points
27:01 9Image Selection
25:20 10Global Color Correction
21:02 11Retouching Basics
46:12 12Advanced Skin Smoothing Technique
46:36Day 2
13Luminosity vs. Color
14:44 14Shoot: Low Key Dramatic
28:43 15Student Shoot: Ian
11:54 16Student Shoot: Michael
11:20 17Student Shoot: Colleen
03:41 18Shoot: Beauty Light
12:57 19Luminosity Blending in Photoshop
16:07 20Applying Luminosity
12:19 21Color Correction in Lightroom
23:57 22Detailed Retouching
23:55 23Color Space Discussion
19:16 24Darkening and Lightening Skin
21:10 25Spot Treatment
12:20 26Sharpening
29:57 27Compositing
54:51Day 3
28Introduction to Shooting Movement
11:41 29Shoot: Dancer Leaping
10:52 30Students Shooting
44:15 31Shoot: Dancing
14:59 32Student Shoot: Ian and Colleen
08:57 33Shoot: Dancer Portrait
15:49 34Dancer Session Q&A
11:30 35Figure Retouching
10:52 36Liquify Filter
10:16 37Masking and Edges
13:22 38Importing a Background
16:47 39Color Change and Motion Blur
24:45 40Enhancing Color
17:59 41Removing Tattoos and Adding Effects
21:30 42Lee's Photoshop History
21:56 43Final Portrait Edit
19:03Lesson Info
Retouching Basics
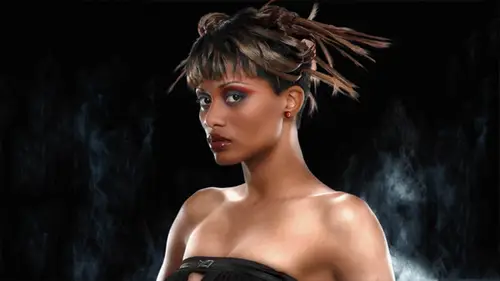
Well, welcome, and we're going to get back in here and do some some retouching, but but I just discovered that I have a very cool things to show you here about equalizing the skin color a bit. Now, lorraine here, right that's has has a unique kind of very colorful skin, and when, when we're zoomed out it's not quite as a parent, as when we zoom in, we can kind of see that, uh, some parts of her face there's sort of red component in the skin has been really emphasized, and this is a kind of a common a common problem with digital capture, believe it or not, it's more common to find us into in a digital image than an image on film, um and there's, a technical reason for the green pixel on the chip because there's a there's a filter pattern over the ccd, the camera that alternates between reid red, green and blue and has twice as many green pixels is it does red or blue, and the color of skin actually falls between the red and the green pixel on the chip. So when the color is interpolated ...
through the various algorithms of the demos, aching algorithms that the cameras use that color of skin is kind of tricky, so sometimes it falls on one side. Gets either more green or more red uh and it's it's a very sort of tricky negotiation to kind of come up with exactly the right color and her face here exhibits this classic issue where uh there's sort of red blotches I call him you could get this look and it's in person you don't see the it's honor it just sort of happens in the digital capture uh and she has this these strong veins uh which are causing also kind of a color shift here but I'm going to show you a technique to kind of equalize get the skin that's to read a little more yellow on the skin is too yellow a little more red it kind of blend them together and so this you'll use this all the time it's a great technique it is great for like reducing acne or eliminating the three sheets to the wind red nose look um so if you don't want your subject to look like he's feeling no pain and you want to you know, help that red nose thing this is the technique to use now on her it's more like the freckles and that's sort of frankly nous of the scanner uh I've gotten to read so we're gonna we're gonna eliminate that using this technique so this is how it goes we're gonna take the hugh satun saturation adjustment and make a huge saturation adjustment layer and um we're going to be adjusting uh instead of masters, the master here is all the colors were just going to work on reds. Now, as soon as you make this selection from master to reds, you get thes ie droppers here. Ok? So we're going to use the left most eyedropper that's, the main selection eyedropper and we're going to pick a red blotch and I'll make my sample size a little smaller so that I can isolate just you're kind of a red patch, I find something that like a red patching the skin and click on it and you see down here now, uh, this portion of this sort of grady in thing here has jumped over it centered itself on that exact color uh, now we're gonna use the minus eyedropper, which is on the right and I'm going to select ah less red color some sort of average skin color right here looks good and you'll notice that this jumped so this this area here let me zoom in a little bit this area here, the dark gray section in the middle is the fully selected color. The lighter gray areas on either side of that are where the selection sort of feathers off and ramps off into the surrounding color so we're going to be manipulating uh, you know, this areas that are selected so the good color skin is on this side it's the it's the skin it's a little more yellow than it is red so I wantto close in that gray bar on that side so that it's a little narrower and now here's the trick this this is the trick helps me visualize which color on her face is the most selective is most fully selected it's the kind of martian color technique just do a ridiculous you shift and the colors that are like science or close to the you know close to sayin are the most fully selected colors, so I'm going to actually open up this darker square just a little bit to get some of these patches fully selected, okay, um go where the good color is it's it hasn't been affected by the color ship, so as long as we can see that, uh, see if I open up this gray area mohr the skin gets elected and I wantto trim it down until it starts to peel off the good color. All right? So now we're not going to use it like this. We're going to bring the hugh back in so now it towards the center and now we're going to push this slider in the direction that the good color exists in this grady and this is the part that confuses everybody because this rainbow up here is doesn't mean anything it's just a graphic this rainbow down here represents where we're selecting the color and we're kind of in the red region which is skin is a kind of a red color and we want to move the slider towards the right towards the yellow color so I come up here and while I'm looking at the image you're gonna move the slider over until the red freckles become less red and we can maybe even lightened the freckles just a little bit using the lightness it's lighter I'm just gonna nudge this over just a little bit okay? And now we could toggle this on an awful turn the ion and offer you see what what happened and ignore the lips because we're going to fix that later so you see the the kind of readiness the blotchy nous kind of disappears and it looks like it's a more even color even though the frankel's air still there uh they're not as red okay now uh this sort of vain color it's kind of a little on the blue side I want to see if I can at least help that out. So it's not you know it's closer to the correct color, so since I've already edited reds I'm going to try yellows we'll get this eyedropper and I'll select maybe this this skin color and cnn jumped over a little bit into the yellow region and uh will subtract now a redder color and pinch in the red side here so we're selecting mme or the yellow er color and do the same kind of ridiculous you shift where the things are kind of blue that's fully selected where there magenta there partially selected I on I just make sure ramps off of all the skin that was more red before we're gonna trim this down in a little bit like that okay, now that I've done that, I come back here to the center and this time I'm going to make it more red instead of more yellow, so I'll move the slider to the other side and we'll talk this on so it when you look at it compared where it's next to the red skin this almost looks green this area in here when I correct it, they come close that come together so they were sort of equalizing the skin color. This one trick is huge for giving a nicer looking complexion it's almost like, you know we're help we're putting better concealer on then you could you could really have with makeup now the real problem here, of course, is that I've killed the color on the lips uh and possibly you know, if we talk about it on and off, we might like a little bit rhetoric color in the eyes, but I I think not I think I like it a little more a little less red but I don't want to you know I don't want to have the lips go you know de saturated I mean that's you know, especially for a woman it's very bad so we're going to mask out off so the thea hughes saturation adjusted that has a layer mask with it and right now you can see the mask thumbnail is white and that means that this adjustment is being applied over the whole image and in fact it's making the hair a little less red um and we have to decide if we want the hair to be read or not, so we may want that, but we definitely want the lips redder, so I'm going to mask this adjustment off the lips of very easy get a paintbrush, we're going to paint with black into the white layer mask over where the thiss lips are, so I'm just using the bracket keys here to make the brush smaller so that I can just now brush, you know, change my capacity and make sure it's a one hundred percent and I'm just masking off that adjustment off the lips to bring the color back okay see some hands already people have questions, all right? Yes mouse and keyboard kind of guy or welcome time I'm a welcome ah, welcome kat tablet guy and so I'm using a mouse here so I'm a little shaky okay? You know, I do not find it easy to draw with a bar of soap so you know, I do prefer you know I want to turn off that keyboard thing I'm just zooming out is in the you know, keyboard here uh I don't know I'm actually I think maybe this this brown or color is more natural looking um but this that's kind of a judgment call to so you if you prefer the redder hair uh I would mask it off the air I'm not gonna bother to do that but now it's just you know, just looking at the result uh it has it's sort of taken a little bit of the color out of the cheeks so I might I might be inclined to just softly bring some of that color back so I'll use a bigger, bigger brush and change the capacity down here like thirty percent or so and I'm just gonna kind of partially bring it bring back some of that that cheek coloring because that was probably part of the makeup, but I think it helps that the nose gets less red um and again I'm kind of maybe, you know, we might have taken it too far because if you if you take out all the color variation and can look sort of bad, so I can I could just reduced capacity a little bit of that adjustment to kind of adjust it to taste, so I think we're much better there than we sir, we're in this position, ok? Let's see if we can do something similar to this other one, the high key one. Uh, which when we zoom in like this, it does it has sort of the same thing, it's a little going to be a little harder to see because it's so bright let's go ahead and do that. So just as a review, because this is a very cool technique, I'm gonna create a huge saturation adjustment layer select reds, select my eye dropper now, and I'm going click on red patch so there's a freckle right there, that's a little red and click on and now I get the minus eyedropper and I'll check some other area the skin and you can look at the numbers two and see you know this is a has a good skin color as far as I'm concerned, and I'll select that and it's trimmed this little area in, so move the gray bar in over a little bit, do our wacky color shift, make sure that we've got maximum of patches selected and then trim off as much from the good color is possible ok, bring this back to zero and push it towards yellow just a little bit just to see what effect you're having and now we're going to do work that same thing on from the other side of the skin that's two yellow is that looks sort of greenish it's right here, so I'm going to select it using the left eye dropper here so I click and that jumps my selected color and then I use the minus and this time I'm going to subtract the redder color so that we're not, you know, working across purposes here, so I'm isolating two different regions of the face and, uh, do the same wacky hugh shift thing here I can see that my my blue areas are the areas that are fully selected and I've peeled off from the other skin the skin that was to read before so I'm really going toe most strongly affect the veins on going to make them a little red or to blend in. So I'm pushing in the opposite direction on the hugh here to kind of equalize the skin color and, uh yeah it's done, you can see the nose and around the nose of the nose looks kind of red and then this stuff looks sort of greenish, you know, it's really strange looking, but when I do the adjustment now that at least their closer together in terms of their actual color okay, so does that make sense to everybody will have to mask off those lips and tell you a couple comments sure way have questions did you want but you have a question how do you how do you approach determining what you're going to first correct in this you started off with the red and knowing that you were going to follow up with the veins uh is that what you're always going for uh with the day elation? You know, it depends on the image but like ninety percent of the time the biggest problem is red patch innis in the skin and um so usually that's what I'm trying to attack first it was all sample of skin that's to read and try to get it closer to a good color you know, um sometimes you get, you know, like and she presented both most people I see it's usually just one or the other it's just and it's like most of the time it's the redskins with skins to read. So uh I'm going to attack the biggest problem, which is the red blotches on the the skin that was too yellow on her, which is kind of unusual and I think it has to do with, you know, those veins that she has um that I am attacking less because it's smaller area so and that's the second thing I'm going to try to move I have been lucky and that I can use one adjustment layer to move those two areas you know sometimes it's kind of tricky with you know if they're both sort of red it gets to be hard to sample them then you know sometimes you have to use a different a saturation adjustment layer you know to work it but I think we made a a big improvement here and it's also this sort of thing is also you need to zoom in to really see it because now when we're kind of zoomed out you know it's even hard to see the defect to begin with and we zoom in it's obvious but now that we've corrected it I think it's much better okay okay I wantto sure I want before you go I want to read some of these comments that are coming in uh filled place as well just wow I've struggled with that for so long bernadette says this is awesome stuff beth olson creative says in all capital letters what this is so awesome uh jazz bill says wicked so I just wanted to let you know reaction that yeah I mean it's just surprising how often you can use this to solve a problem that a lot of people gave up on it was like oh yeah that's digital in the beginning that was one of the things you know I just don't like the way skin looks in digital capture and you know especially in the beginning with earlier cameras it was even worse and we were just like wow you know that's just gotta live with it you know but you don't and this isn't that hard you see actually I could be really quick with this this is very easy and in fact if we had a whole bunch of these I could just drag in fact let's let's open up one of our other images because we've got a correction for this one um this is kind of cool we can uh let's open up one of these other images here well maybe this question can kind of lead what we do next can I ask the question really quick? Okay. Okay banana says can you use this technique to bury the blue purple under eyes at all or is that another technique to address later maybe does she have blue purple under eyes? Well I'm not sure she's I don't know bananas is speaking towards this photo exactly but maybe you can use it there's this is also really useful when you have a group shot and everybody's got different skin color and you know how I said really in reproduction the disney version is a very narrow type of spit skin color and you know I would correct everybody skin to try and make them look better uh you can use this to bring the people that are you know, two yellow make him a little redder and bring the people that are too red make him a little more yellow and kind of play it across a group so that you're equalising you know, skin color across a group and like those that really pink baby that's just too pink you know that you know don't necessarily want to do ah curve at it globally for that but this kind of thing that hughes a shift is like magic for that you can really work it well and what I wanted to show you is that once we have we've done that correction over here uh now I've got a mask on it, but I can, uh just drag the correction uh let's see actually could drag it isn't moved to drag it off the top and just drop it onto another image. So did you catch that? I've got that his saturation layer set here it's selected and all it did was used to move to a drag it to the new tab and inherit iss throw that away and do it over again so once you've got established that if all the shots all of the shots were taken under similar light they're going to be the same I can just now dragged that adjustment and apply it to another inmate judge just by dragging up to this tab until it comes forward and they're now I'm holding down and and bringing it down into the image and then letting go and I'm dropping the adjustment layer right on top of the other image and at this point I would just throw away that layer mass that had masks in it because I have to redo the mass to match her face and so we have dragged the layer mask away to the trash and I'm making a new layer mass so now I can mask off lips and what happened? Okay, so save yourself a little work and not have to do those same moves over and over again. Okay that's great. Well, that that answers debbie's question which was is this a good way to get rid of magenta red spots on newborns is I know that is almost always the case yeah it's uh yeah, I mean there's so many applications for this because we way see this sort of issue all the time and even that one little thing is done a huge improvement and I haven't even gotten to the retouching part of um so I like to kind of get like the color adjusted first uh and make it look as nice as possible before I start messing with retouching um I know the typical workflow usually what's recommended is that you do your global color correction last so that it's on top and do all your retouching underneath it. But if I can solve like a, you know, a skin issue with just some retouching like this, I will do this first because for her, I think we're going to be using some skins types, some skin smoothing technique of some kind. Um, so I'm gonna want the skin to be in a proper color first, before I started doing that, yeah, question, yeah, we dio so from j c b so after doing the correction of the red blotchy nous and the bluish veins do, then go back and check the cm more case in values, skin tone values. Uh, well, hopefully I've been checking that all along and I'm still, you know, in good shape. Some areas are redder, we're letting that happen, but like on the nose, you know, we're we're at about ten percent higher yellow, which is good. Uh, and my my science is low enough that, you know, we're still in good shape, so yes, you just sort of check as you go along. Yeah, but say in a wedding that you were speaking in african american groom and caucasian bride portrait real close together, um, obviously this is working on it. Caucasian how this color adjustments affect the african american? Uh, well, usually with african american skin, which going, we're gonna be dealing with tomorrow. Um, the issue is the skin, uh, looking green, so we're usually adjusting and you could do it in curbs, but it if some problem presents itself where there's like, you know, a shadow side of the face looks green and the rest of face looks ok, you can use the same thing, but you're tryingto make it, push it towards magenta, so we're moving away from yellow into magenta to help make the dark skin look right. Um and yeah, way can tolerate the magenta equaling yellow and really dark african skin, and that looks better, you know, caucasian skin, it looks like sunder, but the darker the skin is the more likely going to have more magenta on, but I'm not higher than you. I've never seen it work with magenta higher than yellow, but so yes, you can use this technique for african american skin, but it's a be moving in a different direction. Typically sand picture, you may have to do two different adjustments for each person and just mask it in, ok, but you know, in this case you know, soft edged brush painted in mask it's. Fine. We don't have to get really trick because it's easy to kind of just painted over the skin where you need it. Okay, okay. Thank you. Want another question? Sure. Ok. I just want to ask while we're on this topic. Ah, hybrid spider. How would you deal with the problem of monitoring color adjustments in other parts of the photo when using this method for vibrant images for vibrant images, vibrant images? Well, yeah, anytime we're shifting the hugh around if she was wearing a webb's red sweater or something like that, I have to be worried about that. Or, you know, the red tie. The guy's nose is all red and he's at the party and it's like no, you know, he's, the he's, the groom's father. You cannot have it looking that way. So you do this adjustment on his nose and then the tide turns orange instead of red. So it's like the problem with this lips, I have to mask it off, but it's fairly easy to do. Uh, and in some cases you're going toe instead of painting black on a white mask, you would just black everything out so that it's not affecting anything and then just painted over the skin so you'd paint white into a black mask over just the skin, and, you know, that would be the other way of doing it there would isolated to just the area that that you needed to adjust. Okay? All right, so are we ready for the fun stuff? Is like that that's doing touching stuff, right? So, you know, there's there's all kinds of approaches, the classic approach is using the retouching tools and, you know, I would get in there and, you know, maybe just start cloning or or healing, uh, spot hailing brush is good for smaller things, um, and there's no riel like secret to that, you just got to be really patient and work it, uh, but I can show you a technique that maybe you're not that familiar with because sometimes you less is more we don't want to go to heavy handed, um, so we can dodge and burn areas to kind of knock back darker line's s o, for instance, I'll owe a work on some of these patches and some of the lines in the face, but not by removing them, but by just lightning them up, and what I'll do is I'll make, uh, an overlay layer, so I'm going to make a new layer. But I'm going to hold down the the option key while I do that and click and you make a new layer, so I get a new layer options. Okay, so this is going to be my dodge and burned later, I'm gonna change the mode from normal to overlay, okay? So normal toe overlay. And now, as soon as I change that, I get this little option fill with overly neutral color fifty percent grade so I can check that and I get this gray layer on the top, which is does absolutely nothing because fifty percent gray is neutral doesn't do anything but where it deviates from fifty percent gray it's gonna have a corresponding effect in the underlying image so I can use the dodge and burn tools will use the dodge tool first. Ok? And I'm gonna be dodging mid tones. Uh, I'll make the, uh, back we turn that off. I'm just going to resize the brush now, make very small brush and zoom in there and just, uh, very. Tiny this works a lot better oops let's make my exposure much less so I build it up slowly so I'm kind of in the ten to fifteen percent range and then I'm just dodging into wrinkle and again this is a whole lot easier with welcome tablet which unfortunately don't have here um but we're just this is a good way of avoiding the kind of messing with the skin texture where you know if you if you want to just do very light sort of beautifying here I'm not trying to eliminate all the wrinkles you know let's just say she's happy with the way she looks and she doesn't want to look like a twenty year old uh but we're going to still do a little bit of a favor and we're gonna take out you know, you know, maybe you could work some of the darker freckles just a little bit just tow kind of dodge them back, right? So I'm just going around and dabbing away at these darker patches and you know, uh you just kind of go to your happy place and just keep cool steadily, you know, there's no there's, no shortcut here uh and a lot of retouching is like this just with a small, tiny little brush poor by poor we're you know, we're knocking back the dart and so I'm good talk about on off you see what I've already done okay, so uh you can get in there and really do a lot of retouching this way um and that that sort of detailed stuff kind of pays off also in sort of total shading you know? So I think there's a shadow here that's really making this highlight stand out to try and burn the highlight down it's going to start looking weird so the highlight will kind of go gray and it needs to get skin color in it so I'm you know, it's difficult to knock back highlights that way but I can light in the shadow next to it which will help it out so I'll get a brush size it sort of matches that that shadows size and just kind of, you know, knock it back just a little bit and it sort of take the curse off of that that highlight because not next to a darker shadow same thing over here maybe I can can knock this shadow back just a little bit shadow side on the nose here just a little bit okay now for me to go around the whole face and kind of like do this take a long time even I a cz good as I am I'm not I can't work that fast, so I'm not going to force you to sit here and watch me do that but just to get the idea this is a very good strategy for sort of minimal retouching and um we are probably going to need to do some more retouching I know there was a question earlier about highlights when you have like, these glossy highlight it's how do you knock those back? Um and you know, typically we don't want to eliminate the highlight because that's what's giving the shape to the face but when things go toe this kind of sweaty white look, you know it's usually bad so we'd like a way of dealing with that um so let me see I'm going toe I'm going to try a technique here that works really well in l a b this is a little strange we're not used to converting our document into l a b so I'm going to I'm going toe work on a copy yes, I see a hand raised we do that we're going to do that for folks that don't know could you explain what led leiby colors lately is one of your image color modes? So we see appear we're rgb color stands for a green on blue cm like a we were looking at seeing why numbers were very important so that stands for your subtracted color space of siam, magenta yellow and black that's more for print you know rgb is how we capture images leiby is a very strange color space but has some unique properties. It stands for lightness, it's, it's, lightness and a and b uh, it's um has three channels, but only two channels are color, so the l channel has all the luminosity. The total variation in it the a channel is the magenta greenness of the image is encoded into the h and the b channel in codes the blue yellow nous so it's, a grey scale channel, and what things that are lighter in the b channel are more yellow things that are darker arm or blue. Lighter colors in the a channel are more magenta. Darker colors are more green now, because of that, it has a kind of interesting idiosyncrasies and one of those idiosyncrasies we're going to take advantage of to help out with these white speculate highlights on her face. So I'm gonna take this whole document and make a copy, so I'm going to duplicate it. The image duplicate, and I'm going to go ahead and duplicate the merged layers duplicate merge layers. So that makes another copy over here and this copy I'm going to change into l a, b o r r r r channels a lightness channel, and then these two weird color channels the a channel and to be channel, and they're very strange. All right so people usually don't know what to do in l a and led what what is it good for it's kind of a strange space and it's it's the kind of it's the color space that's the connection color space when our when we use our color management transforms so everything is sort of kind of uh moved into and out of l a b when we're doing color transforms between co spaces but it has a unique property because of this separation of the lightness from the color um l e b has a has a way of encoding a color that is really bright bright enough that it's white but it can also be colorful in rgb as things get white they get less saturated so they start to lose color but in l a b theoretically it can encode color into those highlights right now it doesn't right now there you know there's no color so in in the the color channels it's like really neutral gray so there's it's not lighter or darker it's just sort of neutral but we can cheat it and an interesting thing happens when we do that let's see if that works for this image I'm going to keep my fingers crossed because I I never know and I'm going live I haven't tested this out but I'm going to create an empty layer here I'm gonna change the layer from normal to color and I'll get uh my brush tool and I'm going to sample you know a color on her face and we'll take a color that's adjacent to this this highlight colored from this shadow side I'm in a sample that and that's put this nice flesh color into my foreground color here and now in a kind of zoom in here and I'm going to paint that color right over the highlight now it it is painting that it's affecting the highlight an interesting way right it's sort of color rising it so that it's not white anymore and I can kind of do do this with anything that now I have to decide like how colorful I want that highlight you know, because it this may be a little too colorful so maybe I'll just change capacities these things can go a long way too just taking the curse of that white off of it because we want the highlight there we just don't want it so bright um and it's just easy to do this in l a b because I'm not affecting the color around it um I can kind of you know, maybe paint some of that that color into uh some of the paler skin color you know that sort of helps equalize that it's very easy to do this in l a b and impossible to do this in rgb because this is sort of uh this is a defect um it's photo shop is trying to split the difference between this impossible color that you're asking for this color that's white but also colorful and it's an impossible color and photo shop is like that's what they're calling for I'm gonna split the difference and kind of meet you halfway so it's tries to preserve some of that luminosity and put some of that color into it and that helps to kind of knock back that that white highlight so then if I if I wanted to continue retouching are working on this image uh I can bring this as a layer, you know, in on top uh but I I will emerge it to the background here so I will, uh merged down or flatten I guess I'm gonna merge down, okay? And then we will drag this back on top of the other document, so holding down this this is different because now I'm dragging image and not an adjustment layer, so I'm going to click with the move tool in the middle of the image and hold down the shift key and dragged that up to the other image until the tab pops forward and then dragged down while and keep my hand on the shift key and then drop it and it's put that you see the changes it's colored the highlight so it's not white anymore now you can just paint put paint over it to cover up the highlight um but a lot of times you just don't want to do that you don't want to take off the natural glisten uh but two and to really knock it back that's what you have to do is either clone over it or you know, cover it up we literally covered up this this helps a lot. Okay, so, uh way good we can keep going. Okay, so all right let's see what you have go ahead is actually going as long as you let us ask you many questions, all right? Yeah, yeah, uh, so, you know, maybe I would like to try to kind of, uh, clone over that or he'll over that were hell over this that's another strategy that I would use so, um we would take let's, let's, let's heal it. So I use this the healing brush tool for this healing brush and uh, the way I use this, I try to make the brush more less match the area that I wantto cover up and I'm in an empty layer. So I have to have tio, you know, we'll use a line sample and I have to make sure that it's I've got current and below so that I'm sampling from something if I'm in an empty layer, I can't have current selected because I'd be sampling and empty later so I want a sample from all the layers of current and below in this case and I want a sample from the area right next to it and sort of painted right over that and what they the healing rush does is it tries to blend it into the adjacent area so it you know when you're painting over it it looks like it doesn't match you know so I could paint here and it looks like a move that color doesn't matter it's never going to go with since I lift off it blends it in now remember I said I didn't necessarily want to completely cover this highlight so here I would reduce the capacity just a little bit to bring some of that highlight back okay, so that's that's why it's you know you kind of always want to be re touching on on a layer um rather than directly on the pixels of the image so um all right let's see maybe we'll do do a similar thing to this and uh we'll pick that area next to that highlight again to sample from and we'll paint right over it and it's already now this layers sort of transparent so then when it blends in you see we've already kind of knocked it back all right so far so good let's let's toggle down to the the bat where we started before everything so I'm going down to the bottom here, the ei icon, final down, the option key and click on that. I I can solo that layers, it's, turning off all the layers above it, and that's what we were looking like when we open this up in the photo shop and, you know way really did mostly just color work on this. We haven't really gotten too heavy with retouching, but we've had a huge improvement already. But wait, there's more, right? Because we really have to do. We have to do some more work on this.
Class Materials
Bonus Materials with Purchase
Ratings and Reviews
Luis
Skin tones correction and portraits editing are new to me. This course provides a set of tools for me to improve my portraiture work. Lee doesn't just show you how things are done, but also the reasons for the corrections. The delivery is a bit dry because the topic is quite technical. You can have a break between lessons, if it becomes too overbearing for you. I highly recommend to take this course, if you are planning to do portraits, head shots, or even senior pictures.