Using Filters, Reflectors, & Diffusers
Lesson 5 from: The Art of Seeing: Macro Techniques for Flowers and PlantsFrans Lanting
Using Filters, Reflectors, & Diffusers
Lesson 5 from: The Art of Seeing: Macro Techniques for Flowers and PlantsFrans Lanting
Lessons
Class introduction
03:17 2Macro Photography Overview
16:27 3Playing With Plants
49:33 4The Importance of Light
36:29 5Using Filters, Reflectors, & Diffusers
07:56 6Working With Afternoon Light
10:18 7The Lighting Toolkit Wrap Up
16:15 8Why Macro Photography?
04:08Lesson Info
Using Filters, Reflectors, & Diffusers
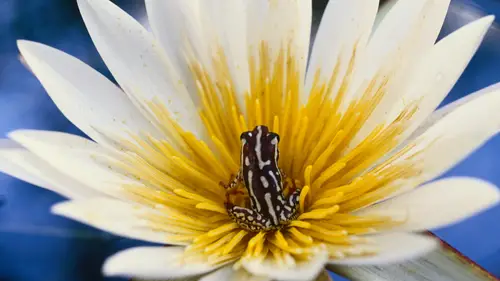
A few comments about these amazing tools. I've got two of these reflector shields, the same ones that you saw in the video. This is the bigger one, and you can see the diffuser here, and then the different surfaces. There's actually bigger reflector still, but they're not the kind of thing that I use with me in the field when I'm by myself. This is much more manageable. Now this, when you fold it, easily fits into a backpack. And then there's smaller ones still that are very convenient to use when you're actually going backpacking. Now what is not mentioned in the video, but I would like to kind of clarify that now, is these tools are especially useful when you have a direct light source. When you're dealing with overcast light, there's not that much direct light to reflect back into your subject. However, I've been amazed at times when even in open, shady situations, I can still find light to bounce back into my subject. But they're especially useful under sunny skies. Franz, do you...
happen to know the brand of these reflectors? Yes. There's several companies that make them now. There's a company called Photoflex, but if you go to any of the big camera stores, or the online camera stores, you're gonna find half a dozen other companies that make them. And as I mentioned earlier, they also make them in different varieties now, with devices that make them easier to clamp them onto tripods or light stands. Great, thank you, Franz. And one more question before we move on, from Petrol. Do you ever use mirror lock up when you're photographing with your tripod? That's a very good question, and I meant to make a comment about that. You may have heard that some of the shutter speeds that were applied in the video were becoming a little bit longish. And when you entered a territory of shutter speeds below 1/30th of a second, you really wanna start thinking about applying a remote release, or applying mirror lockup first. So, on my camera, I have, first of all, I have a GPS unit, which is a very interesting device that is always attached to my cameras. It geotracks every picture I make, and because I do so much travel, it means that part of the metadata of every image includes kind of the actual location. Very helpful. Then, on top of my GPS unit sits an electric release. This is the transmitter. The receiver sits on my camera, and this is how I can trigger the frames. This is an invaluable tool, and when I look back at the pictures that I just saw myself make in the arboretum, I realize I really should've used that tool to achieve the maximum sharpness. Franz, do you annotate what just users are using in any way? 'cause when you get back in the lab and the classroom, you remembered you used the gold one, or the silver one, or, how could you tell? (laughs) And that's a good question. I was actually in that recent case, I was dropping little pieces of paper on top of the bush, so that we could track the progression of going from one surface to the next, but that was for instructional purposes. Most of the time, I pretty much know what I'm after, and when I'm in doubt, I will just apply different surfaces, and I look at 'em after the fact when I download the images. But here's a good lesson to keep in mind. I wasn't very clear about that in the video, not as clear as I can be now. You really want to appreciate the intrinsic color in your subject, and then find the best surface to match the reflected light with. And if you're looking at something that has an intrinsic cool color, a blue, for instance, you don't wanna fight against it by reflecting a really warm light into it, because it can clash with each other. You wanna go where the color wants to be. Do you have a preference to the maximum aperture to reduce the diffraction at f/36 and f/22? That's a very technical question, and people ask me that quite a bit. Yet, it's good to make a distinction between a maximum depth of field, which you can achieve by closing your aperture all the way down, and achieving the maximum optimal sharpness in your lens, which typically, you can render between f/8 and f/11. Now some purists, people who do very technical photography, may say, well, you can't close your aperture, because you may lose a little bit of sharpness. But for most intents and purposes, I'm not so bothered by that. If I need f/36 to maximize my depth of field, that is typically in situations where I have a lot of detail that I want to capture in my images. And that detail will mask any slight decrease in optical quality. Franz, can you explain, when you use a backdrop, the velvet, are there any studio techniques that you can transfer into the field for controlling a backdrop? Thanks for asking that, Larry, and that gives me a chance to bring out a very affordable piece in my macro kit, which is a piece of black velvet that's been traveling with me to many locations around the world. And I can drop this in behind a plant, and I can clamp it with a couple of document clamps. Where are they? Document clips, I don't see them here at the moment. Or sometimes, I just drop them loosely behind a plant, over a bush, and then this is my magic black backdrop. This is what we used in one of the pictures that I started the class off earlier this morning. And when we come to the next section in the class, I'm gonna talk a little bit more about how we apply different kinds of backdrops in studio settings.
Class Materials
Bonus Materials with Purchase
Ratings and Reviews
JIll C.
I had the pleasure of participating in this class as part of the live studio audience in the Creative Live San Francisco studios. I really enjoyed the format in which two students had been pre-selected to visit the UC Santa Cruz Arboretum for a photo shoot with Frans Lanting about a week in advance of the class; then the videos were edited and played out during the class. Frans stopped the video frequently to clarify and supplement the information provided, so we weren't just sitting in a room watching pre-recorded material. Nor were we just listening to him lecture for hours. It was actually a surprisingly dynamic format. I also enjoyed the final session in which student-submitted images were critiqued by Frans and edited by Jim Cetechi (Creative Live host) real-time. It was interesting to learn how our images could be improved with just a few simple techniques, e.g. cropping, contrast, highlights etc. - all done in Lightroom. Frans helped us to see the potential for perfection in each image. I was thrilled when he didn't find anything to "fix" in my images :) Frans seems to truly enjoy "playing with plants", and helped us think about how we can use our photography to portray the beauty and significance of the natural world. I like the fact that he helped us to think about the potential of photography as more than just a hobby. He is an enthusiastic and personable trainer, well-versed in all aspects of photography, not just macro photos. I can't wait to add some of his techniques to my photography arsenal.
North San Francisco Bay
This workshop will give you everything you need to start macro photography, appreciate macro photography, and/or take your personal skill set to the next level. Frans really is a fantastic instructor whose love of teaching is obvious and infectious. He provides you the technical tools, inspiration, and has a unique ability to help you refine your own vision while simultaneously broadening the possibilities of that same vision. His respect for individual artistry coupled with his fined tuned eye of decades of experience puts him in a very elite class of photography instructors. You can expect to have a list of gear (much of out inexpensive and very effective) to put on your wish list as well as the urge to immediately go out and try what you have learned. If you have gone so far as to read this whole recommendation then go ahead and purchase the class. You won't regret it. Have fun!
a Creativelive Student
Frans is an inspiration. Not only is he an incredible photographer, but also he is an equally wonderful teacher. His ability to explain both the simple and complex in easy terms -- as well is the ease with which he shows as he speaks -- makes learning from him a treat. You can also see him come alive with excitement as he 'plays with plants' which makes you all the more excited. So glad I was able to take this course with him! Thanks, CL!