Rock Climber: Environmental Portrait
Lesson 16 from: Advanced Lighting for Adventure PhotographyMichael Clark
Rock Climber: Environmental Portrait
Lesson 16 from: Advanced Lighting for Adventure PhotographyMichael Clark
Lessons
Class Introduction
03:25 2Evolution with Lighting
04:44 3Why Use Artificial Lighting?
06:43 4Pre-Production and Pre-Visualizing
07:16 5Equipment: Overview of the Gear
25:28 6Equipment: Selecting the Right Gear
24:05 7Strobes vs. Speedlights
08:01 8Lighting 101: Flash Sync Speeds
14:35Lighting 101: Flash Basics
24:46 10High-Speed Sync (HSS) vs. Hi-Sync (HS) vs. HyperSync vs. Leaf Shutter
14:50 11Gear Requirements for Hi-Sync (HS)
12:29 12Flash Exposure
21:39 13Pre-production and Location Scouting for Rock Climbing
06:02 14Gear on Location: Rock Climbing
07:04 15Rock Climbing Photography 101
11:37 16Rock Climber: Environmental Portrait
24:22 17Finding the Shot
13:48 18Capturing the Action: Rock Climbing
07:09 19Shooting at High Angle: Rock Climber
21:15 20Digital Workflow: Overview
16:09 21Editing and Post-Processing of Rock Climbing images
30:17 22Cyclocross Photography 101
11:32 23Location Scouting for Cyclocross
05:36 24Gear on Location: Cyclocross
11:42 25Intro to the Cyclocross Rider
16:29 26Capturing Action: Motion Blur
43:13 27Communication with Athletes
18:55 28Variations of the Shot
23:21 29Cyclocross & Trail Runner Portraits
40:40 30Location Scouting & Planning the Shot
09:20 31Capturing the Action: Lighting Set Up for Trail Running
37:01 32Editing and Post-Processing of Cyclocross Images
21:34 33Editing and Post-Processing of Trail Running Images
07:52 34The Business of Adventure Photography
17:42 35Image Critique with Chase Jarvis
48:41Lesson Info
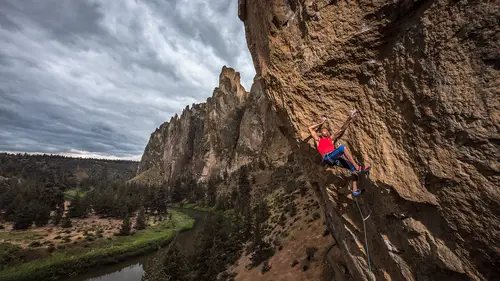
Rock Climber: Environmental Portrait
We're gonna do another video here and this is environmental portraits with Kai Lightner. And you can see how I pulled this off. Let's go ahead and roll a video and then I'll talk about it after the fact and show the images that we produced. Alright, we're out here at Smith Rock. We've got Kai Lightner, amazing rock climber. Where you from, Kai? Fayetteville, North Carolina. Awesome. And how long have you been climbing? I've been climbing for 11 years so most of my life. Most of your life, that's awesome. And you know, I'm a big fan of yours. So I'm super psyched to work with you. You're the future of climbing as far as I've seen. So I know those are big shoes to fill. I photographed Chris Sharma when he was 13. I see the same thing in you so it's super exciting to work with you, so now we're gonna go ahead and get set up for our portrait, we have all the elements down here but we're gonna build a lighting set up and post up Kai on this rock up here where we have the rope and sh...
oot a few portraits before we get rolling with the action. So I'm gonna put you up there first to do some test shots. Just to show how I'm doing this. And then we'll get it rolling, we'll take you off. We'll bring Kai out, if it's okay, take your jacket with you and then take it off and put underneath the ropes so it doesn't blow away or something and then we'll do a bit with it and then a bit without it. It's a brighter color. It is a brighter color, it's got a really nice version of your logo on it and we're trying to imagine that it's a little bit warmer than it actually is which it would be on a typical day, so. Alright, let's go ahead and get you out there. Go ahead and hop up, here, let me move my tripod out of the way, for this set up, what we have here I'm gonna shoot with the Hasselblad today. And I've just chose the Hasselblad because it's a portrait. It's really easy to set this up with a Hasselblad. It tethers incredibly well. We have it tethered to my laptop down here so I can see what's going on, just make it super easy. If I wasn't shooting with students, I probably wouldn't be tethered for this but it just makes it easier for me. So we have one ELB 1200, we have just one head. These are the action heads because I'm shooting with leaf shutters on these cameras, I need the fast flash duration of the action head so it's not the HS high sink heads. Transmitter is set to speed mode which is also a thing you need to, for a Linchrome at least, you have to set the transmitters to speed mode to use these heads with 1/800th of a second flash syncs that this can go up to so first things I need to do is I need to establish the ambient exposure and to do that I have one of our participants, Aaron out here, in particular, I chose one of our participants to do this with because typically I don't use the athlete, I don't want them out there freezing while we're doin' this whole thing. I want him to stay nice and comfortable and warm so that when he comes out, he's feelin' good about life. And I wanna dial this in with a stand in before he gets here so we have killer shots right off the bat. So the other thing is we have the Dvachta on here. It's a one light set up for this. Tom's just gonna hold the stand and that way we can maneuver the light really easily. We've feathered the light off is you can see so it's tilted up just a little bit. That way we're not lighting up the foreground here completely and also it's just easy for Tom to just move the light forward or backward just a hair. It's not gonna change the amount of light that's hitting our subject too much to feather it off a little bit or put more light on the ground. Let me just turn this off, Tom. Alright, so let me go ahead and take an exposure here and just see what the ambient looks like. Also just of note, this camera is much slower to use so it definitely slows down the process. Essentially I'm exposing for that sky back there. When you see these images, Aaron, the background is in full darkness, it's not pitch black. There's a little detail on the shot but there's not a ton of detail so I'm gonna add light to all of that stuff. Let's see what else we can open up just a little bit here. That opens up that detail a little bit. The other thing with the Hasselblad is it's got incredible dynamic range so it's really difficult to full blow out the blacks or clip the highlights on this camera so even though it may look super silhouetted over here, it's easy to pull out those shadows. So let's go ahead and turn on the flash. And Tom, can we have you go over there just a little bit on the other side of the case, you want me to hold that? Alright and there's nothing in that bag so you can just stand on it or there you go. This way we can get the camera a little more off or the light a little more off the camera, perfect. So pop the flash, did it pop, it did, alright. Thank you Aaron. See what that looks like with a flash, alright. So we started at full power because we're not using high sync shutter speeds, we're technically using the leaf shutter which goes up to an 800th of a second. I'm only at 320th of a second shutter speed. So I'm not even shooting at really fast shutter speeds for this camera, the light looks pretty good on him. Let me just zoom in real quick. I could use a light meter with this camera and go up there and test it but I think we're already there. That looks great actually, we got lucky. So alright, let me zoom back out. So go ahead and come down if you want, be careful. And Kai, we'll bring you out now. And so let's just do another test with you, Kai. So let's have you move over just a little bit where they were standing, just right in there. Let's just do one more test and you gotta have a relaxed stance, maybe put one foot out in front of you. There you go, just like that, we'll just make sure the lighting looks good, the other thing you might notice when you see these pictures is I'm shooting really wide, I have a 24 millimeter lens on this camera which is the equivalent of an 18 millimeter lens in DSLR world, I've got 50 megapixels here so I've got truck loads of megapixels, I like the shooting sky coming over. And I could even create a really nice panorama out of this that's still 25 megapixels just by cropping it down, so. Now let's go ahead and have you flake the rope. It's okay if you just flake it straight under the rock or something maybe, like just flake it onto the rock and then we can flake it back onto the bag. And again, can I have you move over back to where you were. There you go, cool, there you go, perfect, just like that. I'm just gonna keep shooting here, Kai. Can I have you move over this way just a little bit right there, alright, and maybe put that right leg out just a bit, like bend the knee, there you go, like that. There you go, superman pose and you can do it fast. You don't have to do it super slow. Really sling the rope around, that's good. That gives me a little more action. And don't just look at me. Just do what you're doing, imagine I'm not here. Alright, let's see how that's lookin'. That's pretty cool, we got the rope flying around there a bit, I'm gonna come in a little closer here. (mumbling) The thing I'm going for here is a relaxed. Like you're doing this and we're not necessarily here. Yeah, might blow away, do you wanna flake it back onto there, go for it, alright, I'll just keep shooting. Go for it. You okay? Alright, I'm just waiting for the rope to fly around there when I'm hesitating. (mumbling) Flinging it a lot, yeah, not way off the bag. Ah, beautiful, oh, that was great, you doin' okay? You're not freezing? I'm cold, but. We're makin' great pictures so we won't keep you out there forever, oh, that was good. Let me, hold on a second, go for it again, nice. The light's totally catching the bag. Don't put your hand too high up 'cause that looks a little weird, maybe just keep your hand on it but just fling it, it's okay, you're doin' great. That was good 'cause your hand followed it right there. So I think round two of this, do you know the butterfly coil where you just flake it one way or the other so you're at the start of the rope and then start a butterfly coil and we're not doin' the whole thing 'cause I just want the loops flying from hand to hand as you do that, do you want your jacket for this part? Okay, let's actually, I think the light, pull the light back, I'm gonna go up to 400th of a second. I've seen a little bit of clipping. Maybe I'll go to F8, alright, let me just take one more test picture, alright, that's golden, go for it. Cool, those are pretty sweet, let me move in even closer. Make sure I'm stable here, alright, go for it again. Nice, that's sweet, I'm gonna pull the tripod in just 'cause it is an unstable position. (chatter) You doin' okay, we'll just take one more shot, go for it. I'm gettin' rained on. Yeah, yup. (model inaudibly chattering) What I'm doing is there only one focus point on this camera, it's very old school so I have to focus on your face and recompose, then focus on your face, then recompose. I thought I wasn't interesting enough. No, no, no, 'cause this lens is seeing super wide so I don't want your face right in the middle of the picture, I want to have you up in the upper left. And there we go, nice, the black jacket here, there you go. I have a lot of things in there. You have a lot of things in there. I have my contacts, my glasses. We'll just do literally three more and this time around you're looking at me every time so I don't want you looking at the camera, look over me or something as if you're doing this and you're just thinking about the next route you're going to be doing or the moves on, you haven't been on Chain yet, have you? Are you excited to get on Chain, yeah, it's super classic. Ultra super classic so go ahead and get rollin' with that. I wanna get a little rope goin', there you go. And there you go, perfect, just like that. Just keep lookin' up at the roots. And let me move back, let me just sit on this rock here. It's okay, I'm just gonna sit down here. I'm only using the tripod as a stabilizing force just 'cause it's hard to focus this camera. There we go, right there, nice, those are great. And it stopped raining, keep goin', nice, alright. All I heard was stop. No, sorry. It's a lot windier over there than it is right here. Alright, keep going, nice. Cool and let's have you look off over there towards these climbers a little bit. There you go, just like that, perfect. You're doin' great, Kai. Yeah, my contacts are effected by that wind too. Nice, I think we got it there, that's pretty sweet. Go ahead and just pull the rope out of the. It's catching the, every time you pulled it up. Go ahead and pull the end on this side, there you go. Just pull out some slack and lay it, there we go. Now let's go back and shoot one more, nice, we got it. Alright, that's it, I think, so, so I'm looking at the sky here and you can tell even though this looks pitch black down here in the bottom, it's not even clipping on the blacks in the histogram, does that make sense? So and then the starting point, we got lucky. I just turned the pack up to full power because I felt from that distance we're probably gonna need full power just to overpower the bright sky behind him and it turned out to be perfect light. We're not clipping highlights at all. One thing when we're shooting portraits. I definitely zoom into the subject's face and the skin and I don't want to be blowing out any highlights on the person's face or in this case it's a full body shot, on any parts of the skin and also I checked it with Kai as well just because he has a different skin tone. Looks great on him, the histogram still looks great. So once I get that exposure established, I'm shooting pretty wide, with the Hasselblad I tend to shoot a little looser than I do with my Nikon because I just know I have so much resolution, it gives me more options in the cropping. I can take a vertical out of that. There's room for like Climbing magazine or whatever logo for the magazine if they need it. I can take a panoramic, I can crop in. We can do whatever we want with that. So and you also saw I kept moving in during the shoot to get closer and closer so I have all options. So just keep shooting, once you got the lighting dialed in that's when you wanna really focus on your subject, really work with him. I looked at the images at one point and for these first parts where he's flaking the rope, we definitely had him paying attention to what he's doing. I don't want this to be, it's not necessarily a full on portrait, right in his face with his eyes and then I'm having him, then we're paying attention to the rope and how the rope's flaking up and also paying attention to how the rope's catching on itself so if he's flaking and a big pile of rope is coming out, that means something's not looking right so I want him to know, to look like everything's going smoothly with the rope flake, ya know. Climbing, that looks great, just the wave of that rope rolling down so there's lots of options here, like this, that, he's looking at the rope. He's not looking at me and then the butterfly coil over the shoulders and then he gave us a smile in a few of 'em, like there he's looking a little more intense. We've got all kinds of different options. This rope bag in the foreground, it's maybe a little messy but that's real, we're thinkin' about. I think that's one of the better ones. I think that might be the best one. And obviously you're looking at this. That background's pitch black on those cliffs. I'm gonna pull that out in post. I could've dropped the shutter speed even more to bleed in the background but it's not clipped on there so it'll be totally fine. Whenever using leaf shutters, you definitely wanna make sure you have a flash duration faster than your shutter speed, of course at 320th of a second, that's not a very fast shutter speed so it's not that hard to pull off but if I'm shooting at 800s or 1000th or even 2000th of a second, like on the X1B, then the flash duration has to be at minimum 2000th of a second and the good news with the action head is that at full power, which is the lowest flash duration on that pack, I think it's still at 2600th of a second. So we could achieve the same thing with pretty much any camera, we just change our shutter speed. We'd use the same head, same modifier, all of our DSLRs could pretty much get the same shot. With that portrait I can nit pick it and I will. For sure here, these I'll just show you a series of them worked up so you can see what I was talking about. The beauty of the Hasselblad and 16 bit image quality is that you can work the image over the coals and it doesn't start to fall apart like it would if it was a DSLR image which it's a small difference. But it really helps in some scenarios. You can see already here that the cliff behind him, I really opened up the shadows. I haven't done the full HDR thing here. But I've done like an in camera, just adjusting the shadow sliders and the highlights and we'll talk about this later. With him and that sky, that's why I exposed the sky and maybe looking at this now on this TV, I'm like it looks a little over processed to me. So that's part of the taste in what you're trying to go for. I will say the rope, I should've stopped and dealt with that, it was a nightmare on some level. Because he was pulling up parts of the rope and the whole wad of rope was coming up. The rope bag was all over the place. I should've just taken the rope bag out of the equation because he was on a nice rock that wasn't really dirty. You typically have a rope back to keep your rope from getting dust and dirt into it. So because I was teaching and trying to shoot and talk to the class, it's hard to keep everything. If it was a portrait I was shooting on a normal portrait shoot or a normal day, I would've spent a lot more time with all of that stuff but as you will see in the next set of videos, it started raining shortly after this. It was raining while we were shooting this portrait so I sped things up and didn't hang out as long as I would to really shoot the full portrait. Showing some of these other pictures. So we kept working, I kept talking to him as you saw 'cause Kai is 17 and he's an exceptional rock climber. But I don't know how many times he's had his portrait shot in a scenario like this and what you don't see in that is that there's like 20 people standing behind me. And so imagine you're 17 and you've got this whole stadium seating of people watching you flake a rope while you're getting your portrait taken. That would be a little, even for me, right now, that would be weird so but he did great. And I just kept talking to him, I kept shooting. This might be one of the best portraits 'cause the bag doesn't look as bad as it could. I kind of like that the boulder's angled and I had him start looking around. At certain points, I noticed that he had a huge smile on his face which is totally fine but for a serious portraiture, I tend to go with a dead pan look. So I just want that, ya know, like no expression, as you've seen in a ton of my other portraits. Or I want him doing something else, thinking about something else, I here I told him to look at another rock climb and think about that climb, Chain Reaction's only a few lines over so or look at other climbers on a cliff. This is a nice sullen moment but the rope bag's a total mess down there, Photoshop could come to the rescue. But that would be a lot of Photoshop to take that out. And it still looks like a mess. But or maybe I just crop it and crop the rope bag out. And one of the things you'll notice is that I feathered the light up, what we could've done is feathered the light down, so feathering means I'm not pointing the light at the subject. So feathering the lights if you're in a studio scenario, let's say somebody's taking a portrait of me, the light is right here pointed directly at me. When you point a soft box or any light source directly at a person, there's a hard light source in the middle of that soft box just by the nature of the way they work so to get the ultimate soft light, what you would do is take that soft box and rotate it out so that all the light is going past me and there's just a little bit of light coming off the edge of that soft box hitting me and that stuff coming off the side of the soft box is the soft light so that's called feathering and in this case I wasn't feathering side to side, I was feathering up. I was feathering up so that the ground is not lit up like a Christmas tree and so that you look at him and not the ground, does that make sense? And that's just a quick and dirty way to do it when you're on location outside. You could put the light down and that could put a giant flag in there to block the light on the ground but then that would necessitate more people, more time. It just depends on what you're going for. The other thing to think about when you're feathering a light especially like that soft box. I think we had double diffusion in it. So we've already lost two stops of light before the light even gets out of the box. Typically each piece of diffusion which is the white surface on the front of the soft box. You lose about a stop, two thirds of a stop to a stop with every piece of diffusion so we're using a 1200 watt second head at full power but out of the box is only coming the equivalent of 400 watt seconds. So if you're really gonna diffuse your light source a lot, that's where you need more power on your pack. And that's why you would have a higher power 1200 watt second pack as opposed to a 400 watt second pack. If I was using the LB400s on that shoot, I would've had to barely use any diffusion or maybe one diffusion and put the light closer to him to pull it off with the light balance. So and the other reason I kept having him do the butterfly coil above his head is because he has a very unique physical traits in that his arms are six inches, his wing span from tip to tip of his arms is six inches longer than he is tall and he's about the same height as me six foot one or two. And there's not many people in the world that have a plus six wing span which he's obviously wicked strong but that also helps him reach holes that other people can't even reach so that's kind of shown off in this picture too where he's holding the rope over his head like this and I'm not sure which of those pictures is the best picture, there's a few of them I like better than others but if I had more time, I probably would've massaged it quite a bit more. Typically with a portrait shoot, I'll keep them out there until I feel they're ultra uncomfortable. You feel how they're doin' and you can see he was freezing at one point so we had him put on his jacket. He's also sponsored by Adidas so the more Adidas clothing we get in there, the better for him and his sponsors. And one other note, you saw me putting the Hasselblad on the tripod but not actually putting it into the tripod head, the reason being there is we dropped the tripod accidentally on the way in and it bent the clamp pin so I couldn't open the clamp to actually use the tripod head so stuff happens and you just adapt and use it on the day you're out there.
Class Materials
Bonus Materials with Purchase
Ratings and Reviews
norah levine
This is a course that I could watch repeatedly and be able to learn something new each time. Michael is a truly an expert in his field and is so generous with his knowledge. This course really breaks down the process of adventure photography, but it's more than that. I don't think you need to even be an adventure sports photographer to get tons out of this course. Michael is really good at breaking down some very complicated technology. Thank you!
a Creativelive Student
Great course that combines the technical aspects of shooting with light in different situations, with the art of making a great image of athletes. Michael is a great teacher and I'm sure his lessons will continue to help guide over and over again!
Jeph DeLorme
Great class with dozens of tips, ideas and lighting strategies for tough outdoor lighting challenges. Advanced class taught in a way that allows even a beginner to get a handle on lighting tough situations. The location videos provide real life examples that make this class a definite must have for my Creative Live collection. Thank you Michael Clark and Creative Live! Jeph DeLorme