Settings Chart for Night Photography
Lesson 5 from: Creative Wow: Night and Star PhotographyJack Davis
Settings Chart for Night Photography
Lesson 5 from: Creative Wow: Night and Star PhotographyJack Davis
Lessons
Pre-Show
09:45 2Night and Star Overview Part 1
35:26 3Night and Star Overview Part 2
24:26 4Night Photography Gear
42:33 5Settings Chart for Night Photography
44:45 6How They Took That Image Part 1
19:48 7How They Took That Image Part 2
27:59 8Night iPhone Photography
17:29Lesson Info
Settings Chart for Night Photography
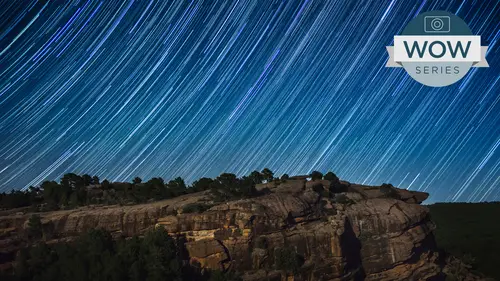
So shall we start with your wonderful starting point chart? Way? Certainly can't. But I'm interested to see what you can do with, uh because obviously you're changing all these settings at night. Yeah, well, that's why I tell my students you really need to know your camera. Really? Well, because, um, sure, you can get out the flashlight and shine it on there. But if you're photographing with somebody else, you may be ruining their photo or you're ruining your own I sensitivity. Certainly. So I really encourage in my students to know exactly which buttons aware being about the assemble and disassemble or tripod in the dark, attached things and get all their settings to what, you know, thirties be ableto change it to time, priority mood and shut. 30 seconds and so on in the dark. But you can't really operate your camera completely at night in the dark. You don't have that. Memorize that that much? I don't know. I think I probably could barely a lot of the not all the hunting, but some of...
the way. Can we try that here? Can we turn down the lights in the audience to turn down all the way, All the way. We turn off the TV set to, uh Okay, so this doesn't make for great TV. I guess it was. Let's turn back on the lights and figure out how we can do this. Oh, son of a gun. I just haven't have a blindfold. How many people would like to see Bren completely operate his canon DSLR way? Do want to make three days straight and making a fool of myself. You should, if you have not seen brand creative fool of himself in both the underwater and the motion blur class. He's very good at this. And, uh, we will see right here What brand can dio with his DSLR while completely blindfolded. Okay. Can do what? That's right. Okay, so let me go ahead and change, because, of course, you probably already done that, so yeah. Wow. Can Aiken dio Okay, wait a minute. You've got this on automatic stupid person mode. Wait a minute. There's nothing different about automatic man grabs. Okay, let's go in here and turn it on. Yes, we do need to turn it on, Brand. I don't know how to turn on your bloody camera. Oh, that's going to be? Oh, you did that on purpose. I have another bad over the wall. You change the settings on a completely dead camera. Kwan, if you really were good, who needs electricity? So what am I gonna try to do here? I guess, Like, if I was gonna do a milk you, like, say, we're trying to set up for a Milky Way shot? Yeah, it would be That would be 30 seconds. So I tell a starting point on deal. See this on the chart? I started with 30 seconds, and I s 0 with as wide open as my lens goes, which normally I do with my fish, I at 2.8. So, like this is an F four lens, so I might want to do I s 0 6400 Compensate for the left light. Seriously feeling like you changing other crazy minutes? Yeah, I'm gonna make sure that you're on dust moment. And so, of course you want to start out before you go out for night photography. You might as well set your camera up for all the basic settings that to get close to what you think you're gonna want so that you have fewer things to change. My Jack. Okay. Undoing here. Okay, this is your camera. Put your hand up. Okay. And I guess we're going to set it up so that this camera is gonna see the lenses on this end. Yeah. Yeah, thanks. Yeah, I appreciate that. Okay, So I don't know if I hold it like this in the audience. Watch what? I'm changing as I go. I think that what we're gonna do is if you can do it a little bit like that, the camera's gonna be right over your shoulder. So if you can do it from that, not only are you not able to see, but you're awkward is Well, okay. So what was that? I've got some broken glass. Was. And if you could put your feet on this broken glass, OK, so it feels like you left it on the slightest switches over here. I had no idea what MODY left it in. So I'm going to rotate it all the way to the end, which I know in my cameras. See, three, which is my grab shot setting. So, um, I have that saved to do this. 1 16 hundreds of a second auto. So so that, like, if you know, just walking somewhere and want a quick take a picture of my family or something. So if I were doing star trails, I would need to go down to see, to see one and then bulb, um, in order to do the two minutes. But if I'm doing milky way out, I know that on C three. I have it in time. Priority, mood or shutter priority. Eso a Nikon s here. The TV essentially. But 1600 of a second you get, from which way? Uh, I mean, I'm gonna go all the way to be an enemy. They're gonna be 1 8000 there. One for 30 seconds. I can't remember which direction that. Okay, so and then my, um, buttons over here are the one with the ridge is the one with the I s. So I think so. And then a go all the way to the left, I think is auto. And then it would go low. 102 100 for I might have 30 with stops on its shutter speed. Oh, I am. That's not the right button, then starting to illustrate the point of you know, it's better to know these things. It's really It's hard on the right, so But I want it. Okay. This is the light button, I believe, which is very useful in the dark to get that back light so you can see what's on the screen. And, like, so light. And it's Mr Reid drive, So All right. Yeah. Clue into your coffee at the break. So it could be that I'm not changing right now. You Are you okay? This wasn't pushing hard enough on the button. Okay. All the way to the left for auto. Yeah. Yeah. Okay. And low 100. And then it started in two. So you were OK. That's a custom setting. Whether or not you have a foreigner in a back two seconds, not pressing hard. My buttons get salt water and then with underwater, and they get finicky. Okay, So gosh, mirror lockup is going to be there really, impossibly difficult. One. So many button is under my thumb there, but my many button sticks really badly. So hopefully the menus up and I have my custom menu, and I know that mirror lock up, I think is three down on my custom in years I'm gonna set and then turn it on set again press menu to get rid of it back in shooting. So hopefully I s 0 3200 I've got hopefully 30 seconds in shutter party mode. My appetite is just going to be set for me. I would probably rather be in manual mode so that I can just that that guaranteed wide open because it's going toe under expose the cameras really gonna under exposed So I can get around that by using the dial on my back and crank up the over exposure toe. Plus, I think as far as it will go on, this game was plus three. So the camera is going to try and turn the night sky in the, uh, it normally try to make everything 18% gray. But when everything's really dark, it sort of says, OK, we're doing night, but it doesn't know, So it's gonna expose for, like, uh, street lights or whatever bright points of light. But it's not going to try and get the Milky Way like it doesn't know that you're trying to get that you need to over expose or just go to manual. 30 seconds F 28 32 100 then from there you can look at the image that comes on the back of the screen. You know, the history rams much better See whether it's in the upper right quadrant. That would be the basic starting point other than attaching it to a tripod that I would do for tonight. That was really considering that your camera is giving you some trouble with the pressing the buttons. I'd say that that was quite a president. You knew where everything waas, even though it was giving you the challenge of not changing, not having the anyway. It's mostly just you get the idea that it's it's challenging, so trying to remember some of those buttons will speed you along. One thing I'm nothing. I have it on high speed, continuous shooting, which is good for the time lapse if you're using the external remote. But if you don't have one of those, you can put it on to second timer, you know, and then, especially with mirror lock up it put the mirror up, which makes vibrations and then waits two seconds and you've let go that don't touch it, and two seconds is enough to let that shake settle out. And so then it's not getting any vibration movement, which will show up in those little thing go pickle stars thing that I found interesting what you started off with when I was manipulated camera and that you were very sneaky with his. Well, I've got custom settings already made up. Oh my gosh, that's my favorite future on my camp. So Z talk about that because most cameras, they're gonna have that even point shoots now have a custom mode, and it's amazing how many people don't take advantage of it. I use it on my point and clicks when I'm shooting surf versus a portrait versus whatever just elaborate on that, what these are and how useful they are. The on the canons of the column c three c two c one not sure what they are on Icahn's another, but it saves every single setting basically on the camera. And so then when you switch away from it and come back to it, it will reload all those settings that you had saved so If you're doing a lot of Milky Way shots, you can set up that 30 seconds. Eyes are F 2.8 as well as mirror lock up. You can set the I s so you can even have it. The LCD brightness turned all the way down, so it's really dim because when the LCDs come on on their full brightness and you guys have adjusted to the stars, it's really kind of bright. All those different settings, your customizing noticed what you're doing, and when you get it toe like a pretty clean state that you can start from, then you can save those settings. So when somebody messes with your camera, your loan it or you're doing two different things, you know you're shooting your kids during the day and then you go out tonight. Just a quick turn to it. I don't have one set of one year. I have 16 under oath of us second auto everything for oh, you know, moments. And then my C two is bracketed aperture priority mode, starting it f a cause that tend to be where she was a lot of my landscapes on. Then see one. I actually think I have mirror lock up on that one. But sometimes you see one of my motion blur setting, where it's always F 22 lo eso and when the best feature about that other, the one D X cameras that there's a little button next to the shutter finger and you can change modes there so I could be shooting football, getting freezing action settings and then hit that button. Yeah, and almost instantaneously changing to motion blur so I can get my sharp shot and then start playing without fiddling with me. This one you can do to a switch it here and that lets you control the inside of an underwater housing. You can actually change your modes as well. Oh, that's awesome. So basically how those work is, you'll go ahead and customize the camera anyway. You want is Labra as you want, and then you go into your messed menu and custom and say, Save it and it says okay, whatever is currently the current settings save, and then you have this bank of options, and then oftentimes you'll have multiple of those. So again it's invaluable. And whether that's one is for a fast moving action. Maybe one is your portrait setting. When maybe night one, maybe your motion blur. So depending upon what you can dio, I find those absolutely invaluable because a lot of turning flash off. If you're in a point and shoot, you know your flashes. Oh, auto flash will default everything. So having something that set toe simply turn off your flash. So you're in that mode, you know that you've got, you know, sport mode with no flash with high speed burst mode like the Olympus TG three. That's one of my ones that I do. If I'm shooting surfing high speed, I want the flash off. I want in burst mode. And I wanted to be in a shutter priority, so yeah, they're absolutely invaluable. Well, speaking of the settings I've got up here, this little chart that you made up on the screen so if you wanted to is now a good time. Teoh. Yeah, chat through. Maybe go through each one quickly and then weaken. Do somehow how I shot this specific image to talk about these air Just starting points. Okay? Don't take these as rules, everybody. Lots of people like toe, get a guideline and then be like what? You said it was 30 seconds. So utilize your history. I'm utilize your life. You start here, it gets you in the neighborhood and then maybe you need a change darker later. Whatever. For May, it's the fear factor having at least some starting point since I didn't know it. And there's so many variables when you have, you know, your shutter speed, your aperture in your eyes. So the three things that control your exposure in your camera Yeah, those are the only three things shutter speed, aperture and eso each one of those works against each other that, you know, one stop over here is gonna affect your shutter speed, which will affect your eyes. So everything is in these stops of exposure without even a starting point you're fearful about. That's That's still a lot of variables. That's a heck of a lot of variables. And because you can balance out by doing each one of these, having a starting point for me was invaluable, and that's what allowed me to start doing the night photography was your holding our hands. So I think it's if you're so far off on the exposure that it's all black. You don't know. Is this even possible? Or is it Am I just too far away on the exposure? So hopefully these settings will at least get you. You know, you're seeing stuff on your instagram and you're live you and you're seeing how to prioritize rather than, you know, cranking up your eyes so to 10 billion. Well, you might as well just open up your f stop. So you're in a sense, they give people permission, Teoh. Oh, of course, I could do this. And since this was the priority here and okay, so it it's just it's a I think it's an excellent Yeah, and neither tried to be like, maybe what I used most commonly it is a balance of those different factors. Dimension here is this is for your DSLR canon settings based upon, you know, the glass that you're using the capability of it the size of the sensor. These air also variables, and that's why we have this scary disclaimer at the bottom of not being applicable in some parts of Mexico and Canada. Store boy were prohibited. See store for details. Don't try this is home. This is done by professional drivers on a closed track. So that's a good point about the camera. I think the biggest variation that you'll see from these settings, um, is the different sensor sizes. So, you know, if you have a 1.6 x center crop sensor, you have a little bit higher noise. On a point, you will have even smaller centers, even more noise. But you still need to get this amount of light into those cameras. So, yes, they will be more noisy. But you know you don't want to drop your eye. So is lower because you want you'll get an under exposed image. So it's, I think it's still relatively universal of trying to get to these like, you may not have enough 2.8 lens, right? So, um, you condone F four and then instead for the Milky Way, 30 seconds F four and then I also 6400. So you're getting twice as much light by doubling that I s O and more noise, but you know it's making up for that less light coming in through the lens. But it does show how important it is to have this quote unquote fast glass ah lens that can let you do that like it said for cost purposes. If you're shooting with something that's a wide angle, much easier to get an affordable wide angle lens that may go down 2 to 8 versus your tele photos that fast glass. That's a big lens that will set you back. That's where you sell the Children in the house and everything else so clean with pointing shoot, it is you can. That's one factor that you can decide there's so many. But maybe one has an F 2.0 Lens and the other has enough 2.8 at its widest angle. It doesn't for stars. You want wide, right? So the how the aperture at its most doom maybe is not as important, but yeah, OK, great. So the next one of that star trails So I let you Wigan. We didn't Milky Way 30 seconds after point. It s 0 32 other. Okay, Yeah, for those of you who can't read star trails, eyes a little bit different and that you really are looking for the brightest stars so you don't need as high oven eso And in fact, it will probably got too chaotic and noisy if we have the highest. So you can leave right So down 200 or doing two or three minute exposures using the interval ometer. If you don't have one, you can do it with 30 seconds. You just end up that gap of one second. We'll show up in your images on we can talk, Jack. I'll show you a cool but difficult advanced way to remove those gaps. The longer the exposure, the better for less gaps. But your sensors heat up whenever they're actively taking a picture. So you start getting actually mawr noise with a longer exposure. Unlike film, you can't just leave the shutter open for an hour or four hours. You like I did start trails in Botswana, the tree or the circles around the tree. Yeah, I'm the one on the wall and it because of some trickiness, with it being a national park and having the set it up beforehand and leave it strapped to a car with all sorts of plastic wrapped around it to keep the hyenas from chewing on the camera. I ended up leaving one camera with two minutes, and I decided my backup camera. I'd give it a try with 15 minutes as exposures. Um, the two minute camera didn't work. It was completely gone, that's all. I was left with only the 15 minute segments, and they're super noisy. And if you zoom in on that image, you'll see that I had to apply a lot of noise reduction. You get really bright pixel that they build up over time, and that brings up another point on both milk. Milky Way you're doing one shot it so you can have the cameras in camera noise reduction on and that will. If you do a 32nd shot, it'll take 30 seconds to do a dark frame with the iris, closed shutter clothes and adjusting what the sensors noise characteristics are, and that helps reduce noise. But when you're using the kilometer doing a time lapse or star trails, you can't wait that 32nd gap for it. Do that dark frame every time so you can take a picture with your lens cap on beforehand and get one dark frame. Although nice, those were getting so good these days lightly through the lens cap. It's starting to be a problem, but so shoot it. Get all your setting set up as if you're going to shoot you. Exactly. However, you're going to do it on, get a dark frame and then start doing your star trails. And then later on, you can use that dark frame. Even if you aren't necessarily right now wanting to fiddle with doing that level of photo shop of subtracting out that dark frame, you'll have it when you're Photoshopped. Skills increased later on after you've watched Jack's classes, and then you can go back and use that So noise reduction technology the cameras have is it shoots your frame for 30 seconds or whatever it shuts down. The shutter basically takes another 30 for 32nd exposure, exactly the same settings. That black frame is your calling. It has a noise pattern in it, and then it physically in camera, subtracts that noise from the first. That's why you have a shot for 30 seconds. You have to wait another 30 seconds. Nothing's going on. You get a little end, are on there and then you continue on and that some of them allow you to do that. Reference that noise reference shot and again in camera. Say, please use this noise reference for all these shots so you can do it in photo shop. Or you could do it in camera. In this case, where you're shooting so many things related to start trails, you're gonna want to, you know, automate that process is as much as possible, but not allow the camera to do it in camera. So start trails. I've found a sweet spot to be that 2 to 3 minute range of urine starting to have a super hot sensor. But you have fewer gaps. So, you know, I think, um, you know, talk about it. I think that the Navajo Cliffs image was ended up being eighties 72 minute exposures that then you combine together, so you also have the problem of Then you need to combine those images. So if you open all at once and Photoshopped, you have a lot of ram. So the longer you have on the exposure, the fewer files you have to deal with. So maybe if you have limited ram on your computer tried to in five minutes on, get fewer files to deal with. You know, there's there's room to play in there. It's not a hard and fast like noise arrives at five minutes and five seconds. It just builds up Bennett. But it is nonlinear and that the long you get the worst, it gets hotter and hotter. You let your camera have that one second break in between, um so for star trails, I usually shoot wide open again at F 2.8. Or sometimes if I have a foreground because it's such a long exposure, you have more light coming into. You have more flexibility. You can bump that up to 456 to get your foreground in focus or eight. But you need to compensate with raising the I S O. So. But if you shooting I s 0 800 on today's cameras, that's still pretty low noise area to be in. And so you still get that smooth image. So I would say the least important setting on the star trails is that I s o choose your aperture based on what you need to be in focus and then adjust your so to compensate the auroras. If you're lucky enough to live in a place that has or visit on northern lights. It depends on how bright they are, how active the sun is, so they range from really dimmed really bright, so the settings change a lot. But a good starting point, I found was 10 seconds as wide open as you can get. So if you can rent a 1.4 lens or two or 2.8, go for, you know, and I also 6400. A lot of people are afraid to use those high numbers, the other noisier but relative to not getting the shot, you know, do it so you could also do 30 seconds so three more times, or dropping down to times the 3200 and then, like a mid 2000. Or, you know, it's all ballparks. You could go to 1600 but at 30 seconds there were roars, air moving back and forth so they're blurring out more. So you're losing some of that. But it does give amore full sky of color, so tradeoff there. On that time, I was trying to do some shots down at one or two seconds in orderto get really crispier edges. And you know I 12,800 F 1.4 there's a shot you have of the person in the foreground who's pointing up and you're able to, you know, freeze that so that that's obviously a shorter so full moon, Uh, it says 1 800 that just indicate 1 8/100 of a second, so really quite fast. Is it so bright? I think that Moonshot I showed you guys was actually F 5.6. Um, and this is for when it's a full moon, like you're getting the full disk. If you're trying, it's really you can you can get the dark part of the disc, not the dark side, but the non illuminated portion that's facing us. But you need to do it like HDR because there's so many stops, the difference between the bright side and the dark side of the moon. So this is saying if you got the full disk and you're just trying to get that get the craters on their the 800 maybe four or 56 I. So this setting was when I was hand holding it on a boat. So that's why I have it. I s 0 800 You could do it. I s 0 and want, you know, 2/100 of a second if you're using a tripod because at 640 millimeters, I can't hand hold 1 2/100 of a second so that just that shot I showed was it was a 600 millimeter lens with a 1.4 converter on it, which makes 840 millimeters. So that's pretty tricky to handle that 1 And this also you need to be. How tall you be? 65 if you've ever seen him with his is device. It's a massive that once they win the moon, that and sometimes I do shoot those cause it's a little bit less scary. The full moon. Of course, we love it because of the orb. But the need thing is, as it starts to go out a full moon, we get the sun hitting that transition, that core of light as it transitions from shadow. And so you're getting sidelight on all the craters of the moon, which exaggerates the whole texture. So I like actually shooting less than full moon and get more of a crescent because you get this dramatic raising of the impostor off the surface of the moon. This text I love the three d athletic of that moonshine. You see, the creator shadows. Yeah, so that's, you know, just another thing to keep in mind. Just as with photography will like our sidelight, we like to emphasize texture and shape with side lighting. And so there's a benefit also not doing full moon. When you're during the moon, just as a small part of the scene, it's usually if it's a nighttime Moonshot, it's gonna be so much brighter than whatever is illuminating your foreground. If anything, they're pretty much it's gonna blow out. You'd have to you have to dio 10 or 14 out of dynamic range and in HDR in order, I think, get fully properly exposed Moon and a non illuminated foreground so often is just let it let it go out on that halo. But one quick last note on that it moves. Remember, the moon is well and we're moving, It's moving, everything is moving on. And so, you know, 32nd exposure for the foreground. The Moon's actually going to be moving through that image. So you may need to shorten your exposure, crank up the I s. So just to keep the moon from moving even though it's blown out bright. Another thing that you mentioned here, which I couldn't fit on the chart, is changing your meeting to spot meter. Yeah, you know, you can either one use exposure compensation for something like the moon toe. Take it way down to get all that detail so it doesn't blow out. But the other thing remember, we often don't use take advantage of our spot metering option in our cameras, meaning that that the default setting for a lot of cameras, as it looks in the entire scene tries to evaluate and says what would be a good exposure? We also have a would be usually a matrix meeting of some sort. We also have a center weighted which it's looking at usually the center of the image says Okay, that's I'm gonna basically set. That is what I think is a good exposure, not worried about the edges. Then we also have the spot meter, which says, whatever my focal point is, I'm gonna be concerned with that. And only that and that is, you know, very tricky because it's only going to expose that correctly, and it's not taking into account the scene, so we normally don't shoot with that. But in the sense of a moon, that's really the only time that where you're gonna tell the camera, look, I want you to expose for that and that one point, not the black sky around it is the only way without some sort of significant exposure compensation of under exposing over exposing a spot meter. That's a perfect time to use your spot meter option. And usually that's right on the back. Usually somewhere near the eyepiece. There's gonna be your meat oring either matrix center, weighted or spot. So that was usually just tap. Yeah, if you be able to finally hit the moon. So to do a spot metering thing and read off the moon for IPhones or a lot of points, you have touchscreens. Yeah, back. Olympus, the pen Siris are really kind of in that way. Okay, continue. So, fireworks, Um, this, um, much more loosey goosey or it should be. It's depending on how much of a trail you want. If you do really fast, you can get you just get little points of light of in a circle or something. So it's often I liked him. Let it go longer. So then you get the burst going. You need to have the whole time of from here out to here, which is not that long. So half second is probably long enough to get a couple births going. So if you have a wider shot in different times explosions, if you're just doing a single explosion, maybe a little shorter eighth of a second might be enough demand. If you're handing your further away, you want to get more, so you like you said. It's really a variable. How much? If you're using a telephone, a lot of people do fireworks with a telephoto. It's filling up the frame so your exposure is gonna be based upon a big, freaking bright explosion. If you're doing the scene, it's the capital on, you know, and all this sort of stuff. It's mainly black and the fireworks or a portion of it. So as you said, this is really there's a lot of latitude in here, but it's a good starting point. Maybe you If you're on a tripod of your hand holding and then you put on auto soas well rather than so it's That's a good trick that not many people uses in manual mode. People are tend to shy away from manual. But if you know what you want, your shutter speed to be and you know what your aperture is. But you don't know what the meeting in the situation is. So you know how much you need in depth of field and you know that you can only handhold 1/15 of a second. Then you just put the camera on auto I s O in manual mode and it will figure out what it needs. Toe Jack the eso up to to make those other two conditions work. You don't have the ability to do exposure compensation then, but you can see what it chose. Oh, it shows 1600 but it's too bright. So I'm gonna crank it down to 12 50 and then said it and then you're good. And again, it's amazing how many people do not take advantage of Ottawa, so somehow it's got a bad rap. But remember, You know, you've got the three things that you can control. Shut us be priority when you're trying to freeze action. You know, aperture priority when you're affecting your depth of field, you know, blowing out a portrait's background and I auto eso so you can choose one of these variables and let the computer inside choose that third portion of the equation. So I I love it, but it does Presuppose that you're not going to say, Well, I want to shoot at eight thousands of a second in the dark at F 22 because I want everything in focus and think that somehow you're I s o is gonna be usable. So if you understand how those three work on Oso is an amazing feat of technology, So yeah, okay. All right. So night city, what I like to do and this is another one that's wide open hand, how bright the lights are, how much you're trying to get the non lit areas, so but I like to bracket it because you have the street lights which are super bright, and then you have the dark area is a huge range. They're not quite day tonight, but still big rains. You can bracket plus or minus one and put it zero minus one minus two. Because I find the camera tends to try and make the night scenes too bright for what I want. I'm often going for the texture of all the different lights rather than trying to fill in all the dark areas. I want some texture in there, but I'm not trying to make it look like daytime. But another setting often do is to stop different in order to get more of that range, and I'll do plus one minus one and minus three. So to do that, use that your exposure compensation to plus or minus two and then you use your city bracketing the plus or minus two. You and then you use your exposure compensation the thumb dial for me and you roll it down. One stop minus. So then it's no the plus to get you back up the plus one, and that you can pull in some texture from that. But then it's a better exposure at minus one, and then minus three really gives you just more of the point lights, and it's where F stop. That's, you know depends on how much you have close to you. Vs far Away. If it's all far away, you can just go 4 to 8 or whatever. But if you have a range F eight, if you want to make starburst is a good trick not just for night lights but also the sun or the moon. You can make a starburst out of any point lights worse by going to F 16 or F 22 under exposing so that you can see it rather than a big halo. You don't need to buy a star filter toe to put on there, and you'll get a different number of raise, depending on the shape of the iris of your lens. Help clean your lenses Well, effective as well. Okay, on at least light trails like What do you mean? What does that mean? Like cars going past on a road or me running around with a glow stick like a crazy person or whatever that you're trying to get that longer time showing the motion of those lights and maybe starting if that really is depending upon how long it takes for that light to get through the scene. The car from this side of the frame to the other side of the frames. Sit there, woman. Alligator Teoh, Count. Figure it out or longer. If if you're running through the frame, give yourself time. Put it on seconds. So that and then adjust the aperture. And that s oh, so that 30 seconds works. Or just put it on. Shutter Priority. 30 seconds. Let the camera figure it out and then use exposure. Compensation too. Make it brighter or darker, depending on what you need. But generally those point light sources are pretty bright. So you blow them out if you have too much exposure eso balancing like that one where I was painting with a glow sticks you could sort of see some of the background. But if it I made that background any brighter than those glow sticks would have just been totally highlights would have been blown and not recoverable. A great starting point. Great overview of some of these things which now and after we take our next break, we will actually show samples and again we'll probably see, like where the exceptions are, how it did perfect, right Well, I'm glad that we've covered settings for all of those things. That is amazing resource right there. And all of the questions that you asked about these particular things have hopefully been answered. If you continue to have questions, you go ahead and ask, and we'll try to get anything that wasn't answered, answered. Let's take a few questions before we finish the segment. Okay, All right. Question from F abuser when working at night. Is it true that using a red light flashlight will help to preserve your night vision and help your eyes re adjust to the darkness faster? Would this be a better option than a standard flashlight? Yes, absolutely. Um, it's I think the red light doesn't affect your dilation of your iris as much your but for whatever reason, our brains don't respond to it. I'm not sure on the science behind it, but experientially I found that that is the case. It's not as good is working without it in the dark, like if you if you can get your settings all done beforehand like I'll tape over. Not this part, because it doesn't light up, but on my camera. When its writing to the compact flash card. This little red light is blinking on and off, and that's actually pretty bright. If you've let your eyes adjust 20 or 30 minutes already, and other cameras have some kinds of blue late to show your settings, they're helpful to indicate things. Except so just a little bit of black efforts. Table cover over that and say that. But also you can if you keep it away from your eyes. Even when you're using that red flashlight, shine it on the ground so you don't trip what we're walking. But don't point it back at your eyes because you get mawr of that point throws and then you get a ghost image, even with just simple red lights. For a while, when you had your blindfold on me and Chatham said, I'm gonna male Red doesn't have to blind. Even the red lichens of red flashlight will reduce your ability to see those dimmest stars and like the and maybe I'm being a perfectionist about it, but trying to focus through that viewfinders hard on those dim stars on the auroras. So, yeah, absolutely. I got a cool flashlight that has four buttons on it blue, green, red and white. I think I was like $ at Wal Mart. I don't know if they still carry him or not, but I'm sure there's other places to find them, and that is fun for light painting. You can use it, and then you can use the red. The tricky part is all the buttons feel exactly the same in the dark. So before he turned it on, you can't see it. So I have, you know, flying to myself with the bright white setting by turning that on accidentally so you can take a little bit of fingernail polish and paint onto the button like a little bump or something to know that Oh, that's the red one. Not all the checks. He's done this a few times. Okay, let's get a few more questions in if we can. Um, so question came in from Robin Neighbor. Do you do any light painting of foreground objects when doing night photography, scenic landscapes? And if so, are there any suggestions for how to approach doing that? Um, I do. I do. It is like sort of fill light like get the exposure up. Folks like Ben Little more does really cool, elaborate outlining of people. You can take a little led key chain sort of light that's really dim on and run it around somebody's face or go trace the outline of their body, and then you get a little side glow from the light, and then, if you keep the light pointed towards the camera, gives you this cool kind of Jaggi outline of the body. So tips for that keep moving where black So that you show up less than the camera, but a long exposure, and you can crank up the aperture so that it doesn't sense you as much. But those bright lights still come through like when you're using a flashlight. The paint Keep moving. I showed an image of, ah, palm tree that I'd lit up in Tonga. Andi, that was with a tiny little white flashlight. But it was still so bright that I would go like this to try. And just like that much time of the light with more than enough to give that amount of light So you can you You move really quickly, or, if it's dimmer light, you can more slowly like paint and just keep it moving so that if there is any reflections off the molecules in the air, water vapour, whatever, the camp is not seeing the beam as much. You got any other tips? Mention headlights. We again with that? There's a wonderful palm Grover on Molokai Palm Grove, right at a parking lot. And, well, let the sun go down So we have the beautiful just a little bit of the color on the horizon line with his beautiful black silhouetted trees and just literally turning on the headlights on the car are going to give you this this beautiful light, you know, and again very short. You're gonna control that in your car. But headlights are a great way to do that painting. And then, like you said, just whether you're gonna think conceptually if I'm just trying toe illustrate the shape of tree of Rock. You had some things in there then going in and manually painting it in just with that flashlight or whatever. And then, since you know, shape paint with light, get Ben has got an entire class here, a creative live on light painting that I highly recommend. But yeah, the screen of your smartphone. You can get an app that will just give you a solid red or solid green whatever color you want. And then infinitely colored flashlight there. And it's not as bright as a flash light. Also, regular flashes. You can go if you have a long exposure or many you can composite many light painting pictures together. You don't have to get it perfect in one frame so you can go light. I'm dropping is incredible photographer that lights huge scenes on the tarmac of Airport with airplane B 52 massive planet. So he'll go over and flash just the engine and then inside the cockpit, you can put life inside of things, make them glow. Also your movie later. Glowing bathtub. So think creatively about Yoon. You paint this part and then do another frame. Paint this part and then stack them together and footage up in light mode and they'll come through your talking. No, this is like it takes all night, like 79 different images later. This is that light painting. If you can put on my camera that we'll talk about. Before I mentioned that I was like painting with my IPhone remotely. So this was this little car that we were talking about. And then that is the foreground. Specifically, I was just worried about the grill. And so there is the scene, and there is using a spot just in this case, just using the IPhone. Well, I'm triggering my camera with the same IPhone. I'm actually during a little light painting on the foreground just to help shape the car, so yeah.
Class Materials
bonus material with purchase
bonus material with enrollment
Ratings and Reviews
a Creativelive Student
I found this course interesting and motivating. I enjoyed hearing about using a range of cameras from compacts to larger DSLRs to capture great images. I appreciate the great experience and passion from both Jack and Bryn and look forward to using the information to improve my night photography. The post processing is a very useful part of the course which makes it an integrated approach. The varied ideas expressed by Jack and Brynn and a depth to the topic of night photography.
Cecily
Interesting and informative class. Jack as always is brilliant, and Bryn shared a lot of his night shooting experience, his chart is a great starting point, and as he states is "just a starting point", make your own settings decisions on the night! Even though I have been a photographer for quite some years I'm always learning new things. Thank you both for sharing!!