Lessons
The Camera
19:20 2The Shutter
19:17 3The Sensor
10:45 4ISO
14:12 5The Lens
14:23 6Aperture and Depth of Field
15:59 7Focusing
15:07 8Metering
12:06Lesson Info
Settings and Workflow
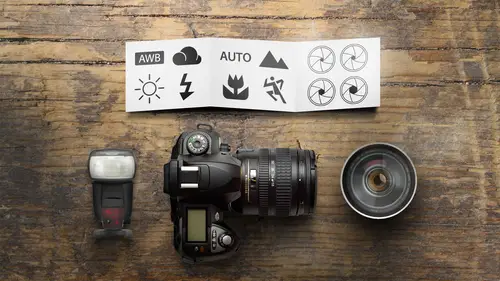
this next section I don't like. It's just all this other stuff that, you know, you end up with all these loose ends, and I'm putting them here rather than at the very end of the class. And so we're gonna be dealing with settings and workflow. So the first thing is some other general camera settings that you need to be concerned about on your camera. First off is this whole J peg versus raw file types that you get out your Cameron. So this is how your camera is recording images to the memory card. Let's talk about J pegs first. This starts with the original information from the sensor, and then it goes through a bit of processing, which means the camera is adjusting the color in the contrast in the saturation of what's going on. It will then compress the photos to keep them in a very small file size. And when an image is compressed, the camera throws away some color information. So rather than having six bits of color describing a particular part of the blue sky, it might only be three ...
bits of color. Or it might only be two bits of color describing that sky's worth throwing some good information and photographers hate throwing good information away. Now you do end up with an oh so convenient JPEG image that you can post to Facebook and you can email to your friends and you can put on your blog's. And it's very, very easy to work with the raw images. Start with the original information again. It does need to go through a little bit of a converter to turn it into a digital file. It'll add a white balance, which is something that will talk about into in about in just a moment. But it doesn't change your image at all, captures the original information, and it puts it into a raw Now. Each camera company has their own proprietary language and formula for what a raw images and which is why cannons will end in a CR two or night. Cons will be in any F. Other companies will have different things. And if you try to send this to a friend or you try to upload it to Facebook, probably your servers not even gonna be able to handle the file size. But it's not even gonna be able to read the photograph because it's proprietary language. And so if you want to use these, what you need to do is you need to use the software that came with the camera or other software. I particularly like Adobe Light Room and Adobe Photo shopped for working with an image, and what I will do is I'll take the raw image. I work with it, do a little of this to a little of that, adjusted according to the needs of that particular photograph. I will then create a J peg that I will put on my website were all put on Facebook or I'll email to somebody that sized appropriately from the needs. And so if you're just getting started and you don't have the right computer and write software, you're gonna kind of have to start with Jay Peak. But my ing, what I want to encourage you is either to shoot raw or plan on shooting raw in the future, because this is where you're going to get the best information, the full tonal range of the brightest brights to the darkest darks. You'll have the most working area in an image. This is kind of like the old days of negatives and prints. When you went to the store to pick up your negatives and prints, you didn't take your negatives and throw him away. You know we're gonna use them to look at, but they're great because they have the original information. And so whenever I shoot in a serious about what I'm doing, I want to shoot with those raw images. But I do need that software, and I'll talk a little bit more about that later on in this particular section here. Now, on your camera's settings. If you are going to set J peg, you will often have multiple choices of large, medium and small. And undoubtedly, you're gonna want to shoot the largest possible J peg because you want to get the highest resolution, the most pixels. You didn't buy a 20 megapixel camera to use it at five megapixels. There are reasons for doing this for special situations, where you just need to shoot it in camera and get it out of there as quickly as possible. But for most of the stuff, you want to get this set to the largest possible setting. The other thing about J pegs that I mentioned earlier was compression, and they can take the same number of pixels and they can compress it more or less. You want low compression, which is going to be the highest quality, and this goes by different names or icons. For instance, Nikon calls it fine, normal and basic, and when you get the camera from the store, it comes in normal. But you can go to find which is actually a better quality J pic. Now the file size will be a little bit larger, but it will retain a little bit more of that original information. And trust me in 20 years when you go back to your photography and you're trying to look at some old photographs and you're wanting toe redevelop a photograph, you're gonna want as much information as you can get your hands on. Now, if you decide to go with raw, many cameras now have an option to shoot a large, raw or a small raw and a small raw is a lower resolution raw that doesn't use up much space, and undoubtedly you're gonna want to shoot with the highest quality raw setting. Possible memory cards are relatively cheap, hard drives are relatively cheap. I recently upgraded my hard drives and Aiken store all of my photographs on one single hard drive, and that hard drive is only half filled. All right, that hard drive, you know, did it cost me more than a couple $100? And so you should be shooting in the largest. Why? I know you get more pictures when you said it to the low settings. It's not quantity. It's quality that is important in photography. Lastly, you can set your camera to record raw plus J pick. And I don't recommend this except for special situations, because you're gonna end up with two files every time you press the shutter. Release once and you're gonna end up with duplicate files that you don't really need, because if you can process and work with the raws, you don't need J pecs. Special exception is you're shooting your friend's wedding. They want raw images because they want the highest quality images. But they also want you to do a slide show at the reception, and you're thinking there's no way you're gonna be able to download all your raw images and put him into a slide show. You could shoot J Peg at the same time and use those for a quick, immediate need. But in general, I don't like using this because you get double files on your computers that are exactly the same. Well, not exactly the same, but similar the memory cards that you use when you shoot pictures on them. The camera creates a folder and then a folder within that, which is where the pictures are actually on or where they're located. And every time you delete the pictures and you start taking pictures again, the camera creates a new folder, and these ghost folders can sometimes cause a communication. Aaron, your camera. So what you want to do after you have downloaded and backed up your images is you want to format the memory card, and what that is going to do is that is going to wipe clean the card, get rid of the folders, get rid of the images, reset the directory as if it's a brand new memory card. So any time you buy a brand new memory card or a friend who had a Nikon camera gives you who have a canon camera, a memory card, and the pictures are safely downloaded. You want a format, that card. It's something I do every time I go out to photograph. I want to go out new and fresh. The drive mode on your camera controls what happens when you press down on the shutter release. Does it take a single shot or does it could take shots continuously? So obviously, if you're shooting sports and action, you're gonna want to use the motor drive. Some cameras will have a low speed in a high speed option at different frames per second, or FPs said it appropriate to your needs. This is also likely where the self timer will be. You'll see different self timers. 10 seconds, of course, is a good enough amount of time for you to get into the image yourself to second works Great when you're on a tripod and you just don't want anything touching the camera when the shutter is released. Many cameras also have a remote control option so that you can fire it from a distance, which could be kind of handy. And they're often pretty cheap, only around $20 or so. Another very important mode is the white balance setting on your camera. This is where your camera adjust for the different types of lights that you are shooting under. And so in this case we have three different settings for most cameras for natural day lighting situations, and you would set it appropriately. The one that's way off from everything else is incandescent lamps. This is what a lot of us have in our living rooms. It's a very orange light. And if you have orange photos of yourself as a young child, which I have lots of orange photos of me, it's because my dad had daylight balanced film and we had tungsten lights in the living room. All right, this is where you can fix that with a digital camera by simply adjusting it to incandescent or the tungsten setting. And so you would set this on an as needed basis according to the light that you're working under. Now you do have a couple of other settings. For those of you who really like manually sending things, there is a Kelvin City that you can say, you know what? I think it's around 7500 degrees in here, and you could sit it right there, all right. But there is also a setting called Auto White Balance. And most of you have probably got the idea that I'm not a big fan of auto anything. Fact of matter is, is I use auto white balance all the time on my camera, and there's two reasons why I use number one. It's pretty accurate. It does a pretty good job. And number two, I shoot raw images and raw images, collects all the data, and I can actually fix white balance problems later in the program that I like to use called Adobe Light Room. So if I get an image like this, which is wacky colors, I can take the temperature. Slider and Aiken slide it on over to the yellow setting. Okay, that's a little too far, and I confined that nice middle tone balance that gets me the correct colors. And so that's another good reason for shooting raw images is that you can fix the white balance later on now, I mean said that in photography and in a lot of things in life, it's better to fix problems early on rather than later. And so if I know that I'm gonna be in a particular environment. I'm outside shooting pictures at the Grand Canyon. I'm gonna put it in the sunny or the cloudy mode just so that they're all consistent and I don't have to go back and fix them in your cameras is the date and time. And this will just be recorded with not on top of the photographs you take, which is gonna be very nice for going back and judging when you were shooting different locations. But your camera doesn't know about time zone changes and daylight saving time changes. And so you need to go in and adjust this as needed. The camera that you have also has firmware, which is like software, but it's exclusively designed for your camera. And occasionally the manufacturers come up with an improved version of that software. They fix a little bug, they add a little feature. And so the only way to get this new firmware is you have to go to your manufacturers. What website? Look up your camera to see which firmware is going on in your camera. And some cameras have very frequent firmware adjustments. I know that with some of my canon cameras. They've given me whole sets of new features that I didn't have. When I bought the camera and they were free, all I had to do was download the firmware. Fuji has been known to really update their firm where all the time, cause they're constantly adding features and making changes. So you need to go to your appropriate website, look up your camera and follow the procedure for updating the firmware. It's really quite easy and doesn't take very long to Dio. All cameras have custom functions and these air functions that you get to go in and customize exactly how you work with the camera. We certainly don't have time to get into this. For each and all the cameras. I do actually have classes on individual cameras. So if you have a Canon six d, I have a class that goes to all the custom functions on explain great places to start in what each one of those things do. And I'd have that for most of the night. Cons and cannons as well as Olympus is and Fuji's and Panasonic's another cameras. And so that's something else you can look through at Creative life. Okay, Going to jump over into after the picture has taken workflow. So once you have shot shot pictures, you should download them to your computer and one of the things I don't have a slide for. But how often should you download pictures as soon as it is conveniently possible? I don't like to leave my pictures on my camera for more than a day. Just don't like the chance of something happening to that camera. That memory card I generally like to shoot and then go out and download as soon as I come back, downloading straight from the camera. The computer is a very slow process. What they have in the cameras. The transfer system is very slow. You want to get one of these card readers, or if your computer has a slot straight on, it just plugged the card straight, and it's going to download much, much faster. You're gonna need a program toe. Look at your images to really judge what you've shot. My favorite program is from Adobe called Light Room. It's the most popular program for photographers out of the market. It's it's your own darkroom, but now it's in the computer, so they call it Light Room, and it's a great way to go in and judge which images are best. There's great tools for comparing images, and then when you want to get into develop and makes subtle little adjustments in your images, it's really easy to work with because there's these sliders that are very intuitive and easy to work with for adjusting your exposure. Now, however, if you take a photograph like this and you're thinking to yourself nice. But I would like more birds. Okay, this is something that you can't do in like room. You can't take an image, and you can't clone it over itself. You're just working on a single image. This is something that you might need, something like photo shop with where you can actually work on different layers and Cloney, and so if you get really into it, is when you need photo shop. If I had to recommend just one program to get started with, I would say adobe light room. I will tell you that if you buy it and you download it and you open it up, you're going to sit there and you're gonna go like What do I do now? It's not gonna be real intuitive. What you dio you're gonna have to take a class. You're gonna have to read a book. You're gonna have to get an instructor to walk through it with you. And there are some great classes here at Creative Live that will teach you how to use light room. But it is something that you usually need a few hours of instruction. But once you get past that little introduction phase, it's fantastic. One of things I like about light room is that when I'm working at my computer and I'm thinking I know a photo that I want, I can find it in 10 seconds every time. It's very nice to be able to navigate your pictures and find them. Now, if you want to print your pictures, you need a good printer. Epson and Canon are kind of the two main manufacturers that make very good photo in check printers, you need good ink. Generally, I stick to the original length from the manufacturer for you need good paper. I keep telling my dad they had stop using that old typewriter paper. It's too thin. You can't print pictures on it. You gotta have the good photographic paper. And I know it costs a lot of money. It's like a back a sheet. But that's how you're gonna get the good photographs. And then you also do need to have your monitor calibrated so that when you have read, your computer is actually showing you read and not orange. Otherwise, you're gonna be adjusting your images and forever trying to be matching your printer, which could be a whole. That's a whole nother subject right there for storing your images. You should not store your images on your computer. Your computer is gonna die. At some point, it's gonna get clogged up with photos, foot photographers shoot a lot of pictures, and that uses up a lot of data, and that slows down your computer. It's better to have it on it. External hard drives and these could be purchased fairly cheaply. But the problem with your computer and these hard drives is that everything is gonna fail, and so you gotta have a backup. And so you should buy these in twos so that you have a backup, but you're also still susceptible. You should actually by 1/3 and that should be stored in a far off location. Store one at work store, one at home Start wanted a friend's place just in case your house get Rob gets robbed, it burns down. There's all sorts of tragic things that can happen. Think how you would feel if you lost all your photographs. I would feel horrible would be devastated, and I really I'm not worried about it because I got two copies at home and I got one in a secret location. So let's sort of see what questions that has spurred. We covered a lot of big variety there, but let's just see what we got. We absolutely have questions. So going back to settings, there was a question from Tracy, who said when shooting outside at a sporting event, I have a difficult time seeing my mom, my LCD. Because of the sun T. Check to see if the settings are correct. How do you check your settings on your LCD in the sun? Well, the settings can be easily checked in the viewfinder, so you shouldn't be looking on the back of your camera for your settings. If you have an SLR or camera viewfinder. You should be setting your settings in there. If you're trying to check for your exposure, you can look at your history and it doesn't matter how bright it is outside. You can see that shape very, very easily. So you'd be looking at the history Graham as a judge to your exposure, not how bright and dark the images on the back camera great and another kind of display question from Kitty Does raw format display the same as A. J. Paige in the cameras LCD display in the cameras? LCD. Yes, it will display the same, but if you are shooting raw, you will be able to squeeze mawr juice out of it later on in the process.
Class Materials
bonus material with purchase
Ratings and Reviews
user-f3f891
I'm not sure my first review posted. But I LOVE this class! John Greengo is a great, engaging teacher who is really adept at representing the concepts visually and excellent at explaining them verbally. I love how he goes through examples with photographs he has taken. Even though I only have a Nikon Coolpix digital camera, it does have Manual, Shutter priority, and Aperture priority modes. Through his class I've gotten a really good sense of how to balance ISO, aperture, and shutter speed. It's a great overview for me especially since I am new to photography, I can play around with some of these settings, and I have a greater understanding of what I might need in a higher level camera in the future. Money well spend! (For $29, this is an absolute steal). John Greengo is an awesome teacher and I hope to take more of his classes in the future!
Megan Wagner
John is extremely articulate and is a great teacher with lots of visual aids and metaphors to help understand photography. I have been doing photography for a few years now and this class was a tremendous help in boosting my knowledge and refreshing my memory in multiple aspects of photography. The graphics that John uses are helpful and he even goes through images and asks which settings would be best to use and will go through the why. He makes things easy to understand and is very clear about the information he provides. I am so glad I took this course and I would highly recommend it even to an experienced photographer. Thank you John Greengo!
a Creativelive Student
Bravo!!! I am an adventure traveler and have been to many places in the world. I recently completed hiking the ancient Inca Trail in Peru to Macchu Picchu with only my Canon Power shot camera. Even though I have some great photographs, I found that I wanted better quality and decided to buy an upgrade to a SLR camera. I have had no idea how to shoot in manual mode and even when I improved quality by shooting in Automatic mode with my new camera on a trip to Jerusalem, I knew I needed to get to manual as soon as possible. I have an upcoming trip to hike to Mt. Everest Base camp and so I decided to check into this course via Facebook. I am so glad I did! I now have enough information to begin to practice as I prepare for my trek. I am confident that if I need further information as I learn, that I can participate in future courses to improve my knowledge and capabilities. Thank you!