Lesson Info
6. Using a Reflector the Right Way
Lessons
DAY 1
1Intro and Who This Class is For
07:01 23 Groups for All Lighting Scenarios
09:00 3My Progress in Lighting
10:09 4Analyzing Circumstantial Lighting
51:46 5Circumstantial Lighting Q & A
04:16 6Using a Reflector the Right Way
15:45 75 Behaviors of Light: Overview and Angle
15:225 Behaviors of Light: Inverse Square Law of Light
13:05 95 Behaviors of Light: Relative Size
21:43 105 Behaviors of Light: Relative Size Continued
38:13 115 Behaviors of Light: Color
12:26 125 Behaviors of Light: Reflective Surfaces
05:39 135 Behaviors of Light: Q & A
04:53 14Location SWOT Analysis and 10 Things to Look For
23:47 15Location SWOT Analysis: Examples and Exercises
45:13 16Overview Q & A
11:30DAY 2
17Speedlites: The Basics and TTL
33:40 18Speedlites: Manual Flash
36:00 19Speedlites: Zoom Flash
08:35 20Speedlites: Zoom and Rotating Flash Head and Reflectors
12:50 21Speedlites: First Curtain vs. Second Curtain Sync
08:07 22Speedlites: High Speed Sync
12:01 23Speedlites: Optical vs. Radio Systems
06:38 24Speedlites: Groups and Channels
11:35 25Location Lighting Upgrade Examples
32:38 26Indoor Lighting: Building on Ambient Light
14:44 27Outdoor Lighting : Speedlights in Direct Sunlight
15:41 28Outdoor Lighting: Using Speedlites in Shade
22:29 29Outdoor Lighting: Romantic Look and Patterns with Speedlites
09:48 30Indoor Lighting: Creating a Window with Strobes and a Curtain
15:47 31Indoor Lighting: Moody Light with Speedlites and Gels
19:05 32Indoor Lighting: Reflective Surfaces
17:47 33Indoor Lighting: Shooting Against a Window
10:21 34Indoor Lighting: Adding a Reference Point and Ambience
07:15 35Indoor Lighting: Shooting into a Mirror and Creating Separation
04:59DAY 3
36Why You Need to Learn to Get it Right In Camera
07:32 37Location Photo Review and Analysis
35:07 38Intro to Reception Lighting SWOT Analysis
15:49 39Reception Lighting Setup
32:01 40Image Critique: Lighting Problems and Solutions
46:32 41Don't Limit Yourself As A Photographer
04:02Lesson Info
Using a Reflector the Right Way
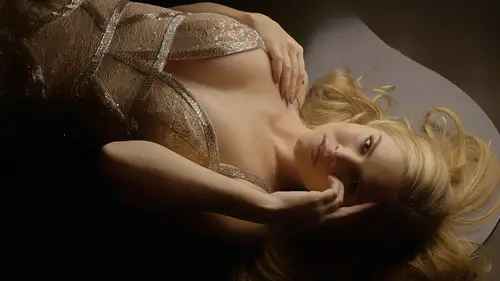
Lot of times when we do for the shoes, I see people holding a reflector. So they have the son comes this way. They put up the put the reflector this way and I see the blast of light hearing the person's face. Nothing wrong with that. The problem is that you have to have a reference point when you use a reflector. A reference point means what is the light around? You look like and can you match it with a reflector? Not I have a reflector and I just bought it. I want to blast the poor person with it because I paid full price, you know? And so I want to use the entire reflectors or not. Like other purchases, you make you buy it to only use ten percent of it. That's. Kind of, kind of like most of our gear. You buy it for lee here. So then explain if you look at the photo on the left, you notice that her the skin is well lit. She looks fine. But one thing that you notice also that her eyes have a little bit off a raccoon eye socket, darkness situation. This is where laziness really comes in...
most photographers or, you know, you're either in a hurry and you have to move on. Or you just decide not to take the extra step to fix that. Part of the reason is if it's cloudy like you shooting in seattle or something the flash the reflector is not going to reflect anything it's just going to reflect how depressing the sky looks all the time she went insane joke in seattle if you have son but if you live in arizona uh it's just reflects too much light and there's no reference point if you use a video light outside you may not have enough power to really bring out the ice I think the only solution is either used a strobe, a flash or the easiest one to solve this is to do ah a reflector if you do do the reflector you have to only use literally ten percent of it. It's like the edge off the reflector will give you enough light to keep the reference even the reference again is that the the lighting levels in the surrounding area that's it within your frame on how much lies you're throwing into your subject. So if you have a lot of light in the surrounding area, then you can throw more light into your subject because the reference point is higher if the reference point is slower like it's kind of moody, you gotta keep it moody on the reflector makes sense you want to keep it relaxed so the four on the left is the original photo taken on the photo on the right is me trying to photo shop it out me trying to make the eyes brighter in photo shop so I went with the last two I highlighted the eyes and I brought them up okay and he looks like that would you say in your honest opinion the photo on the right is absolutely fantastic I mean would you say is horrible probably not horrible but this is what this class is about it's about taking the extra step it's about the extra effort to make it good I'm going to show you um some reflect the usage on I want to talk to you about what is the limit that your eye can handle before he starts to squint which is actually I also one hundred to five point six shutters be five hundred that is the limit off your eye if your eye if the light is any higher than that you're going to be like it's gonna be really squinty none of these lights were using strobes none of these photos were using anything crazy it was just me a reflector on the person and that's it and this is the quality of light were getting on the two on the differences in the two the one on the right you notice something really interesting her eyes are lit but her eye sockets are not overly brightened that is the key is a ten percent use off the reflector so and then I'm also going to show you some technical use with this in order to accomplish that this is a very high tech piece of equipment is called a piece of white fabric you go get yourself one of these and you put it on the reflector and that reduces thie eye socket over brightness but it still it still breaks the ice just enough because the eyeball is much more reflective than the skin so all you need is a little bit something a little bit brighter and they will brand the eye but without going crazy on the ice okay, I'll explain that in a second here we go that's that's me using that little white suck it little white blanket thing on the reflector I'll explain that it requires you seeing it requires you seeing if you have some of these little clips I just get four of these and I just clipped a white sheet on it and I just used a little angle of it when you put the white sheet on the reflector it makes a light beautiful now people on the internet are probably saying, roberta why don't you just use the white side of the reflector dog right? Oh my god I never thought about that that's like why did I know think about the white side of the river the reflectors reflectors when they're made their actual the white side sexually very has a sheen to it that that's it that read those that kills with a point of what I'm trying to make that she makes it gives it too much power so I tried to keep it a fabric takes that away that's the only difference if they make a reflected that doesn't have that sheen I would use that but in the meantime that's the way this guy just came up with a business idea just give me oh okay another one the limit off somebody's eyes is five point six I also one hundred shutter speed five hundred if you put someone in light at this point there is one technique the light's gonna look gorgeous but you have you have about a quarter of a second before the people's I start to strain that doesn't mean you don't take the picture they just means you're aware of it if your light meter says I s so one hundred shutter speed at four sorry if I point six uh apertura five point six shutter speed five hundred if you have a light meter most people don't these days but if you do you know that you have about half a second before the eyes are going to have a hard time however you also know that the light is gonna be crazy good a little bit too good almost okay so um that is, the difference isn't direct reflection on diffuse reflection if you have strong light and you put a reflector on the person's face to give it even more light on that reflection that you put on her face measures higher than what I just said it's going to be overpowering for her. Why did I mention this? Because I see this all the time I see people at the beach going wow! And I just see the poor break one ball like whoever the shooting if you shouldn't family pictures I see a crazy overuse of reflector if you use it issuing children or high school seniors I just see the reflector being used crazy ways creative life reaches people around the world. This is a good place to say it's a ten percent use of your reflector. I know that david between direct reflection when the sun gets the reflector and then you bounce it directly on a diffuse reflection when the sun hits the reflector hits the sheet first, diffuses it, absorb some of the light and then bounces back softer cleaner light okay, uh, let's see here, this's what your poor subjects look like look to it looks like this for them. How would you like to look at that for more than two seconds if you have to do it closure subject's eyes get ready to shoot tell them where to look before they opened up their eyes. Then tell him to open up the rice. Okay, so remember, close their eyes then say, when you open your eyes, look at my shoulder, okay? My shoulders, right? He remember that then they opened up the rise. You take a picture as soon as they opened their eyes and you can you can take advantage of the light without straining their eyes. Um, this is direct reflection when the sun hits the reflector directly. This is what your subjects look like under direct reflection. Okay, you see how the light is almost too strong it's a little bit too made a wish. Okay, look at the look at this overuse off reflector past the I'll omit. You know, I know that in two thousand fifteen nobody has a light meter, but I got to say, if you want to learn lighting, you should probably go get a light meter looks just like a cheap one on remember what I said, I don't use a light meter when I'm shooting. I mean, I do check this I use a light meter to train myself on how to read light I think light meters or one of those discussions where if you're like the techie type you're like, if you don't have light meter, you're a disaster you get out of my face, right? And if you're like that oh, I just love photography I want to get into it you don't even know what a light meter is I recommend if you're going to get into the photography world you just get a light meter like, get a cheap one or something I don't care what get one um if you do, you're going to be a lot more conscience off the light when I point my camera at a subject like this on my setting say I s so one hundred shutter speed five hundred aperture at five point six I know I'm not gonna be able to shoot it it's too much and if my settings say f ate it's gonna look like this that f ate now why do I say this numbers to confuse people know if in your brain you start to associate numbers with looks, you're going to be faster you're gonna be a faster photographer. So for example, if you point your camera at someone on the camera says I s a one hundred shutter speed f f ate apertura fate shutter speed five hundred your brain should automatically have a reference points like that is too strong that is too much light, okay? And you get this does I look pleasing to the eye into you guys? No way this is the this is the limit I s so one hundred shutter speed one to fiftieth of a second aperture at four that's the limit that I can stay open without any struggle andi gives you the maximum amount of light so if you shoot yes nicky you have a question? I just have a question about the aperture so aren't you letting more light and well, I know you're letting more light in the smaller the number is so two point eight so why is it stronger at that's? Why I love his questions this is very important you just said that I'm not talking about the camera setting some talking about the measurement of light so if you put that if you put that incident light meter next to the person's chin if it reads f eight you're killing them your camera is can I can I just put the amount of light hitting her face is what I'm talking about so that's not something you that's that's why the light meter helps because if you put a light meter under a person's chin under that light you say okay that's that's crazy like it's too much light um yeah if you want to shoot this with your camera you would probably go to like some other toe kill the light you would be like that f sixteen or something like that yeah I'm talking about that's good point talking about the incident light like the light is hitting your subject not the reflected light like the incident okay this is what I do know many times it looks with the ghetto but it's fine it works totally well so what so what happens is this you open up your sheet you wrap it around on you're done you just you just do this okay if you look at the cameras and stuff it just looks a lot cleaner if you need someone to hold it get this clips and just clip it open on dh maybe don't do this in front of like a high end clients looks a little weird but you know that's the way it goes um anyway you get the point you do it this way and you get the fuse reflection diffuse reflection is a big difference between direct reflection this allows you to use the entire reflector instead of just ten percent of the direct one cool does that help is just a white sheet okay okay any questions on that direct versus diffuse reflection and proper use of reflectors and I limit is there any questions in there? Are we good good yes I did have some questions from the internet maybe we can just take a couple of really quickly so this was from sunrise so why are the reflector reflectors so big if only ten percent is needed? Okay, well you're shooting the shooting three quarter body so you want to have the size of the reflector there reflector still pointed at the body, but the main light the part that's actually hitting the reflector directly, it's pointed towards their face, so that's probably why you would do that? I recommend forty two inch reflectors, fifty two inch reflectors to support the good ones. Um so that's, why cool? So that kind of roberto answers a little bit? Is it more effective to use the corner of a big reflector or use a mini reflector? Does it depend on the subject? Okay, good one, yet I have about maybe eight reflector sizes when I come and I have a bag with all the reflectors in it. I even have ones that are just about five inches or twelve inches or small wants if I'm shooting a portrait of the girl's face on her faces or a model or whatever and she looks good, but her eyes just need a little pop. I don't want to I don't want to add more light into her entire body, so I just bring back the little five inch little desk like this and I just give it a little pop off light now believe it or not, this works really well if you need a little pop of light on a small reflector, put put put a reflector here, put put, put, very light this way, and that keeps you the popoff lights that you needed. So if you don't have enough light coming from the sun or whatever, just go like this. Remember, light is light. The light coming from the sun is the same as the light coming from the ice lights, or from any light source for you. Did you choose? Ok, actually, what I just said, it and it's really important. I don't know if you could see what I'm saying. They're a little pop, a flight on the ice, you put a small reflector if you don't have enough light to bounce us and use a light like this and make the light okay.
Class Materials
Bonus Materials with Purchase
Ratings and Reviews
MizUniverse
Im sitting in my office listening to Roberto with my earplugs on and I know I have already left 2 reviews but he's so funny…. my family comes into the office asking me "whats so funny" Roberto makes me laugh out loud with his jokes but at the same time, he is SO great at teaching. Im watching for second time to make sure all his good info is ingrained. HIGHLY recommend you take his workshop on Picture Perfect Lighting if you truly want to take your photography to the next level! WOW thats 3 reviews now…can you tell I am impressed
Maureen T.
I'm taking a portrait photography course at NYIP online. one of the mentors there recommended the posing book by Roberto. I ended up ordering at the library the posing and the perfect practice book. I fell in love with both books...ended up buying them and signing up here for the year membership just so I can take all of his photos courses. I spent most of my weekend doing perfect lighting course here I am in love with the way that he teaches! He makes something so difficult and challenging for me make sense. I also like that he challenges us photographers to be true professionals. I am thrilled to have discovered Roberto and already noticed my photography is better in the short time that I've been studying him.
dLhickey
Roberto has the personaliyy and gift to relate to others.He is honest and shared some of rhe disaters that occurred, even with high paying and important clients when he failed to follow his proven and tested approaches. He has shared from his extensive knowledge developed by hard work and effort to master his craft. His dedication in attacking his weaknesses and making them a strength is inspiring. I have purchased many CL classes and all have worth the investment so I hesitated to purchase this course because I didn't think there was much new information. However the clear teaching and extensive knowledge shared by Roberto in his unique style caused me to purchase it gladly and believe it is an exceptional value. Roberto has shared his extensive tools, but you will never be the master of the craft without putting in the hard work and testing that roberto testified to. Thanks again CL for bringing the best to us and Thank you Roberto for taking the time and preparation to achive excellance in in this class.
Student Work
Related Classes
Lighting