Lessons
Class Introduction
01:36 2Fundamentals of Night Portraiture
04:49 3Gear and Preparation
16:50 4Basic Settings
08:15 5Locations
06:15 6Subjects
04:22 7Safety
02:25 8Beating Adversity
01:28Lesson Info
Adding Life to Long Exposure
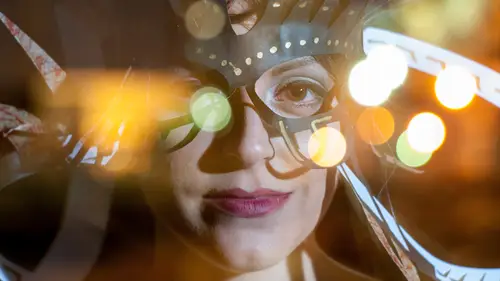
Now that we know which light sources we can use, let's start adding some life to a night portrait. What's that mean? That means, put some time bending in there. Make something move. And the first question you really gotta ask yourself is, to ghost or not to ghost? What's that mean? Well, you can freeze action and have somebody stand in the same place and not move as much as possible, and they'll stay mostly solid. Or you can have them move partway through the exposure after you make some light on them, and then they will start to become transparent. We call that ghosting. Let's start with an image where we don't ghost Caitlin. I'm going to make a single exposure where 15 seconds, F11, ISO 500. I'm gonna walk behind and backlight Caitlin. And I've underexposed the background by one stop, so that I can edge light her. And we're gonna do that. I have my self timer set. And it's 15 seconds on here. Bulb on there. And a five second countdown, here we go. And because I have no light that's b...
right on me, I don't become part of the exposure. I can walk through it. Results say? Great edge lighting. There's enough forward light on Caitlin that she's blurry. So what do we do about that? Normally we'd add flash. But let's just say we'll reduce the exposure from 15 seconds to half is seven and a half, and half again, let's say three seconds. Now what do we do over here? We take it from F to eight, to 5.6. So now it's gonna be three seconds long and I gotta boogie. Here we go. I got my flashlight in there, but there's a lot less motion on Caitlin. The difference? Blurry, less blurry. Fantastic. So we can go down even further. We got one more stop. Get it down to one second. And go. Ah. Not sure I caught that one. Let's see what happens. I did. My flashlight's in there. But Caitlin's a lot sharper. Before. After. So now we're headed in the right direction. I'm gonna do it one more time and try not to get my flashlight in there. Oh. And I got in there this time. Right, so what we can do this time is go portrait side. I'm gonna hustle around the other side this time, and go for portrait light. Perfect. Cool. That's great. Let's see what happens if we light up the background instead. Ready, go. It's got a spot right behind her head. I like that. Let's bring in the big guns. So I grabbed the Profoto B1s. Battery powered TTL, 500 watt seconds, and a seven inch grid reflector. I want a slightly larger light source than last time. And I'm using this specifically so that I can freeze the action. I don't need to take a full exposure to see what the flash does. So I'm just gonna pop really quick, check flash. Realize it's time to switch my ISO. My white balance here. To flash. Which will create some interesting color in the background. I can come down. Increase my exposure time. That's better. We're gonna go up 7.1. Fantastic. So, very rapidly we've created nice portrait light. And now we have to increase the exposure again, which is the area I love to live in. So, we went up by a certain amount of stops. I'm gonna go back to 30 seconds. We got 30 seconds. Modeling light off. So now I have a strong modeling light. And 30 seconds to play. Caitlin, turn your head to me. Good. Turn your head to me again. Great. Now I made a little bit of time bending in there. The flash froze her in one place, and then I had her turn her head once and twice to hit it with a flashlight. Let's see what happened. A little bit of ghosting. Okay. So I don't need to go 30 seconds. We'll bring it down two thirds of a stop, to 20 seconds, and have a little bit of fun here. Perfect. And now I have some more elements of motion in here, where the light hit her after the flash, where I striped across the leg, and where I drew the light through the air deliberately to create some swirls of motion. Now for a final variation on this, we have the flash as a main light, and I'm gonna add some more light on the background. Because I kept part of it dark, I want to create a spotlight on the background with the flashlight. Here we go. And just like that. We have a sharp portrait with the beautiful highlight on the background. So we've gone through adding more light sources here. Rather than just choosing one, we're now mixing flash and flashlight together, and we're also getting a little bit of time bending in there too. We have a brick wall behind, which obviously isn't moving, but our next location hopefully will have something that's a little bit more moving behind that we can increase the time bending effect of this night portrait. Thanks a lot and I challenge you to level up by adding light sources together. Welcome back. First, we're gonna do a little bit of ghosting. So, Caitlin is already up there. I'm going to ask you, Caitlin, after the flash fires, this exposure is going to last for eight seconds. After four seconds I'll say, okay, move, and I just want you to scoot over to your left without jumping down out of the frame, all right? Yes. All right, here we go. Five, four, three, two, one. Hold, two, three, four, scoot. Little bit more. Okay. Return to position. And now, you can see wherever there was shadow with Caitlin, you can see the brick wall through her body, which is pretty cool. That ghosting part. Wherever there was extreme highlight, it holds all of the tone. This is something I like to play with often in night portraiture because it shows that either one thing's going on. Chicanery, that you're doing something in post, but here, we're doing it all in camera. We just made a ghost out of Caitlin. Whereas before, she was completely solid because she didn't move. Now we're gonna combine ghosting with some other light sources, like Christmas lights. So, I have eight seconds to get in there and behind. So I'm gonna hit this five second timer and we're gonna do the same thing again, Caitlin. After four seconds I'll say scoot, and there'll be some other fun stuff going on. Ready, go. Scoot. (laughing) All right. Let's see what happened. Now a lot of people use Christmas lights for many reasons. Now we have Christmas lights showing up through her body, where she was not when she moved away, and then ending with her body where she was, which is a pretty cool effect. I'm gonna do it one more time, and I'm gonna try and get this vortex of red light to happen behind her instead of off to the side. Here we go. Five, four, three, two. And scoot. All right. I love scoot, it's a good word. There we go. Now looks like there's star trails through and around. But some of them are going through her face, which is not actually ideal. So I'm gonna do less that happens when she's not there. I'm gonna do this one more time. Five, four, three, two. (cheers) Scoot. All right. This should be on the money. And there we go. This time, there's none that are going through her head, which was distracting last time. Now we've got this great vortex. Fun toy. Battery operated Christmas lights. Ikea, two dollars. Fantastic toy. Now I have EL wire, which has grown in popularity. It's not as, let's say, it's not as sharp when you use it, like LEDs, which are point light sources. The EL wire is a long continuous tone of color. It's also dimmer, so. I just brought the flash down by two stops and I'm gonna adjust my aperture the same amount, and see if I can balance the exposure to make sure that we can see the EL wire. But it has a very gentle effect to it, which can be used in a lot softer way than when using something as sharp as what we just used, so. Let's drop all this stuff. See that? Look at how fun that is? (laughs) Safety first. (laughs) There you go. Maybe that'll work down there. I might have you twirl and stuff so, let's see if we can hold that there. Just hold it behind you. That's great. So, nose a little bit towards the light, good. And after the flash goes off, I want you to slowly rotate, okay? Three, two, one. And now we have a really great sharpness to the beginning and then some blue lines that are rotating around. I'm gonna bring the flash back up a little or down a little. Let's do that again. And this time, just sort of rise up on your toes, up and down. Ready, three, two, one. Fooled you. Cool. And now we have a nice soft effect there. In darker places where there's less ambient light, you can use this to create really soft, gentle flows. Let's do one more fun one. This time, try and move everything below your shoulders after the flash goes off. Ready? Three, two, one. Great. Now because her head was in the same place, it stayed relatively sharp there. But the EL wire created these beautiful movements. Oh, that's great. Great work, Caitlin. Love it. All right, that's EL wire. After the flash goes off, I'd like you to close your eyes, because I'll be using UV light now. You'll get a suntan. So, UV will pick up probably the pulls on her hoodie, because they have optical brighteners in there, because they're white, they were bleached. Let's see if we can pull out some extra fun stuff with this. This is an experiment. Yep. And now we have something that looks like the EL wire, but it's just the UV light hitting the white tape around the zipper and those pulls. You can have fun with this, playing with highlighters, and we'll do that in a later segment. But the UV light is a fun light source. You can also find scorpions with it, by the way. This is something I believed in from day one. It's sort of a night photographer light painter's dream. It's called the pixel stick. You might've heard about it on Kickstarter. Backer 412, that was me. This is six feet of LEDs, RGB. What's it do? Well, it works like a big scanner. You feed images into it, and then it writes them in the sky. Isn't that cool? So I've created some color ribbons, I've created some other hand drawn art with this. The pixel stick makes beautiful light. You have options on here to select files, and I'm just gonna start with a red stripe. You have brightness, speed, all this other good stuff but we're gonna do something similar again, Caitlin, where I'm gonna just run behind with this, and you're gonna stand in place. So, chin a little bit towards the light. Little bit up. And a five second delay, and then I come in behind. It's so fun, it's so easy. Got a beautiful red stripe behind there. Let's go with some other fun stuff. Like I have made leaves. Leaves, I've made leaves. I went into Photoshop and made my own files. Yeah, love it. Combining this with flash is so powerful. Okay, I have even taken some of my paper art and put it in there because it can read any file. And that'll probably, because I'm set on 30% speed, be a little distorted. But look at that. Something that started out as cut paper is now being written as light in the air. Such a fun tool. And smoke grenades are not just for the daytime. They're also for the night. Guess what moves, smoke. And it moves longer and stronger at night. So we're gonna put this behind Caitlin and we're gonna do one final exposure where we make some colored smoke and add some light to it. I'm gonna go place it, and I'm gonna pull it and I'm gonna come back here, and my friend Gabe is gonna help me by doing a little light painting from underneath. So come on in, Gabe. All right. Somebody's gonna have fun with that one. Uh oh. Oh boy. Fantastic. All right, five, four, three, two. Perfect. Perfect. (laughs) So exciting. That's beautiful. Now we're really playing with time. And Gabe's adding a little bit of light to that. That's good, Gabe. We're running a 40 second exposure here. Hopefully we got a lot of that beautiful yellow smoke. Two, one. Exposure says, it's gorgeous. It's so gorgeous, I gotta make another. Three, two, look forward, up, up, up. Great. Gabe, a little bit, good. (whistles) And now Caitlin, scoot out. Fantastic. Making the best of the situation. Huh, and it's all over. I'm gonna cut this one off early, make a darker background. And there's two pretty phenomenal portraits there. One with smoke. Party in the club. One without. Fantastic. Well, now that we've covered all this, I want to challenge you to find your own toy light sources. If it has an LED, you should use it. If it has a soft source, you should use it. If it's light, you should use it. Pick it up. One example is this great thing that I found in Union Square in New York City. It was three little flycopters for 10 bucks. It was basically modeled after a maple seed. You shoot it up with a slingshot, it comes down and it twirls down, LED makes a nice little spiral. I saw that and I said, I'm gonna use it. Six months later, I brought it out to Nevada. And it looked like aliens descending. Who would've known? I didn't, I was experimenting. So, take it from me. It's worth finding a light source and experimenting with and level up your night portraiture.
Ratings and Reviews
Jan
I learned some techniques in Matt's class, which were helpful, but believe this was for the advanced photographer and i was a little confused at times. i would've liked to know the "how to" with the lights, showing how to program them with more detail. I am just learning how to set my camera for different lighting situations. But a very interesting course and glad i went through it.
Kirk Edwards
Great class! Liked it so much that I booked a trip to Colorado to work with Matt and Lance on one of their National Parks at Night classes. Highly recommend.
Margaret Lovell
While I believe this course is more beneficial for a photographer with better night photography and lighting skills, I learned quite a bit. This class made me think of some interesting ideas, especially using regular light sources such as flashlights or a pixelstick.