Lesson Info
11. Editing Images: Global Adjustments
Lessons
Class Overview
01:41 2What is Lightroom CC?
06:55 3Adding Photos to Lightroom
08:50 4Organizing Photos in Folders and Albums
09:11 5Adobe Sensei – It’s Magic
04:42 6Date and People View
06:15 7Picking Winners
08:45 8Filtering Images
06:17Using Photo Merge for HDR and Panoramas
17:48 10Edit using the Enhance Feature
04:26 11Editing Images: Global Adjustments
28:13 12Editing Images: Local Adjustments
23:45 13Copy and Paste Edit Settings
03:43 14Using Presets
13:12 15Integration with Photoshop
07:07 16Adding Titles and Captions to Images
04:51 17Exporting Images
08:04 18Sharing Images
08:20 19Creating a Slideshow
03:10 20Sharing Images with Gallery
04:31 21Sharing Images with Adobe Portfolio
08:24 22Sharing Images with Adobe Behance
08:51 23Sharing Images with Adobe Spark
05:14 24Sharing an Edit
07:13 25Sharing Images using Connections
05:08 26Migrating a Lightroom Classic Catalog to Lightroom CC
06:19 27Syncing Images with Lightroom Classic
04:39 28Class Wrap Up
01:34Lesson Info
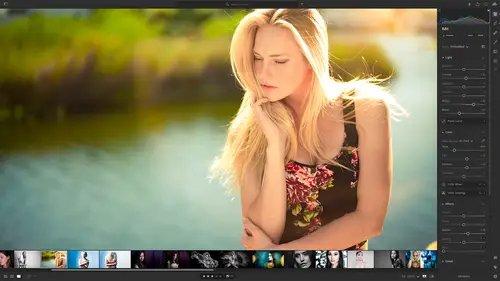
Editing Images: Global Adjustments
once your images are in lightroom, of course you're going to want to edit those images. And so the philosophy in lightroom for editing images, it falls into one of two categories. You're gonna want to do global changes for local changes in this session. We're gonna talk about the global changes in the global change is something that you do and it affects the entire image. Something like changing the exposure, the entire image gets brighter or darker. Or if you crop an image it's cropping the entire image, not just one part of that image or changing the color temperature or the color cast changes the entire image. Local adjustments allowed to go and do one little thing here and there to very specific local areas in the image. So let's start by looking at the global adjustments in Lightroom. I have created a little album here that has a bunch of the images that you can use to sort of understand. So you have most of these, you don't have this first one here of desk and that's because it's...
copyrighted and not allowed for distribution. But we're gonna use that because we're gonna start with this one because it has this fantastic thing here called a color checker passport and this helps us understand the dark areas in our image. The medium gray areas in our image in the white areas as far as colors and color temperatures and stuff you can really see in this area as we change things, these color patches changing so you can see if it's more red or green or whatever. And so this is going to help us see what's happening. And so I have in the the detailed view. So I hit d to get into the detail view and that is going to also help us to edit the image. You can also think of d for develop, we're gonna develop this image and so we want to do a few things. So on the upper right hand corner we have some little icons. This first one is the edit icon and this allows us to do most of our global changes. The second icon is the crop and rotate icon that allows us to crop and rotate our images and then we have our local adjustments that will do in the next session, which are this one right here, that's the healing brush. And then we have the normal brush and the linear gradient and the radio gradients. So we're gonna talk about first, the edit tool here, and so we're gonna go through all of that and notice that I have this hissed a gram up here, that's turned on. So you can show this or hide this, I have it shown. And then once you do that, you have some other options. So if you know what a history graham is, fantastic. Turn it on, if you don't know what it is, don't worry about it, it doesn't matter if it's not there or not. And then there's a workflow, in other words, a process of editing your images and it starts at the very top of this edit panel and goes down. So the very first thing we can do is we can use a preset or use the auto settings or the black and white settings. The next thing is we would add a profile, we'd change our light, then we would change our color and then we change our effects, then we change the details, optics and geometry. So we sort of work our way down this little list. You can jump around however you want but it's sort of set up to work from top to bottom, but you don't have to you can open and close these panels by clicking on these little triangles. So if there's just too much on screen, you can open and close. And then some things like this point curve here, you'll see there's a little triangle next to that. If you click that, it opens this up and then you'll get some help here that pops out, you get all these little help panels that pop in and out. Um and so you'll also see on some of the sliders or these little uh pop out things like color grading here. There's a little triangle if you click that you get more information. And so as we go through here, for example vignette, there's a little triangle, you click that and you get more options or you can hide those options and so be aware of these little triangles because they will show or hide lots of extra tools and if you're not aware of those, you might miss something. And so the triangles click away, see what's hidden there and so you can see what's happening. Okay, let's start at the top. We have um right at the very start we have auto and black and white. And so if I click on auto, um Lightroom is gonna automatically use sensei to figure out the proper way what it thinks is the proper way to edit my image. So I'm gonna click on that just to see what happens here and does a pretty good job. I think it's a pretty good job of figuring out exactly what we want. Um Jessica's skin is a little bit green, There's some issues there, but auto is not bad. If you're new to Lightroom and you just want to get some better looking images, click auto and then you can see what the sliders, what uh since I thought was the best way to edit the image and then you can override those by changing what's happening. So I'm gonna unclip that and get everything back to zero. The black and white button is exactly what you think, click it and now you have a black and white image and then you can edit from there. So I'm going to not choose that. These presets, we're going to come back to presets a little bit later on. So just put a pin in that one, we're gonna come back to what a preset is. So we'll get back to that a profile. You can see there's a bunch of profiles and you can even click browse all profiles or you can click this little check box right here that's next to that. And that also brings you to browse all profiles. So let me tell you what a profile is. So when you shoot a photo in your camera and you're shooting in raw format, the camera is shooting just basically it's saving what the sensor sees and then it has to do something to process that image. So when it shows it on the back of your screen it has either color profile. So it's more um the colors are better for skin tones or for nature it's high contrast, it's low contrast. Perhaps it's a black and white in the camera that you're shooting. But your camera has a mini processor that's processing those images so that when it shows up it shows up in a way that's pleasing the way that your camera is doing that is it's applying a profile. And so you probably have in your menu somewhere picture profiles or something that's similar to that and you can tell your camera and want high contrast low contrast black and white. Um whatever those are all profiles. And so raw files when they come out of your camera, they are unprocessed undeveloped images and they have to be interpreted in some way. And so the profile, the first thing you want to tell Lightroom is which profile to use to interpret that very, very first raw image. How do I want that to show up without any edits at all? And so there are many, many profiles that are built into Lightroom that you can choose from. And there are a great starting point to begin the edit process. You can always change them later. You can mix and match. That's the joy of shooting digital. But we're going to go in here and look at some of these profiles. Now this is set right now to adobe color that works for most things. But you can see the desk of skin color is a little off. If I go here to adobe standard, that looks a little bit better. If I go to adobe landscape, it's too saturated because the landscape is featuring the green and blue areas. So you can see that on this, this little color checker here. These are um natural image colors. So sky and green landscape. So these two. Whereas a portrait, you can see her skin color changes, it emphasizes these colors here more browns and neutral colors. And so you can change the interpretation of the colors just by choosing some of these favorites. There's also this right here, camera matching. So depending on your camera, you'll have profiles that come from your camera. So these came from my Canon camera and so if I click on neutral or standard you can see that the colors are changing. And I think if I click faithful all of a sudden her skin tones look look much better even than portrait. And so you can see there's all kinds of things that you can do. So I'm gonna go ahead and click faithful for this one. But you can see that there are black and white different interpretations, There are artistic interpretations so you can choose any of these as a starting point. And if you just hover over them, you can instantly see how your photo would look by applying that profile. So I'm gonna leave this to my camera matching faithful profile and that's good. So then I'm gonna go click back and you can see profile, camera faithful has been applied okay right after that you can see here that the color is off. So I'm gonna jump Instead of doing the light part, I'm going to do the color part 1st. So we need to set something called r white balance and that tells the camera what should be white and what should be orange and all of that stuff. So we're not going to get into what white balance is really in this class. I have other classes that explain that but if you know what white balance is, here's how you said it. So you can choose how this was shot. I know this was shot with a flash can choose that doesn't really change much or you can use a slider here to make it warmer or cooler. And so that makes a big difference. Or you can use this little color picker right here, this white balance selector. So if you have something that's a medium, um like a white sheet of paper or something that's a neutral color, you can click on it and it will set the white balance. This color checker here has a target. So this first little square right here is a white balance target so I can just click on that square and the white balance is set for me. And this is made to specifically set white balance for portraits or specifically set white balance for scenic photos. I'm clicking on this first little square here and once I have that set, I'm gonna go back over here and put that away. So my cursor is back to normal Now we can see that she looks sort of washed out and the contrast and all the stuff that we'd like isn't there yet. So I've set my color. I'm gonna close that and go back here to light and this is where I can change my exposure and contrast and all that kind of So in discus hair here, we don't really see a lot of the individual strands of hair and the texture of her hair. So I'm gonna go in here and I know that this is in the shadows. So I'm gonna click on shadows and I'm going to slide that to the right and that opens up those shadows so we see more of her hair that looks great. But I also want the black in this image to be black, not dark gray and so the border of this color checker and this little patch right here, that should be black and it's not, I'm going to click on the blacks slide that down. Now we're getting a lot more contrast in this image. I can go in, I can increase the contrast with the contrast slider. I can change my highlights, I can take this down, I can change just my whites if I want. There's a bunch of different things that we can do here to try to get this to the right exposure. And if you're not sure where to start, just click on auto and you're gonna get to a good starting point and then you can adjust and flavor that to taste those are normally referred to as tonal corrections. You can also, if you're a little bit more advanced, you can use this point curve and you can click and change saturation. Change tonality with this little curves thing. This is more of an advanced topic so we're not going to use that, but it's there if you are familiar with using curves to adjust contrast, I'm just going to collapse that we're just going to use these sliders for this class. Okay so we also have some other things that we can use here. I'm gonna collapse that we have an effects panel And we have two things texture and clarity. So texture. If I go to the right you can see we're getting a lot of texture on Jessica's skin and over here. And what that's doing is it's taking dark and light pixels and it's taking those borders and it's really exaggerating those. So the differences on the borders between a dark and a light area, it exaggerates that. And it sort of makes the texture stand out and then we have clarity which is similar to that. But it not only does the borders but it also changes the uh the contrast. So it makes it not only exaggerates the border but it takes the blacks and makes them blacker and makes the whites whiter. So you can see if I take clarity to the right desk looks a little scary and it's too much that we usually use that for something that had like a scenic shot or something. If I take the texture to the right, it increases the texture but it's not quite as scary as clarity. So you can play with these to sort of understand how they work. Sometimes you'll do a little clarity and a little texture. But those two things can make your image pop a lot more just by sliding those, we're gonna talk about D haze in a second with a different image that really shows how that works. So hang on to that vigna is to add a vignette to the outside. So a dark border and you can slide to the left to get a black border or to the right to get white. You can also click this little triangle here, you can change the midpoint, can change how round this is. You can change how it feathers. In other words the transition can be no transition at all. So you can really see what's going on or a nice soft feather. And then also you can select how you want to preserve your highlights. If you have a dark vignette you can slide this up or down to see how things will fade through that vignette and we're gonna take that vignette and get rid of it. Those are what the effects are Detail is to sharpen an image. So if I zoom into 100% and I sharpen this up can see that the eyelashes and individual hairs are much more pronounced. And so sharpening is something that you want to do on most of your images. Um And so you also if you're more advanced you can write or you can click this little triangle and you can talk about the radius and the detail and the masking. So sharpening just to sort of help you understand what these different controls are doing, Let me explain how sharpening works in a general, I'm going to generalize this. The sharpening allows us to perceive images as more sharp than they were taken. And the way postproduction does this is it looks for borders where you have a dark pixel and a light pixel. And what it does is it darkens this and it brightens this. And so depending on the radius, it tells how far out you want to darken or lighten. The radius is too big. You start getting called halos and let me show you in this. If I sharpen this way up and take the radius way way up. Um and make the sharpening way too high, you can see that. It's just way way too much. We don't really see the halos on this, but you might start seeing on the edges of things. If you over sharpen, you might see these little white areas coming out. Those are called halos. So usually your radius is Much lower. Like maybe one you're sharpening is much lower, something maybe 50 or so. That depends on how sharp you want an image in your taste. But the more you sharpen in print and export, the more you'll understand what's appropriate and what's not and again, if you're not quite sure, just hit auto and let sensei sort of help you with that. And there's some other ways that you can learn about all of this stuff that we're gonna show you a little bit later on. That's pretty cool and the noise reduction, if you have noise reduction, if you have noise in your image because you shot in low light, you can reduce the noise by sliding this. And if you have noise in your image because of low light and you've got like sensor kind of craziness, maybe you're shooting stars or something. You can also reduce the color noise. So those two things will help you reduce noise and then optics, these are fantastic. So every lens has some problems that will distort slightly your image. So by default, I almost always have enabled lens correction enabled. Lightroom is going to look and see what lens was used and it's got a profile for hundreds thousands of lenses and so it will automatically correct any kind of distortions. You can see if I uncheck that and check that it fixes, You can see it sort of popping in and out. It's fixing some warping that the that the lens introduces to make this a little bit flatter. And if you don't have a profile, you can manually go in and do some of this stuff. So that's what optics are. So, um, if you're not quite sure, always check enable lens corrections and then correct, remove chromatic aberration. You might want to have those two checked by default so you can click that and sort of see what happened before and after. Pretty cool and then geometry. I'm going to show you that with a different image. So those are the global changes that you can make. But we didn't touch on the hazing and so let's talk about that. And we also need to talk about um the, the geometry stuff and then we're gonna put this all together by editing this image of Karissa. So D haze, I have this image of the Taj Mahal, you have this in your sample files and it was just not a very good day for taking photos. It was very, very foggy and smoggy in Agra India. And so the day that I had planned to shoot the Taj, it just was not working for me, the light was horrible. And so what I've done here, by the way on the right hand side, if you look closely you can see there's a little dot, let me see if I can zoom in on this. There's a little dot, can barely see that there's a little dot next to each of these things. So that means that I've made some changes in the edit. I've made some changes in the crop, I've made some changes in other areas of this image. And so anytime you make a change there will be a dot next to that to tell you, hey, you've made some changes there and so I did that. So we wouldn't have to walk through all the changes that I made in this image and I've saved all those changes that I've made in what's called a version. And so versions can be found at the very bottom of the edit. So anytime you're in one of these edits, ah dialogues or panels here at the very bottom you'll see versions. It's right down here. And what you can do is when you import your photos photo, you'll have a version automatically called the original. And then as you're editing and doing different things, if you get to a point that you think is pretty good, you can create a new version of that. It's sort of like putting a pin in your edits and saying okay if I screw this up, I can always go back to this point. Or you might have different versions of black and white version of vertical version of horizontal. You can save different versions. So we'll create a new version after we finish this. Also. Lightroom creates auto versions. So as you're making edits and doing things, it will automatically create these versions. The differences the versions that you create, they stay in Lightroom forever until you delete them. They are there. The auto versions can disappear at any time. So these are here. Um So you can save an auto version as a named version But there's no telling I think these last 30 days or something like that. Um So you want to if you have a version that you like name it and put it in the named versions. Okay, I'm going to close that. Let's talk about D haze. So this is very hazy and so I want to see if I can save this. So what I'm going to do is I'm going to go down to my effects and we have, I'm going to close this. We have a slider called D haze. Watch what happens all I'm gonna do here is I'm gonna slide this left, I'm sorry, I'm gonna slide it right two d haze this and so I'll slide it about right there about 2 70 bam Holy smokes. Now we have a photo of the Taj Mahal that we can work with that looks fantastic. And so we were quickly able to go from this to this. That is a huge difference. It's just the D haze slider. Now, since we like that, let's save it as a version. Somebody go in here, create a version. I'm going to name this the haze and create there it is. Now I can go to my versions at any time. I can click, there's the original file, here's one that's cropped and I've made some basic changes and then there's the D hazed version. You can always go back and you can sort of see what you've done if you're creating versions along the way. It's really cool. The other thing that you can do is write down here, there's this little before and after icon. If you want to see what your image look like before or after click on that. It will show the original before image, click on it again and we'll go back to your changes so you can sort of see where you came from. This is where I started. This is where it ended, how it started, how it's going. Pretty awesome. Okay let's close that. It's pretty cool. Let's also talk about something called geometry. So I'm gonna go back hit G. And I have in this folder I've got this picture of this house here so I'm gonna take this one, the very first one. Um I think these are just pretty much two identical images here. Um And what I'll do is I'm gonna go to my edit panel. I've clicked that little icon and we're just going to go down and we're going to go down to geometry. It's the last panel, the last little triangle thing that you can open up in the global edit panel. So this has thing called upright. You can do a guided upright and auto, upright level, vertical etcetera. So this building has issues because it looks like it's falling backwards. So what I can do, I'm gonna close the effects here and open geometry so we can really see that. So what I can do is I can go and say auto and again adobe sensei is going to go and try to make this look level and vertical so it's not falling backwards. Does a pretty good job. I can tell it just do the vertical corrections. That looks pretty good. I can say do a full correction vertical and level and everything else. Or I can do a guided geometry guided upright. So the guided upright allows you to go in, get this little tool here and on the left is the are the crosshairs that show you where you're going to start on the right is a little loop that allows you to see exactly where you're placing the point. So I'm gonna click and drag so I'll click there and drag. I'm making a little line and I went to line this up on the building as precisely as possible and then I'll do another one. It's something that should be vertical, I'll do that, it should be there. And so I'm guiding it along saying these should be vertical and to be a little bit more accurate. I can also do one horizontally, so I'll do one right here, something like that. So I'm guiding light room through the process and it looks pretty good and then I can constrain the crop or not constrain the crop. And so I'm going to leave that so it's cropping out those unwanted areas and now we can see before and after before and after and that crop is not what I like. And so let's talk about the crop and rotate tool so we're gonna go to the crop and rotate tool next. And this allows you to crop images and so I want to bring this in a little bit tighter, a little bit tighter. By default there's this little lock right here, your aspect ratio is locked and so I can't make this a skinny or very, very thin and wide crop. It's gonna keep it the same width to height ratio that I shot. So if I want to change that, I have to unlock that, I have to click that lock and now I can make this skinnier and taller than it started out to be and when I get it to the right place I can just click that again and there is my image. If I want to straighten this, I can do that by taking this little straightened slider and it's going to try to level this out so I can do that or I can click outside the crop and drag and that will try to do that or I can click auto and it will try to figure out what level is for me. So cropping works pretty intuitively. You can do that. You can also choose specific aspect ratios. So one by one that's a square or 16 by nine. That's a wide screen for video, five x 7 x 5, 5 x seven for prints etc, you have some of those and then if you want, you can do custom, you can enter in the custom aspect ratio that might be something that you would want to use for a specific project you're working on or a specific print size, something like that. So the crop tool is pretty self explanatory, it works great. And then of course we can go and look at before and after and you can see we fixed our building falling backwards. Now there is a little bit more to that geometry and I'll show you an image that is way out of whack. You can't really fix something that is this far out of whack. But I'll show you that we can get sort of close again. The Taj Mahal, this was shot with a really wide angle lens at 21 millimeter lens so it is not level and it looks like it's falling backwards. If we go into our geometry again at the very bottom we can start looking at some things. So I'm going to try to do a full and you can see that wonk it looks like these, the towers are peeling out to the side so I can try changing my distortion. That sort of helps that can change the vertical part of this so that sort of helps that again um you're not going to get this right with something that's this poorly out of whack. But you can see playing with this, you can get pretty darn close and so you can play with this on your own. It's in the class materials and you can see exactly what all of these different sliders are doing and how that works. So it's just something that you can play with at home. Okay, so those are our global adjustments. The next thing we need to do is to learn how we can do more specific things and so maybe we want to brighten up one part of an image or remove one spot out of one part of the image. We can do all of those things with local adjustments. And so let's learn how we can take the global adjustments and then apply them and then make more specific adjustments. So let's do that next.
Class Materials
Bonus Materials with Purchase
Ratings and Reviews
Susan H
What a great class! I've started & stopped a few Lightroom classes up until now, but generally gotten bored, confused or felt I needed to step away to learn something else like Adobe Bridge first. Mark is a great instructor, engaging, specific & very clear with his explanations. I finally feel confident to play in Lightroom instead of feeling constantly overwhelmed by what I don't know!! Awesome! Thank you, Mark, you've also inspired me to dream about travelling again now the world is opening back up :)
Robin Spencer
I'm glad I bought this course. It was very basic but just what I wanted. My plan was to see if Lightroom could replace my current Lightroom Classic. Some of Lightroom functions are fantastic it looks like many of the functions I use with Lightroom Classic are just not there. So in short Mark answered many of my questions.
Glenn Pierce
Excellent fundamentals course on Lightroom! I really enjoyed Mark's teaching style which is easy to follow and very relaxed :-)