The Ultimate Guide to Learning Photography: What is Bracketing?
Exposure Bracketing: A Simple Trick For Nailing The Exposure Every Time
One of the hardest things to perfect in a photo is the exposure, as there are many pieces to bring together for the perfect image. Exposure bracketing allows you to take 3 images at 3 different exposures which gives you the security of knowing that one of them will have captured the light in the best possible way.
So what’s the best way to use exposure bracketing, both during the shoot and in post? Here’s how a simple camera setting can make sure you capture all the details in a single press of the shutter.
In this guide you will learn:
- What is Bracketing and Auto Exposure Bracketing (AEB)?
- When to use use bracketing in photography
- How to manage bracketing in post-processing
- Other types of bracketing: flash bracketing
What is AEB or Auto Exposure Bracketing?
Exposure bracketing can be done manually by taking a shot, adjusting the exposure compensation or shutter speed and then taking another shot. Manual exposure bracketing makes it easy to customize your bracketing based on the scene by taking more shots for high contrast scenes and fewer shots for low contrast ones. But slight camera movements can make working with the different exposures difficult in post and manual bracketing will slow you down.
Auto exposure bracketing, or AEB, tells the camera to bracket the shot for you, which means that after you turn the feature on, you only need to press the shutter release once to get multiple exposures of the same scene. AEB is included on most advanced cameras and many allow you to customize the number of bracketed shots and the exposure difference between each one.
On the Canon Rebel series, for example, the setting is located inside the menu and referred to as AEB or bracketing. Canon allows users to adjust how much the exposure varies between each shot, but the Rebels only take three bracketed shots.
The Nikon D7200 has the bracketing feature as a shortcut marked "BKT" towards the lens barrel and turning the front and back control dials adjusts both the exposure compensation between each shot and the number of shots, up to five. Nikons without the shortcut button usually have the feature inside the menu.
So how much should you bracket? A 1/3 exposure compensation is the default on many cameras, creating slight exposure differences between shots. The 1/3 is a good setting to use if you are fairly confident about your exposure and for most scenes.
If the scene has a high level of contrast, or you’re just really not sure that your exposure settings are even in the right ballpark, adding to the number of bracketed shots or setting a higher exposure compensation value increases the exposure range the camera captures for a wider range to choose from later.
AEB is a simple way to bracket — the trickiest part is just finding out where the setting is located on your particular camera model. And for that, there’s exploration, the camera manual, Camera Fast Start classes, or of course, Google.

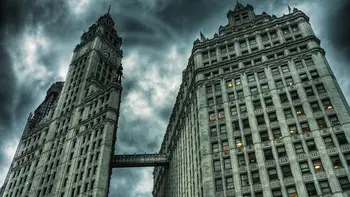
— Photo: Matt McGonagle
Should you use Photo Bracketing all the time?
Exposure bracketing is a helpful technique for getting that exposure dead-on. Using AEB is a quick, efficient way of taking advantage of the method. But, while those shots are one right after another, the slight delay may not be for every shooting scenario. If you’re shooting sports using burst mode, you’ll have three different exposure values mixed into that burst, which could mean that the shot with the right timing has the wrong exposure.
Using AEB also means you’ll be shooting three times the number of photos in about the same amount of time. That means your SD card will fill up three times faster and, if you don’t go through and delete the exposures you don’t need, your hard drive will fill up quickly as well.
When detail is paramount and the exposure is tricky, AEB helps ensure you leave the shoot with the shots you need. While great for a number of applications such as landscape photography and street photography, the delay isn’t ideal for action — and the added images can be a data storage headache.
What’s the best way to manage exposure bracketing in post?
Shooting three images instead of one also opens up more possibilities in post processing: simply choosing the best of the three, dodging and burning the AEB layers or the popular high dynamic range or HDR technique.
Often, the best shot out of the three can be chosen with a quick glance — but not always. Using a RAW editor, sometimes the shadows are easier to recover than the highlights and vice versa, which means you may want to pick the brighter or darker image not because it’s closer to what you want, but because more of the details are recoverable. A good rule of thumb is to start with the closest image, but don’t trash the other exposures until you are finished with your edit.
But what if you like the shadows in one shot, but perhaps the sky in another? Using Photoshop or another image editor, you can layer all three bracketed exposures into a single file, with the best exposure on the top. Using the eraser with different brush sizes or selection tools, you can brush away select areas to reveal the photos underneath. This is similar to using the dodging and burning tools, only you have more data to work with because of those multiple exposures.
HDR is similar to that layered dodge and burn, only all of the images are typically merged together instead of selecting which part of which shot you would like to show. With the images merged, the final file has a greater range of light than what’s possible to capture in a single shot. HDR is a post processing technique, while bracketing is the shooting technique that makes it possible. (You can read more about how to process a set of bracketed exposures for HDR here). While HDR is an incredible technique for high contrast scenes, it’s also easy to overdo. With AEB, however, you have the data to choose whether dodging and burning or a full HDR merge will get you closest to the look you are going for.
Is exposure the only thing that can be bracketed?
Actually, no. Exposure is the most popular type of bracketing and a feature that’s included on most advanced cameras. Bracketing a flash to adjust the intensity of the light with each shot can be just as helpful, or even more so, since manual flash involves a bit more guesswork than choosing exposure settings based on the light meter. Too much flash often means odd shadows, but too little doesn’t grab enough of the details. Auto flash bracketing is a viable solution if you’re not confident in your settings or if you need to move along quickly without checking the shot.
Setting flash exposure bracketing (FEB) is very similar to AEB, except the setting may be located in a different spot. For Nikon shooters, for example, FEB is inside the custom menu under Exposure/Flash, including the option to switch from just bracketing the ambient light, or bracketing with the flash. Some hot shoe flashes also have their own FEB options, including Canon Speedlites. Both will allow you to adjust the difference between the shot in stops, just like with exposure bracketing.
Some cameras will also adjust settings outside of exposure and flash in a bracketed series, though these settings are often less useful than exposure and flash bracketing. Nikon, for example, allows for white balance bracketing. Since shooting in RAW allows you to adjust the white balance later anyways, this setting is less helpful.
If the third time’s a charm, bracketing helps guarantee a charming shot by automatically taking shots with three different settings. Exposure bracketing helps photographers grab the ideal exposure while out shooting — but it also makes post processing techniques possible using more data from multiple images. While auto exposure bracketing is the most popular, flash bracketing can help flash newbies perfect the art of blending a flash with the ambient light.
Other Guides
- Photography Guide Home
- Photography Lighting
- Photography Post Processing Techniques
- What is Aperture?
- What is Shutter Speed?
- 5 Rules of Photography Composition
- What is Camera Raw?
- Creating Bokeh Backgrounds
- Hyperfocal Distance
- Focus Stacking
- Long Exposure
- Choosing Photography Subjects
- What Makes a Good Photo
- How Does A Camera Work?
- Composition Techniques
- Aperture & Depth of Field