Lesson Info
23. Editing Butterfly Shoot
Lessons
Day 1
1Class Introduction
09:49 2My Evolving Style
18:00 3Visual Examination
24:41 4Storytelling and Character
32:40 5Storytelling Q&A
07:59 6Critique Yourself Part 1
30:18 7Critique Yourself Part 2
13:06Identify the Problems
24:10 9Posing Overview and Q&A
15:17 10Ten Basic Poses
35:30 11Posing a Man
10:25 12Shoot: Posing Demo
11:53 13The Art of Self-Portraiture
17:49 14Posing Yourself
24:27 15Shoot: Self-Portraiture Demo
17:18Day 2
16Shoot: Indoor Scene Part 1
23:54 17Shoot: Indoor Scene Part 2
21:13 18Shoot: Butterfly Daydream
30:05 19Image Compositing
37:59 20Shoot: Using Props
18:26 21Editing Indoor Shoot Part 1
26:22 22Editing Indoor Shoot Part 2
20:47 23Editing Butterfly Shoot
18:33 24Editing Pool Shoot
24:48 25Shoot: Outside with Open Sky
23:49Day 3
26Shoot: Fairytale Scene Part 1
29:08 27Shoot: Fairytale Scene Part 2
22:20 28Shoot: Snow Scene
26:36 29Editing Outdoor Scene
31:28 30Editing Fairytale Scene
26:32 31Editing Snow Scene
15:59 32The Business of Fine Art
26:03 33Eight Business Practices for Fine Art
14:28 34Beginning Your Artist Statement
19:28 35Making Prints with Q&A
33:50 36Becoming You
32:35 37Taking Risks
29:40 38Bonus Video: Expand Your Space
01:17Lesson Info
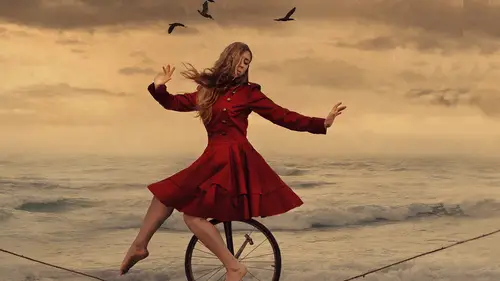
Editing Butterfly Shoot
okay so let's go find our butterfly picture and I want to show you this image in terms of how to composite this together for the simple reason that we expanded the frame a little bit differently I actually moved my tripod this time so let's go ahead and add those shots in together I'm going to start this the same way and I'm going to move through this part a little bit faster because we've already done this so I'm going to do this the easy way not the hard way through canvas size but by clicking the crop tool just dragging outward however much I want let's see that looks good and say okay now that my frame is expanded I'm going to click on my move tool go over here and this is the left hand side of the frame that I shot I shot this by picking up my tripod moving it over photographing that extra space and now I'm going to add it in some clicking anywhere in this image clicking dragging and dropping now this one could be trickier because of all those little tiny butterflies I actually th...
ink it's going to be a lot easier to put together because of the fact that I could just erase around specific butterflies so I don't have to worry about tons of leaves intersecting the butterflies are pretty nicely spaced so I'm going to lower the opacity on that layer let's see I'm going to just place her face there I'm looking at the baseboard though more than her face it's okay if this is slightly off and that baseboard looks perfect so I'm going to dio just to about there I think take the opacity back up on that layer create my layer mask with this little circle with a rectangle button down here choose my brush tool on black make sure my opacity is up right click make sure my hardness is down and I'm going to take that size up quite a bit and now with just big sweeping motions aiken start to a race where I don't want that uh other image to be layering on top it's okay to go too far that's why I love layer masking I'll zoom in here now go in with a smaller brush and I'm going to hit x on my keyboard and that switches to white now I'm going to start to bring that back tto add these images in together I'm going to go down the whole line here zoomed in just so I'm making sure that I'm not missing anything the baseboard fit perfectly in there so I'm really happy about that and everything looks good there now I might make it slightly darker because you can see here that it's a little bit brighter than the other image that we're working with so right at the same time I'll just click on the actual layer command m for curves hoops that was too much and just make it match I'm not being very delicate today I think that looks good does that look okay okay okay all right there now when I add in the other half of this so other half is over here v for the move tool clicking on the image dragging it and dropping it and I'm going to do the same exact thing here looking at the bass board more than anything else just making sure that I am matching that up perfectly let's see if I noted with my little arrow keys I can really see what's happening that looks perfect to me so taking that opacity up zooming out so we can brush the whole thing choosing my layer mask on my brush tool x for black making my brush size bigger with my right square bracket and I am just going to start erasing everything and big sweeping motions because there is nothing specific to be done here zoom in again take a look at what we've got going on make my brush size much smaller x on the keyboard to switch to a white now I'm just going to paint that back in see how I'm replacing that butterfly instead of going back and forth and oh no it's not working I'm not worried I'm just going to replace that entirely if ever that comes up but it looks like we're good because of how the butterflies were spaced this side doesn't even really look like it needs to be changed in terms of the light but let me just do mountain make sure it's a little little bit brighter I can't tell can you get stell I can tell yeah tiny minute okay they're saying you little bit are okay so a little bit darker we're going to make it in curves a smidge smidge okay that good oh you guys you kill me okay we'll take it from the highlights and then we have a little bit more control say okay now from here I would like to crop this so let's just zoom out get the crop tool hold shift click and drag for my perfect square I'm going to send to her up there because I did want her in the center of that image it returned or entered to say okay now when I zoom in we've just got this little missing part and that's where I would clone that in just like we did before very often when you're moving your camera all around you are going to have little missing areas because of tilting we're panning or moving whatever the cases and that's why it can't hurt to take extra shots all around the frame like we mentioned before I was just the other day shooting with andrea and she did a shot that required a lot of extra pictures and she clicked her cameras so many times all around the frame and even then it wasn't quite enough and it feels like you're taking too many pictures but there's no such thing in that case because you don't want to be stuck with something that you just can't fill in in photo shop I know that I will be asked about why don't youse content aware phil I just don't know where it is so I don't know but I just do it manually eh so I'm going to go ahead and clone this I'm clicking right there just below and moving that over so we can see there that I need to combine these layers now to be able to fill that little corner in so I'm going to do the same thing that I've been doing going to click the top layer command option shift e and now everything is combined into one layer on top and now I can much more easily clone this little area in right there okay now let's take a fresh look I really like her pose on this one I like how centered she is I like that she's sort of looking up towards the butterflies a little bit she has a nice long neck naturally which was enhanced by the fact that she put her shoulder blades up against the wall so let's just zoom in and say okay what has to happen here needs to be a little bit brighter in my opinion where the subject is but perhaps not so much where the wall is so let's go ahead and add light to our subject on lee I'm going to do this with my lasso tool again dragging and drawing wherever I think she should be a little bit brighter maybe just through here like that right click feather or refine edge whichever you prefer and let's do something like fifty pixels and we'll see how that goes I always just guessed with my feathering I could just use refine edge my computer likes to crash whenever I open anything more complicated than a single box so father is really good for me and so I'm goingto take that up with curves command m control em if you're on a pc clicking on that curve and pulling up to make her a little bit brighter there say okay right click and d select now I'm going to the same thing but just on her skin now getting right in there feather will dio forty pixels for that one and back into curves to make just her face a little bit brighter and you don't want to make it unbelievably brighter at the same time because if I took that way up it wouldn't even be believable because clearly the same light that's hitting her is hitting the wall so I want to make sure that she is not like this big cutting paste bright white face on this wall but I do want to make her stand out significantly I'd like to make the butterflies brighter so I think that I'd like to just select maybe just like this we'll just do a much bigger selection of her even and get those butterflies right click and feather this time we'll do one hundred and fifty pixels on that feather curves make that all little bit brighter again okay now d select now we haven't done much here but we have brightened her up a lot and that spot on the wall so that's very very important to me to make sure that we're getting the right light here now I can go in and I can change these butterflies if I would like to but I forgot her I was open well we'll have to play with that do hit her I love her eyes so I could change the yellow of these butterflies if I didn't like that I could make them all blue if I wanted to and that is something that I'm actually encouraged to dio because I don't like to photograph yellow that's so bright so often so maybe we will go into image adjustments replaced color and zoom in on our image just to select one of these really vibrant yellow pieces take our fuzziness up a cz much as possible all the way and see what that hugh slider does now whoo that's something not in a good way uh let's see which way should we go I always have to just check it out and see what the possibilities are in either direction I kind of like the light blue a little bit so maybe we'll go with that and we can take the saturation down if we want to if it's just a little bit too saturated there we go I like that one that's a big difference so we'll say okay and see how it looks when we zoom out okay so we have a much more dis saturated image now we haven't image that has lost its color essentially from all that vibrant see into this but I like that a lot more because I like an image that's very subtle in the color instead of having a color that I really don't like be the only vibrant thing in there so I'm going to leave the butterflies as they are with this coloring now the advantage if you d'oh individually place butterflies so if you went with the option of taking one butterfly and photographing it multiple times then they would automatically be on a totally separate layer which means that you could then change the color or the contrast or anything of all those butterflies all in one fell swoop because they're all in different layers without changing the background so that's the benefit to compositing in that way however I'm quite happy with this with this sort of range of coloring that we're getting right now I want to change her hair I want to make her hair be the most vibrant thing in this image so I'm going to select it just like I did before but in this case the replace color probably won't work a cz well because of how dull the hair is at this point so I'm selecting selecting selecting and I'm going to move down hold shift to select mohr of the hair there we go and I'm going to continue doing that until I've selected everything now in this case I would very much like to go into curves to do this because that's going to give me a much more even look so whatever I'm trying to do here with making her hair pick up the red a little bit better than it was before so I'm going to select the rest of these hairs again nothing very fancy doesn't have to be perfect but just so that the majority of her hair has that red glow the rest will look believable a cz well so I have learned my lesson that it's better to get a little bit less of the hair actually in this case than to try to select mohr because then you start changing the color of the wall all around her and I definitely don't want that so right click feather will do ten pixels there I think that might be all right see we'll zoom out just a little bit and now I want to go to image adjustments curves in this case maybe we could make it a little bit brighter there we go ad that contrast again and then go into the red curve and make it a little bit redder you can see here that we are getting some of that dress in there so I'm not gonna worry about that yet I'm going to just de saturate that afterwards because I really like what we've got going on here so I'm going to add a little bit more red I could go in maybe out a little bit of yellow and say okay right click d select so I need to fix this little area in here where we made it a little bit brighter and a little bit too saturated so I'm just going to re select that just get right in there wherever it's a little bit too bright or to saturated right click feather ten pixels curves make it darker and that automatically fixes the saturation of the same time if it didn't you could always go into image adjustments hugh saturation and then take that saturation down went I think I will and that will fix that problem okay so if I zoom out there oh I noticed a little spot that I can't help figs because it'll drive me nuts right click feather ten pixels same thing that we just did make it a little bit darker that's really all it needs okay there we go so now she has much more vibrant hair and I like that contrast of that blue against that read so now I would add my overall color changes or I would add oven yet and I do want a vignette here given that the butterflies are moving outward I think it would be really pretty so I'm just going to select wherever I think that vignette should be right click feather three hundred pixels is a really good amount for me in terms of feathering for a vignette now I have a feathered selection all around my subject so I'm going to right click and select inverse now that selection is still feathered it goes right up into the edges of the frame curves and I'm gonna make it a little bit darker around the edges d select I'd also like to add some contrast to this image maybe make it overall little bit brighter so let's go back into curves see what we can do here with adding some contrast I think that looks nicer usually if I have an image it's a little bit dark I like tio pull up on the shadow portion and that will just make it a little bit hazier sometimes I'll pull down on the highlight portion as well and then give it a little bit more contrast and say ok now if I were to go back into curves I absolutely could I could change some more colors on this maybe I would go blue and sigh in instead of yellow and red but even if I do that I still make the highlights yellow so I'll make the highlights yellow but then add blue overall to the image and then I'll go into my red curve perhaps add some science everything and then green so this is sort of my process going into the blue curve and then the red curve and then the green curve where I now want ad in that magenta so this is just one color option that we have here we can add so many different colors but I want to move on from this image and move over to our pool shoot so if you guys are cool with that then I'm going to go onto the pool is that good yeah can I ask maybe one quick question just cause it's it's one of the topics bubbling in the chat room who again continue to be very enthusiastic about what you're doing but the question is why do you work on one layer instead of doing everything through different layers adjustment layers instead of painting it directly on why do you work destructively instead of non destruct exactly I love it people say that to me all the time why do you work destructively instead of non destructively and the reason is I'm going to defend myself with an article that I can't cite might not be true but uh still I'm going to do it I did read an article once that said that if you have it like let's say one hundred two hundred different adjustment layers in your layers palate then it's just as destructive as if you just do things to the actual layer I read it I'm just saying it could be true but that's what ends up happening to me is that to finish this image I will have so many different adjustment layers that I get really overwhelmed by having one hundred two hundred different adjustment layers and I would rather just make changes to a few specific players so when I'm finished compositing I'll combine everything into one layer but I will never ever flatten my image so yes even though you could call it destructive editing which I mean I don't really know what that means anyways because I've printed my image is very large and haven't had an issue but I haven't done a billboard so I don't know if that's when I'll have an issue with destructive editing but whatever the case may be if I have made a change to the layer that I'm working on like right now I'm on layer three I've made some pretty significant changes there I will then duplicate that layer and I'll start working on a new one so once I've made a significant change I then duplicate my layer continue working on the next layer and then work like that so then if I need to go back to another change that I made a long time ago I can still do that so not a great answer I know but no apologies hey I like it do it the way that works for you yeah right and everyone has that option but at the same time I do use adjustment layers every once in a while and sometimes it's just if I know that I'm not going to be making that many changes that I will absolutely go into my adjustment layer you know click curves from there and then make those adjustments there but the thing is that I almost never ever go back into my adjustment layers to make any changes whatsoever so it doesn't really see beneficial to me because I just have all these extra layers and I don't really use them I'm in the way that some people might so um yeah no good reason now
Class Materials
bonus material with purchase
Ratings and Reviews
Kirsteen
Brooke says she wants to be inspirational - she has achieved this and so much more during this course. I am so inspired to follow my dream of becoming a fine art photographer and step out of a life as an academic and stop finding excuses. Watching other photographers shoot and edit is always a great way to learn, everyone does things slightly differently and I enjoy Brooke's no fuss techniques. Seeing so many of Brooke's beautiful images through the course has been great and seeing shots from the shoot through to editing really makes them come alive. If you are looking for inspiration or you want to learn techniques or new skills then this course provides all of these things with a big dose of positive thinking thrown in.
user-a81eeb
Brooke is amazing! I love this course. Brooke is easy to listen to. She has a beautiful insight into creative fine art . Love it! I have learned so much. I especially love that she is so candid about everything.
renee Akana
I love Brooke and the wonderful way that she teaches. She is a gift to us all. Jane, her model, was lovely - a beautiful girl, a wonderful attitude and a real professional.. I could not do what Jane did to help Brooke convey her story.