Lesson Info
29. Editing Outdoor Scene
Lessons
Day 1
1Class Introduction
09:49 2My Evolving Style
18:00 3Visual Examination
24:41 4Storytelling and Character
32:40 5Storytelling Q&A
07:59 6Critique Yourself Part 1
30:18 7Critique Yourself Part 2
13:06Identify the Problems
24:10 9Posing Overview and Q&A
15:17 10Ten Basic Poses
35:30 11Posing a Man
10:25 12Shoot: Posing Demo
11:53 13The Art of Self-Portraiture
17:49 14Posing Yourself
24:27 15Shoot: Self-Portraiture Demo
17:18Day 2
16Shoot: Indoor Scene Part 1
23:54 17Shoot: Indoor Scene Part 2
21:13 18Shoot: Butterfly Daydream
30:05 19Image Compositing
37:59 20Shoot: Using Props
18:26 21Editing Indoor Shoot Part 1
26:22 22Editing Indoor Shoot Part 2
20:47 23Editing Butterfly Shoot
18:33 24Editing Pool Shoot
24:48 25Shoot: Outside with Open Sky
23:49Day 3
26Shoot: Fairytale Scene Part 1
29:08 27Shoot: Fairytale Scene Part 2
22:20 28Shoot: Snow Scene
26:36 29Editing Outdoor Scene
31:28 30Editing Fairytale Scene
26:32 31Editing Snow Scene
15:59 32The Business of Fine Art
26:03 33Eight Business Practices for Fine Art
14:28 34Beginning Your Artist Statement
19:28 35Making Prints with Q&A
33:50 36Becoming You
32:35 37Taking Risks
29:40 38Bonus Video: Expand Your Space
01:17Lesson Info
Editing Outdoor Scene
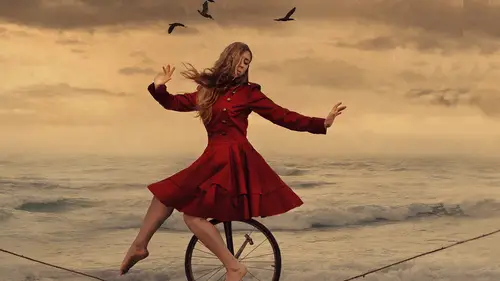
um like I said yesterday editing is my favorite thing in the whole world to dio because you have so much creative control over everything without having to expend a lot of energy dragging six mattresses up four stories in an abandoned building so today we're going to be editing what we shot yesterday so at the end of the day yesterday we went out side we shot some portrait's out there I'm going to be editing the wedding shot from that one where we had the bridal shot with the wedding dress and the veil I'm going to be showing how to get rid of all the extra stuff that we have in that picture you could see the building you could see trees and things like that because of our set up we were supposed to have the model up really high with all the white blocked off of her but it was not going to happen if you were able to watch that segment yesterday so instead we improvised we did what we could we had her down on the ground and so I'm going to show you how to still make it look like I had i...
n my head if you don't have access to perhaps what we didn't have access to tomorrow or yesterday so we're going to be editing that first showing how to put a sky in the shot I love adding clouds and all of my images and that's something that I get a lot of questions about so I want to go over that exactly however you go about doing that for this image it's going to take a lot of little tweaks and playing around with it to see what works and what doesn't work but I find that to be a really inspirational process we're going to edit while we shot today so we're going to do the princess and the pea shot we're going to see if we can put that together and that will mostly be just stitching seeing how the image is stitched together changing the light on that back wall like I talked about during the last segment on dh then we're going to be editing the snow shot which I'm really excited to end on and it's actually really interesting shot because it's a kind of thing that I really like in camera and so that's the one where I'll probably say oh gosh what do I do now because I really like how it looks in camera and I get stuck there a lot where I look at my picture and then I think oh no what do I do now because I already kind of like it and I'm kind of used to not liking my pictures that much in camera I think of it more as getting the raw shots and then say okay now I'm going to transform these shots so that'll be an interesting process because I haven't even been able to look at them yet so I'm going to look at these with you guys for the first time see what everything looks like and then try to put it together so let's go into our first image if I take a look here this is the shot that we're going to be working with from yesterday so I chose this picture was the last one that we took I chose it because the front of the dress is moving and the back of the dress is moving I knew I was going to be cutting the back of the dress off and that's okay with me because that's how I want to crop it so I'm going to crop it right at the edge and then I'm going to crop it just over here into a square obviously we're going to get rid of jen sorry about that we're going to a race you right out of there and we're going to do this very very simply by painting white all around her this is a really easy thing to do because she has a very clear line of her dress where we're going to be a racing against so that's something that we're definitely going to do first I want to take you though into my cloud shots so I'll show you exactly what I have pulled up the moment we have the shot in photo shop and then if I go over here this is the cloud image that I have picked out to use as the one that we're putting behind the subject I thought that it was really beautiful with the way that the light hit the clouds I thought that that would blend really well into this image and the perspective was pretty good as well so I'm going to show you my library of images thumb I take cloud pictures constantly in fact it's a little bit irritating to those around me because anywhere I go I must have my caramel list made it take those amazing cloud shots I usually don't makes me really sad but nonetheless that is something that I have to focus on because I love clouds too much and I know that I want a variety for my images so I'm just going to start over here and show you a few different things that I'm doing when I'm photographing clouds so this one in this case we've got of court backlighting we have the sunset it's just about to go over the horizon but you could also see that we have all of this bramble the trees and different buildings and rocks and whatnot we have a car in front and so all of that has to be taken out of the image which means that realistically I could only use this center portion of these clouds so this is not an ideal cloud shot even though I was able to get up to a higher elevation to shoot the horizon line I still have all of these trees in my way and so I can't use this probably for a very large picture because I have to stretch the sky too much to make it fit you can see I took a few more that day moving on to some other shots with thes mountains in the foreground and so that's really something that I'm trying to avoid so let's see I'll take a look let's just scroll through some of these clouds see lots from that day it was a really exciting cloud day as you can clearly see I mean look at that what a good sons that right that's what I live for so then we have clouds like this which are really great to use because there's a very clear horizon line and you have a very clear shot of the entire cloud so I am looking to shoot clouds with owen's that's probably note no tighter than a fifty something wider is really great for shooting clouds I using either a thirty five or fifty most often because that's all I ever have on my camera so let's take another look through here at the rest of the clouds now some of these air not ideal like this one where I was shooting inside a building looking out and so you can see the sort of reflection that I had from the glass that's something that I have to think about taking out later are these clouds worth using let's see I don't even get this one for the clouds I just thought it was a really pretty scene as I was driving so I'm going to go through now sometimes when I'm in airport in an airplane I take claude pictures out the window if I can I was just on a flight recently where the woman sitting at the window wouldn't let me take the cloud pictures and I was so sad so I try to get them whenever I can and so I have a bunch of those so what I'm looking for are getting a variation of clouds something where there's backlighting where their front lit where it's maybe mid ace something where the sun has just gone down and there are a few clouds left in the sky because I have a lot of different lighting situations that I might need tio have different clothes for so I'm just going to scroll through and if there's something that you guys see here that you were like I would much rather see that cloud in the picture then let me know we'll see what we can dio I may or may not take your advice I have hundreds of cloud shots these air just some of my cloud shots that I brought with me these are some of my favorites though so I like to travel with them just in case I get inspired and I want to do a photo shoot with a cloud these are some of my recent favorites have really been enjoying using these because it has this beautiful color variation in there this one especially I've used it twice don't tell anybody but I use that one a lot flynn let's see we have some sunset shots and just different types of clouds so we do have the cloud already brought in so let's get started editing that in photo shop I'm going to start over here figure out what I need to change I don't want to immediately import that cloud layer because that's just gonna be something distracting that I'm not even ready for yet so I'm just going to focus on this shot of jane up in that wedding dress and I'm going to focus on getting her isolated in the shot so first thing that I want to do is duplicate my background layer I'm duplicating that layer just so that I have it preserved I want to be able to go back to it I don't want to make changes directly to my background layer so I'm just going to duplicate it and now that I have a duplicated I can either make changes directly to that layer or just have the peace of mind of knowing that it's there in case I need it for any reason whatsoever I'm going to go ahead and crop this because I'm not expanding my frame I don't have anything to add into this picture I'm going to crop it so let's just zoom out a little bit here goto our crop to on going toe hold shift click and drag and that will create my perfect square I actually think though that there's a little bit too much negative space on the left hand side of the frame because the right hand side is so filled with fabric so I'm going to take that down hold shift click on any of those corners and just bring that in and I'm gonna cut off the bottom of the wedding dress to leave that mystery of where is she standing how is she you know in this position and I like her over on the left hand side of the frame and that left third esso I do think about third's a lot of from not putting somebody directly in the center I do want to make sure that they're representing a third of the frame so I'm going to leave that just as it is right there and say okay so this will be my frame we'll zoom in on that there and let's take a look at what needs to happen in order to get rid of the building and the trees and things like that in this image so if I take a look here I know that I need thio first let's say we're going to remove this part because it's a really big part of this image that I don't like so how do I start to remove it I could go ahead and clone it but that seems like a lot of work with not a lot of information to work with so we'd really only be ableto work with this little white part in here and I was just going to be tons of little tiny cloning dots all around so I don't want to do that instead I just want to sample a color from within this region and then paint right over that so I'm going in with my paintbrush tool the regular brush tool going to right click to bring up my size and hardness sliders I think the size is pretty good but if I have my hardness down at zero percent that's a very very fuzzy brush so if I have a fuzzy brush and I sample a color going to sample a color by pushing alter or option sampling a color and then I start painting that color opacity all the way up to one hundred percent then I can't really go along that dress without making the dress looked really fuzzy so I don't want to do that I'm going to step back in history and I'm going to go in with a harder brush I have it eighty five percent now that's a pretty hard brush her dress is actually quite in focus I don't know how but I got all my pictures and focus yesterday so this is quite a feat for me so I'm going to go in with about a ninety percent hardness brush and just paint right along that edge and the great thing about doing it this way painting along the edge is that you can actually cut into the dress and nobody will ever know the difference if the hardness of your brush matches how sharp the dresses then I could probably go in here and just cut a bunch of that off like that and you would never ever know in the final shot that I cut some of the dress off I'm going to control z that though because I don't want to do that now another option here let's say you don't want to paint directly on the layer and you want to be able to remove the background without doing that you can create a new blank layer right above everything and then paint directly on that layer so if I'm doing that then I can always turn that on and off I can erase it where I don't want it with a layer mask so it's a little bit more of a nondestructive way of editing this picture now if I go up here I have this really harsh line that I've created and that's because I have a really hard brush but we're not in an area anymore where we need a hard brush because I'm not a racing against anything I'm trying to blend everything together so I'm going to right click take my hardness all the way down and then continue to just paint with a fuzzy brush and now it looks like the clouds are very naturally just that same color white just fluffy in the distance so let's take a fresh look no I so need to get some clouds out over here so I'm going to right click take that hardness up back to ninety percent or so I'm still on that blank layer which is great and I'm going to re sample the color from this side of the image so holding down alter option clicking for the color and then painting right over that area now there I did a little bit too much soul just step back be a little bit more delicate about this here we go so now if I zoom out we can see the picture in its entirety it's ok in my opinion that we have this little bit of a see through part here if I wanted to get rid of some of that building back there although I wouldn't even be able to tell that that's a building we can do that and we could do that by cloning or we can do it by painting again so if I paint at a lobe opacity with the fuzzy brush over this area that's just going to lighten it up a little bit so I'm going to take my brush size down with my left square bracket right click take the hardness all the way down and then with my opacity right up here I can take that opacity down quite a lot as well and the into the twenty percent range and then I can just start to paint over that so that it doesn't look like there's a building back there and it looks a little bit more like the sky is showing through that's one option now I've done that but you can see that I've kind of fae zoom in here I've gone over the dress here where I didn't mean to because of how fuzzy my brush waas so I can create a wear mask on this blank layer go in with my brush tool on black opacity up to one hundred percent make that breast smaller and then I can go in and just erase it where I didn't mean to paint and that's why it's so good to do this on a separate layer because you have so much more control over exactly where your painting so let me zoom out from there I like that area a lot better now that we fixed it we can see those changes that we've made and I think that that looks really nice so now we have to move on to step two how are we going to put the sky in the background we already have some sky in the background so I want to get rid of that is which is possible I'm going to do that by clicking on my background copy layer here and I am going into image adjustments replaced color we use this a lot yesterday but we were using it to change bold colors into something different this time I want to use it just to take away the darker blue in the sky and I'm doing that because when I put my clouds in if I have a white sky behind her than my clouds are going to stick to that a lot better than if there's variation in the sky behind so I'm clicking that blue in the sky taking my fuzziness down and now I'm going teo de saturate that so you can see have whitened that up quite a bit and then I can take the lightness up a cz well so that's allowing me to have a little bit of a more neutral background in the sky now if I didn't want her dress to be affected by those changes you can see the preview button here I have um affected her dress I could always go in and mask that out and make the background show through because we have a copy of that layer or I could very simply just select the sky and not her and make sure to only make changes to that selection so let's cancel that and let's go ahead and do that we're going to chew their lasso tool and I just want to section her off very roughly but I'm just going to go right around the edge of her here and I'm sectioning her off so that she is not affected by the changes that we're about to make going to right click feather let's say fifty pixels there for our feather and if you remember yesterday I was talking about feathering that's just making sure that we have a fuzzy edge that way whatever changes we make are very gradual instead of being a harsh line now I have her selected so I want to right click inside that selection and select in verse now that I have selected inverse I could go back in to replace color and make those changes now directly to the layer so image adjustments replaced color selecting that blue again in sky taking my fuzziness down to about there saturation down to get rid of the blue lightness up and there we go so we're just on the same exact change but now her dress is not being affected and say ok and d select by right clicking and choosing d select now I feel prepared to put my sky into this picture after I save so I'm a chronic saver I save everything and I save it very very very frequently so I typically will make a change like that it's safe go into curves adjusted color hit save and it's very frustrating sometimes to let my computer keep working but it's so much better than losing the work so I want to go over to make clouds I have this cloud shot picked out that I thought was really pretty and so now I'm going to move it on top of my image just like yesterday I talked about how to move an image so I'm going to my move tool over here on the left hand toolbar cooking anywhere within this image dragging it to the tab that we're working on and then dropping it right on top now you can see I have been clicked on my background copy layer because of that when I dropped my sky in it came in just above that layer instead of on top of all the layers so I'm just going to click the sky and then just drag it to the top that way it is covering everything in the scene now I need to blend this sky if I tried to leave it just like that and just take the opacity down on the layer that's not going to look like anything it's just going to cover her up completely actually that looks kind of cool but I'm not going to do it that way but still well maybe we'll play with that later tonight but I'm not going to do it this way because it's just going to dole down the clouds and it's still going to be right on top of our subject so I'm leaving the opacity at one hundred percent and I want to play with my blending modes so yesterday we talked about how to move somebody onto a different background by playing with blending mode typically for me bonding mode lighten works really well for that but this is a little bit of a different story clouds were differently with each picture so it is always best to go in and just see how the clouds are interacting with your subject based on all the different blending modes so among blending mode normal I'm clicking that normal maybe I'll try darken so we can see what happens there the clouds air not sticking to the darkest part of her but they are sticking to all the lighter parts of the area multiply that is my layer mode of choice so I usually choose multiply to blend my skies it sticks really well to all the white and the image it doesn't stick a cz much to the darker part it's and when we erased with a fuzzy brush it tends to have a very natural look multiply color burn I'm just going to go through each of these linear burn darker color lytton is going to do the opposite of what we want because that's going to make it stick to her hair which is the darkest part screen color dodge linear dodge white or color so you can kind of see that some of these air really similar some of them don't seem to do anything at all like soft light you I mean I can hardly even see that sky on there hard light I tend not to like hard light or vivid light because it blows out the highlights so I'm not going to go through the rest of these but I am going to settle on multiply for this image so I've got it all multiply and you can always make changes to your sky to see how that makes it interact differently with your image so if I am on my cloud layer and I go into image adjustments curves and I am changing my curves which by the way just to refresh on how curves works you have your two dark points here that represents your shadows the other end represents your highlights then you also have two different triangles thie upper triangle here also represents highlights bottom part represent shadows so if you click anywhere in this graph and pull up your going and make your sky brighter if you pulled down you're going to make a darker so you can see what this is doing the darker the sky is the harder it is to a race off of your subject if your subject is in fact very light or has light fabric that's going to be a lot more difficult but if you make it brighter it's going to blend a lot better so you could add contrast at this point just to see how everything's looking and you can see kind of why I chose this sky because it has the light running right through her face right through where I want the viewer to look at this image so we'll say okay to that we can leave some contrast on there that's just fine now let's create a layer mask so I'm creating my layer mask on this image so that I can start erasing I'm going to use my brush tool on black opacity though I'm going to take down into the thirty percent range and I'm doing that because I want to see how much that affects these clouds I'm always surprised at how the low opacity numbers really do a number on these clouds so I'm taking the size up with my right square bracket and I just want a really big fuzzy brush so if I right click making sure my hardness is down as well as having a large brush and I'm just going to start a racing so you can see how much of a difference that makes now if you go in with one hundred percent hardness if I do that if I step back here taking my opacity up to one hundred percent you're going to have a very very contrast ing image where you have this sort of glow happening all around the subject if I were to try to erase this with the hard brush and I went in there like this you get thes lines happening around the subject that are very difficult to control and that means you're going to have a very difficult time later on trying to get every single pixel right up along the dress trying to make it perfect so I'm going to go back in my history I'm on my layer mask I am undoing this hardness taking it down and let's take the opacity down let's try fifty percent and we'll do a compromise between the two we'll see how that looks now I'm ok if I ghost this image a little bit by ghosting I mean I have a little bit of a glow happening around her because I can fix that later so I've got my glow it's a little bit dark on the edges still but now I can go in with a much smaller brush and try to get in still not with a big opacity still not with the hard brush but I'll flip over by hitting x on my keyboard toe white painting white on my layer mask to bring that back and I'm going to go ahead and just get in a little bit closer to the dress that we don't have that ghosting effect I call it ghosting just because it has a white glow around it I don't know what it's actually called but that works for me so I'm just getting right in around there I would much rather deal with an image where I can make these very general changes other than images where I have to go in and get those exact pixels so let's say that this area still kind of a problem area if I zoom in there you can see that there's still that kind of like a white line there that I'm not really digging so I'm gonna zoom out I'm going to make my brush size much larger and then I'm going to take my opacity down quite a bit into the twenty percent range now on black I'm going to a race just like that and I'm actually going to lighten up the sky in that area and erase the sky so now that blends a lot better you would never know that I erased the sky there it just happened to be a bit of a dark spot so now it looks like the sky just happens to be a little bit lighter in that area take my size down again I'm going to take my opacity back up and just continue to blend so I'm just bringing that sky back at one hundred percent right through here where it's a little bit bright naturally that's just the sky being bright but I wanted to just fill in a little bit better you see that wasn't good take that away okay so I think a little bit more no no I don't like it I'm playing right now sorry to stop playing so I'm going take my opacity back down maybe just bring it back for a generally through there and I think that looks really nice a ce faras this is concerned so far how do you guys feel about this it's beautiful I like this I love you guys okay so I'm going to start making other changes now let's say that your subject looks too dark after doing this so you can see that she is a little little bit darker the dress has gone a little bit darker and you don't want that you can always click on your actual subject layer where your whichever layer has your model on it and you can go into curves command m or control em and make her brighter so you could go in and lighten her up to make it look like she doesn't have the clouds on her so I might do that just a little bit but I do like how dark her dresses because it stands out really well now instead of having everything look really bright so I say okay now I want to start adding overall changes to this image so I want to make her hair red that's something that I think this image needs is just a little bit of color unless I went black and white but I have no intention of doing that um although we might explore it just a little bit to see how it goes because it could be fun to explore so I'm on my last so tool by hitting l I'm going to go in here select her hair and this is something that we did a lot of yesterday selecting the hair making sure that we could make those changes I'm being a little bit crazy clearly with my selection right now so we'll go in and fix that in just a moment okay so I made my selection holding shift to add to that selection holding ault option to get rid of some of that selection especially in these little white parts where I don't want that changing color and I'm just going to go in and I'm not really worried about these little strands down here don't want to get her next I don't want her neck to become red I'm going to write click and feather now let me go back I haven't really feathered that much during this segment so if I'm going to right click and choose feather I could also choose refine edge which says the same thing is feathering it lets the edges go a little bit soft so you can take that feather slider up and you can see that it is fading your selection that's far too much I think that that's a little bit better five pixels eight pixels maybe even ten pixels well say okay now I can go in and make those changes so I'm going into image adjustments curves I'm going from channel rgb which is how you make those brightness darkness contrast changes into red adding read to the hair when I add red I liketo add some yellow so we'll add that yellow right click d select to know if I zoom out she has this beautiful red hair but everything else is still a little bit drab so I want to make changes to that I'm going to go in click my top layer of my clouds and I am going to use adjustment layers for this one this is one of those situations where we don't have a lot of layers and I don't think I'm going to make be making that many changes to this image actually quite like it as it is it just needs some more color maybe some contrast so I'm going to use adjustment layers and I am going to click this little half black half white cookie circle and I call it a cookie so called because it reminds me of cookies and I'm choosing curves so now I have my curves adjustment layer pops up as a separate layer in my layers palate and I have the same exact graph it just looks a little bit different because rgb is up here instead we have all the whole curve right below now if I want to make changes to everything happening in this image what I might want to do is smooth it out by smooth out the light I mean I want to make the shadows a little bit less harsh the highlights a little bit less less bright so I'm going to take myself up here my curve up from the highlights down a little bit from the up from the shadows down from the highlights I'm getting myself mixed up now make it overall darker tohave that moody feeling and then add some contrast maybe I'll make the highlights a little bit brighter oh there we go what do you guys think okay so I've just made some slight changes there now I think that I want the clouds themselves to be a lot brighter a lot more contrast without affecting my subject so I am going to go into curves the traditional way control command and I'm just going to make them a little bit moodier harry go say okay so it's zoom in here let's see what needs to happen I think that we could stand to de saturate this whole image a little bit because I don't really like the blue hue that I'm getting so on my curves one which is my adjustment layer but now I'm going to choose my adjustment layer again here this time hugh saturation take that saturation slider down and now I'm de saturating the image as a whole the hair is also becoming too saturated but it would have been very de saturated had I not brightened it up before maybe I'll take this to about twenty three points now I could either go back into my curves here because I have an adjustment layer and make color changes that way this isn't how my brain works though it's just a personal thing I have a hard time going back into something that I've already done in making more changes so I tend not to do that and that's why I have so many adjustment layers when I work this way because I prefer to go into my curves adjustment layer again and make a new layer in a new layer because that's just my brain some going into my blue curve blew a question yes so of course in this forest because it seems that if you keep going you have three four million different layers yeah do you have like flatten it or anything before they kind of keep you from definitely going back do you every now and then uh then we go that one real quick and well here's the thing is that the reason why I have so many layers is because I go back and I think maybe I should change this so instead of going back to it I'm just going to make another layer to do the opposite of whatever I did so let's say that I add too much yellow here and then you know twenty minutes later I'm like I shouldn't have added so much yellow I'd rather go in then with another curve and add blue instead of going back and taking away the yellow and there's no reason for that there's no good reason except that that's just how I like the way you work yeah some on my blue curve and I want to make this image a little bit more yellow I want to make this antique because when I see an image like this where we have this beautiful flowing wedding dress I want it to look timeless I wanted to look really beautiful so I'm going to add yellow to the highlights like we've been talking about doing and I'm going pretty extreme here with those highlights you can see it looks green and then we go into the red curve and add red also to those highlights so now we have that more of sort of a cpo looked everything now I would definitely go further with that but for right now I'm going to leave this image as it is I won't play with it anymore but we do have to move on
Class Materials
bonus material with purchase
Ratings and Reviews
Kirsteen
Brooke says she wants to be inspirational - she has achieved this and so much more during this course. I am so inspired to follow my dream of becoming a fine art photographer and step out of a life as an academic and stop finding excuses. Watching other photographers shoot and edit is always a great way to learn, everyone does things slightly differently and I enjoy Brooke's no fuss techniques. Seeing so many of Brooke's beautiful images through the course has been great and seeing shots from the shoot through to editing really makes them come alive. If you are looking for inspiration or you want to learn techniques or new skills then this course provides all of these things with a big dose of positive thinking thrown in.
user-a81eeb
Brooke is amazing! I love this course. Brooke is easy to listen to. She has a beautiful insight into creative fine art . Love it! I have learned so much. I especially love that she is so candid about everything.
renee Akana
I love Brooke and the wonderful way that she teaches. She is a gift to us all. Jane, her model, was lovely - a beautiful girl, a wonderful attitude and a real professional.. I could not do what Jane did to help Brooke convey her story.