Lessons
Class Introduction
04:58 2Local Adjustments Overview
05:47 3Drawing Local Adjustment: Masks with Brushes
08:59 4Drawing Local Adjustment Masks with Gradients
08:05 5Vital Techniques for Dodging and Burning
09:54 6Dodging and Burning Demos
14:49 7Local Sharpening and Local Noise Reduction
07:40 8Advanced Editing for an Editorial Portrait
05:51Simple Element Removal
06:09 10Multiple Local Adjustments: Product Photography
09:43 11Correcting Perspective for Accuracy
04:27 12Multiple Local Adjustments: Architecture Photography
15:13 13Correcting Perspective for Creativity
12:37 14Creating Dramatic B/W images
09:17 15Processing Black and White
22:08Lesson Info
Dodging and Burning Demos
So let's have a look at some dodging and burning demos. So we'll just run through a couple of other pictures so you can see how you might apply it in different situations. Quite often it's just Let's go back to this image with zero adjustment. So I'll just click this to make sure there's nothing there. In an ideal world, we'd have everything perfectly lit. The sun would be in the right place. We'd be in the right angle and so on but of course in a lot of situations especially candid work or street and landscape you can't necessarily get mother nature to work exactly for you. So there's always the scope just to do a little tweak to enhance the image. So if we look at this wedding shot, for example. Again we'll throw in some base corrections first of all. So let's just do a couple of tweaks like a bit more contrast, tweak of the white balance. Go to our color balance tool and play with the color grading a touch. But now her face here, it's just sitting in the dark ever so slightly, but i...
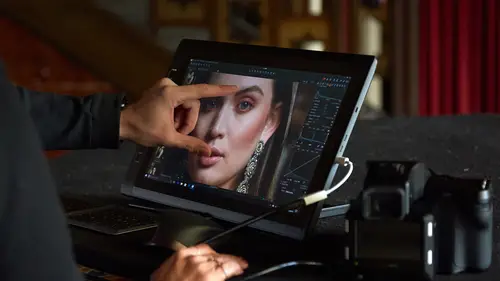
t doesn't need much but it might benefit from a little tweak. So if we make a new layer called lighten or L if you're lazy like me. We could invert if we wanted to but I'm gonna probably guess that a curve like this is gonna fix it. So if you want to be absolutely sure you can always have a quick visualization by inverting just to see what your curve is doing. In actual fact, I'll probably make it a bit stronger. Grab our brush, nice big soft brush. Low flow We can tweak the opacity down a bit. Just means that again our action is just a little bit more subtle and then just we can work over this area a bit more on the right hand side and then that just gives us a very simple lighten in aspect like so. If we've overcooked it, press E for eraser. There was a slight bit of bleed to the right. And then we can just brush back like so. Really simple and it just enhances the image a little bit. It didn't take you much time at all. Your image is better for it. You didn't have to go into Photoshop and do any, you know, additional work like so. Otherwise for wedding, we can use it for sort of making more complex radial filters and such. I'm just gonna obliterate these two layers. So our focus point is in the middle here. So we could of course just have a vignette. We could just draw a vignette, which there's one on there anyway. But if you want to be clever, then we can make our own sort of custom, personalized vignette. So a very similar process again. Make a new layer. Let's call that darken. You could call it vignette if you wish. Once again, my choice would be for the curve. So let's invert the mask so we can visualize it. So I'm gonna darken it down by that much and then now we can take our brush, invert our mask back. Nice and big with this one, and then we can just draw in a vignette as we see fit. See it's hotter down here in the right hand side. So if we spend more time brushing we can kill the exposure down there more than we would need to over here which is pretty much dark anyway and that really doesn't take much time to do at all like so. And if we need to do a bit more on this one again then in this case we could probably make a new layer. We could draw a very quick grad. Gradient mask, or G on your keyboard. Throw in one from the corner like so and then we could just drop the exposure down a bit like so. So again blending two various different masks together nice and simple. If we option click once more then you can see the effect that they've had. And again it didn't take me very long to do that. Once you get faster at making layers and don't forget you could shortcut drive making a layer inverting it and so on and so forth. So very simple. Let's do this one here because this is a good example as well of two different layers. So let's delete those and recreate them. So again we want our wedding couple in the center to be the subject. So it's a little bit hot on the right hand side and gradient masks don't have to be used only on landscape pictures. They're not just for landscape photographers only. Anyone can use a gradient mask. So a quick fix here would be to drag probably something like that and then just take our exposure down. If you're not happy with how the gradient looks leave your adjustment where it is and then just redraw the gradient a few times until you think it looks about right. So I'll probably pick something like that. It was a bit too much. That just takes the exposure down on the right hand side. And then once again if we want to kind of do our own flexible vignette. You can make a new layer, let's just call this vignette. I'm gonna guess a curve like that will probably work quite nicely. I won't bother visualizing it. Take our brush and then we can just darken in the areas that we need to like so. Again pretty speedy to do so. So let's option click to see before and after. That's not option, that's control. That's command Z, I've deleted them. Option click to see before and after like so. Okay let's have a look at some travel landscape stuff. These shots here, these great shots that you see are from India from a friend of mine John Wildgoose. Great name for a photographer. And he actually, I have to credit him for inspiring me to think about these small local adjustments before. You can see the amount of work that he's done here for example. Because I wasn't a great user of local adjustments until I really saw what John was doing with his photographs and even small basic adjustments can really enhance an image. Let's just reset this one for example. And straight away you can see that again we don't necessarily always have the best situation to take a shot but it's a really great shot but he's just sitting in a shadow. Now if we didn't have the dynamic range in our camera then we kind of wouldn't be able to do it. If we were working on a jpeg file then we'd have less data to work with but we've got the raw data. It's so easy to lift that up. So let's say base correction wise we're pretty happy with what we've got. We've got a little boost of exposure and contrast for example, and a slight vignette but we want to lift out his face. So again simple lighten exercise and this time I am going to invert the mask because I don't know what's going to work best for lifting up his face. I'm guessing if I did some shadows high dynamic range with some shadows that would work quite nicely but you see it's also affecting over here and in the background, which I don't really want to. I want those to stay dark so that we're looking at our subject. So if we lift up the shadows and then I might do a little cheeky quick curve lift for example and I think that's gonna do a nice job when I come to brush it in. So we invert back. Grab my brush. Nice low flow and opacity again. What you'll find with flow, when you start brushing if it's coming in too fast like that. There was a lot of change in two quick brush strokes. If it's coming in too quick, then simply undo to reset what you just did and then drop your flow down a bit more and then try again. See for me that's still coming in quite fast. So I've done an undo which is command Z and then take my flow down a bit drop your opacity if you need to and now it's coming in at a much more leisurely pace which is better for the image. Now if you think it's slowing down too much then you could always bring the flow up a bit more and then I'm just gonna concentrate more on the center of his face like so. So if we turn this on and off and it's just given us a little exposure lift and because we used high dynamic range we haven't really affected if we zoom into this area if we turn it on and off. See we haven't really affected what's going on in the background. So we didn't need to use like an auto mask. You might think okay I've got to cut around his glasses. I've got to cut around his hand. I need to follow the line of his head and his hair and all that sort of stuff. You can see that our local adjustment was really nicely targeted on his face because we used shadows and we used a luminosity curve. So we didn't really affect the top end too much. If I'd used exposure, then you'll see if I push it, it is starting to make an effect on the back like so. So often exposure isn't the best choice for these kinds of things. Think about when you brush the adjustment on. What's the best kind of adjustment? Is it just shadow recovery? Is it controlling the highlights with the high dynamic range slider? Is it using a curve to target a particular tonal range and so on? So it's not necessarily gonna be exposure. Probably most of the time, you're gonna be looking at curves and you're gonna be looking at HDR, for example. Also with this particular shot if we wanted to just improve the sharpness a bit here because it's slightly out of focus. On that same layer, we could also add a little bit clarity as well. You can see what it's doing if I go back and forth just to bring up a bit more contrast because as his face is in shadow it has a little bit of less contrast anyway. Okay one more we can squeeze in. Let's have a look at this particular one. Now I will throw my hands up and definitely say that beauty retouching is not my forte. So here's an image from local photographer Jen Collins. We've already done some skin work which we did with the advance color correction class. So using the color editor to just even out the skin a little bit. But sometimes what you might want to explore in Capture One is just doing some dodging and burning for beauty work. If you need to just do some slight density corrections to the highlights and the shadows. And a good tip I got from a Canadian photographer Michael Walawasniech if I've said your name wrong, I'm sorry Michael is to do something called a helper layer. So we add a new layer called helper and then we de-saturate to minus invert our mask so we have a black and white layer. So this means I'm not gonna dodge and burn but just using the helper layer as a visual aid to see best where I need to dodge and burn. This layer we're gonna discard because it's just helping us to visualize the image. So same thing as before. Let's say we just want to lighten a couple of areas. So let's say lighten and we've got, you know, a tiny bit of shadow here for example. Not much. And a tiny little bit of shadow there. So what we'll do is, we will add invert mask so we can see it over the whole image and I'll probably just grab a curve. Now if you hover the cursor on your image you'll get that orange line which tells you where you're sitting in the tonal range. So I wanna just lighten sort of this area a bit. So if, I can see exactly where it is on the curve so I'm just gonna do a little tweak like that. Go back to my local adjustments. Invert it back. Take a brush, keep my flow and opacity low and then I can just gradually paint the areas which are a bit sort of too dense for our liking such especially down in this corner here. We've got a little bit up here as well. Doing the dodge and burning on beauty I find personally myself quite difficult because I'm not a re-toucher and I don't necessarily have the patience and skill to work with the little tiny brushes and spend a long time doing it but adding the helper layer takes away that sort of color destruction as such and then once you're done with our dodging and burning you can simply turn that layer off. It won't be included in the output or you can simply delete the layer by pressing minus. But then we can see lighten. We've just lightened up a few areas like so. And like around the eye, if we wanted to just lift up the makeup for example then we could do so as well. Any questions on our technique so far? Yeah, one of our students Phil would like to know would you work zoomed at 100% or 200% for pixel level dodge and burn? Yeah like, if Phil is as skillful as he sounds, then yes. Like if you really wanted to get into it and do pixel level dodging and burning, then yes I would zoom into 50 or 100. You know, use a nice small brush and such and then you could really sort of get into the, you know, pixel level stuff about evening out and so on. And as I said, I'm not a re-toucher. I don't necessarily have the hand-eye coordination to do Jen's image justice here as such but that would definitely be a good technique, yes.
Class Materials
Bonus Materials with RSVP
Ratings and Reviews
Peter Hudson
This is fabulous - even though I use Capture One regularly I always learn something new from listening to David and this is one of his best - if David is the teacher then get the whole series is my advice - well worth the investment
user-940746
In this class David shows what editing can be done in CaptureOne and when it is time to use an external editor. There are lots of features in the program that David brings out to make the editing quicker and easier. The class also shows how much can be done in the program without going to an external editor, thus saving time and effort in editing. As usual, David presents the information in a manner that is easy to follow.