Cutting Your Sashing Strips
Lesson 11 from: T-Shirt Quilting: Warm Up With Your Life StoryDiane Gilleland
Cutting Your Sashing Strips
Lesson 11 from: T-Shirt Quilting: Warm Up With Your Life StoryDiane Gilleland
Lessons
Day 1
1Turning T-Shirts into Usable Fabric
28:15 2Organizing and Measuring Your Patterns
19:51 3Building Your Quilt Skeleton
25:03 4Stabilizing Your T-Shirts
22:28 5Creating Quilt Blocks
33:40 6Quilt Design Process
31:22 7Sizing and Layout of Your Quilt
32:42Sewing Machine Basics
19:22 9Sewing Odd-Shaped Blocks
10:35 10Sewing Your Columns Together
18:52 11Cutting Your Sashing Strips
24:49Day 2
12Planning Your Backing Piece
23:49 13Cutting and Sewing Your Backing Piece
26:09 14Making Your Quilt Sandwich, Part 1
28:07 15Making Your Quilt Sandwich, Part 2
19:16 16Tacking and Tying
34:48 17Seam Quilting
30:00 18Creating Your Binding Strips
26:11 19Attaching Your Binding Strips to Your Quilt
36:30 20Finishing Your Quilt
30:54 21Hand-sewing the Opening Closed
29:20Lesson Info
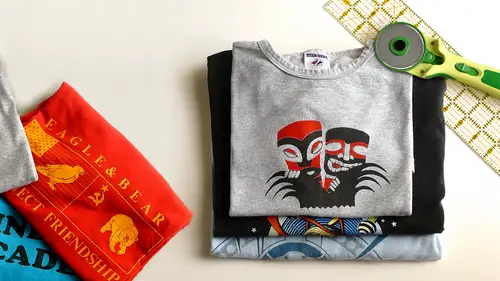
Cutting Your Sashing Strips
I would like to move on to cutting sash ings if we're ok with that, ok, so I've already kind of messed with my whole demo here, but let's, let's use thes blocks as a basis for our discussion of that, and I've shown you a lot of my quilts where I've inserted sash ing strips. I either will use long vertical strips that allow me to cheat these columns apart and add a little bit of extra width to a quilt sometimes all actually put stashing strips all the way around the outside of the quilt as well, which is more often and quilting called the border, but it's made with stashing strips, so I'm going to go with that name when you're working with stashing, obviously, you're never going to have a piece of t shirt fabric that's big enough. There are, you know, a panel of a t shirt that's big enough, so in that case you would go to the fabric store and you would look for jersey. So we're going to work with this stuff here, and I'm going to cut just some simple long strips to give you an idea of h...
ow to work with a piece this big, and then I'll show you how to fuse those for inclusion in that quilt in progress right there. So the first thing I need to know is how long of a strip do I need to cover that quilt from top to bottom let's say for the purposes of our demo that this is going to be the length of my quilt from the top so the bottom of this column right here obviously we're missing a lot of pieces and this is not fully complete but it'll work for us so all measure and it looks like fifty four and a half inches is my height so we know my mantra of cutting and measuring which is we're going to make it longer than we need and then we're going to trim it down to that size and then the width of that stashing strip is actually completely up to you I will tell you that since we're working with a three and truly her a three inch wide stashing strip that's a very convenient option you might want to think about that quoting rulers as we've mentioned a couple times coming a lot of different shapes and sizes so you can get a big six inch wide ruler you khun you can really give yourself more flexibility by investing in a bigger collection of thes but if it's your first quilts and you don't really want to spend the money, the size will really let you do just about anything so I'm going to make a three inch wide stashing for myself we're going to need some few zobel interfacing for this, obviously because we've gotta stabilize everything, including this yardage. This is just a stretchy as a t shirt panel would be, and so we're going to cut the fuse, herbal interfacing a little bit wider than we need, and we're going to pieces here's what's interesting about working with the stuff since we know the grain is running along with length if I wanted to. So this stashing strip with migraine, as we've just talked about, I could cut it, you know, this way I could cut a very long strip that runs this way, but what? That leaves me with this more of an odd size piece that I have to pay a lot of attention to the grain if I just stick with my simple instruction of always cutting, according to the wits that that I need it's just a lot easier than always worrying about which way is migraine going? So the way I'm going to teach you to do this is actually that we're going to cut straight across the width, and we're going to cut enough pieces that we can piece together to get our fifty let's call it eighty and whatever sixty and twit, okay, so I just need strips of interfacing a little bit wider than the three inch wide stashing strip I'm gonna cut something to go with a four inch wide interfacing just always add a margin so that when you trim it the interface and goes off all edges of the piece so this is no different than cutting a quote block is just quite a bit longer, so I'll start by cutting several of these for myself and when you're shopping for your interview things that you have a general I see like it's a crib size quilt or queens how much interfacing yardage deep because it's it's much narrower than a like a fabric of us that's such a great question thank you for asking that I should have brought that up a bit earlier. How much interfacing do you buy when I'm making a lap sais quote like this are forty to sixty and fifty by seventy always buy ten yards it's just a good round number that will cover you in any eventuality it's nothing worse than being in like nearly there and running out of interfacing not that this has happened to me personally. Yeah that's a good round amount and this style of interfacing is usually about a dollar a yard so you just go buy it on the day that it's fifty percent off wait all right so knit fabric is nice because it doesn't I have too much of a grain to it when we work with woven fabric we generally have to pay a lot of attention to whether the fabric is on grain or not and that's usually a process it's actually process I'm going to show you more of tomorrow where you actually hold the fabric folded and you pay attention to how the fold is falling but luckily with jersey we don't have to really mess with that all we need to worry about is what's the longest edge of the fabric we can cut and that's always going to be the distance between the two salvages salvages are the edges of the fabric where the fabric is basically pinned down to the big rollers that it's manufactured on and so you khun generally see little rows of holes and you can also generally see a little bit of a fuzzy edge and that'll occur on both sides the salvage is air not bits that you actually want in your quilt by the way but they do represent a straight edge and we know that we're going to be cutting between them so I like to leave them attached to my fabric so I always know which to mention this is because I can see the salvage is but there are quitters who will go in and cut the salvages off first you do what you want it's all good all right now here's a dandy way to do a long cut like this some quilters like to fold their fabric many times and then line the ruler up with it and then cut through all the layers at once I tend not to do that because it is actually very difficult to get a to get a strip that is the same with and is not sort of doing a little bit of subtle shifting along its length so I actually like to cut through one layer and just cut along the entire length before I do that I will fuse so now we know what edge we're working with you can generally look closely at your jersey and see which is the front and back side not all jersey even looks that different between the front and back but the wrong side is generally just a little rougher and a little nub earlier looking so just look at your fabric closely and see what you can see and then all use this edge and keeping in mind that this is wider than I'm going to need it to be I have plenty of leeway to just go ahead and place it is close to the edge of the fabricas I can get it but if it doesn't quite line up that's ok so and for this process used to use the same weight of refusing material same is the same exact stuff thank you yes that's a great question since I find myself using once again are there any other questions or comments coming in oh actually this question I think you touched on briefly earlier but one of our views is asking they have a question about repairs because their cat has put little holes in the front of all of their dark black t shirts so they want to know how they can fix those so they're invisible invisible when the white interfacing goes on or is there really is no hope wow you probably just find something that isn't full of holes first of all the cat did not mean to do anything wrong boy that's a great question I am not is that black fusing materials it always white there is some black fusing the question is whether you can get it in the weight that you need a lot of times that's used for finer tailoring and it's a heavier weight stuff um what you could do potentially is get ahold of some fabric pens like there are fabric marking pens that air essentially like a sharpie but they're designed to be permanent on fabrics and they come and find and thick points so you could do your fusing and then just touch up those little spots just you know they'd at least be hidden you probably still have a little piece of fuzzy there um your your cleanest fix would be to application something over the top of it for sure but I understand that you may or may not want that visible applicator there. I hope that answers the question. I'm sure behind with the same fabric like you would do on jeans or something where you I mean, it might show up, though you totally could, I think where you might run into trouble there is simply that when you go to quilted that that will be a thicker area that may or may not show up depending on the type of quilting thatyou're doing. But if you want to quote the quilt pretty densely, then I think that might appear. Ok, it's a bit of extra sickness, but if you were going to quilted with hand tying or use minimal quoting than you could totally get away with that now, have you ever made a double quilt with t shirts actually using both sides with the t shirt fabric? Or do you always prefer to use the backing of one? No one has yet given me enough shirts to do a double quote. Was that's the only thing holding you back that iss are you saying that you have those shirts? I think I'm able for a very small girl. Yes, jane boatman, all right, just about there guys, thanks for your patience. The f usable interfacing is manufactured in a width of twenty inches so what that means is every one of these strips that I've cut that her and and is twenty inches and therefore I know the three of them will be a little bit longer than the fifty four inches I need for my stashing strips so that works out nicely sure I haven't of machine it does machine and bravery and I always have to stabilize you stabilizer so I don't know what the difference between stabilizer and interfacing but because there is black stabilizer to use the washroom I kind of believe in kind I have tear away of wash away I have see through you need it I have it but I know there's a black stabilizer so I didn't know if that would be usable you know debbie, if you have some of the way in here I don't know this day boys air the interview like it would have to be a light weight when like a poly mesh usable if it came in black um that might work yeah it's worth experimenting with I mean, maybe start with a smaller project using ah pieces that are not precious to you you could always make a little like a little tribute or something and wash it a few times and just see what happens in that way you know, before you're investing here you're really special shirts say take a piece of the t shirt that has the holes in it and use your seam ripper and add a couple holes, test it and see because a lot of what we do is testing to see how it's going to work if it's going to work or how it will react and so you contest your fabric first doing it that way without going right to the front piece that you don't want to ruin. Excellent yeah that's good yeah really? So much is just experimentation rather than there being rules like much of what I've learned about song has just been through trying stuff out all right the edge of the cutting edge of your fabric, which is thie edge that the people in the fabric store will have cut for you there's no guarantee that that edges ever straight not everybody has the same level of training and things, so what we do is we use the edge of the interfacing because we have cut that ourselves and we know for a fact that it is straight um you can orient this however it is comfortable for you to cut but what I like to d'oh so I'm going to align I have more than I need here, all I need to do is take the edge of my ruler and the edge of this interfacing and then I can simply cut right along and we'll set that down and I'll scoot a little more fabric forward like so and then just get it nice and flat and then just continue this process now is this going to give you the most machine or machine lee precise strip in the world know that do you need it to be that way for the purposes of the t shirt stashing strip no, you really don't so this will work just fine on experience quilter who's used to working with woven fabrics is probably, you know, turning pale and clutching her heart right now but I promise you have done many, many stashing strips this way and this is all the more precision this requires you just need a long strip that is very close to three inches wide along its entire length and you're just fine here this is another one of those ah ha moment e I would have never thought of using interfacing straight line I would've been tryingto get jersey street on the right it both ways on when I hit upon this it just it just made it so simple it was just way way easier can you just clarify which edge you're using refusing the sashimi? Is this the salvage end? No, I am cutting between the salvage is so there's a salvage right up here and there's a salvage at the other end of the strip bright down running this way so I'm cutting between the two salvages is there a difference between stabilizer and inform in facing was just interchangeable work right? We just had some conversation about that actually wei feel like there's a good chance that they could be used interchangeably but we would highly recommend testing it with your own materials and seeing and just don't use your your precious stuff cut the back off a shirt and used that instead for your test and seeing five six seven eight is saying they have just looked up there is appel on s k one three five she innit into facing in black great to watch out for the nit interface ings there there are knit interfaces which have a beautiful feathery way to them but they are stretchy and they're not going to solve your problem of arresting the stretch here so that's something to consider you can you can buy those in many craft stores but I really always recommend the stuff that's that's woven and not actually woven this is pressed in fibers and then of course to get the rest of my strip I'm just going to do the same thing on the opposite side and I'll just follow this machine dedge with the other side of my ruler so now I'm getting this nice long strip and aiken so that between all right then that is what a nice thank you very much so that's a nice long finished stashing strip let me, um excellent. Let me show you what this looks like an action um the kid's quilt is a terrific example of using a sachin like I said before to sort of unify a really unusual fied set of quote blocks so I took a strip very much like this and the first thing I did was before I sewed my long strips of the quilt together I cut one of these long strips into a siri's of pieces that were the width of the quote blocks I was working with for that column. And then I sewed one between each block so you start with short scenes. Then you cut the solid long strip and thatis sewn between the collins and since this is a long seem and your sewing cross grain, you probably depending on your machine why might want to use that a little trick of fusing the strip to it, but that is really all there is to it. It's, just part of the same short, seems first long seen second sewing process. This is also a terrific opportunity to show you guys how on a white t shirt those piecing seems are actually pretty visible and they are because it's a white shirt rohit's this block right here, which is sewn together in a whole bunch of pieces actually that doesn't detract at all not I don't think so. I mean, in the in the visual context of all of this no, I don't think it's really that visible, but it's really? Only the white shirts where those even show up most the time they're really, really invisible. Okay, all right. So, are we good on questions from absolutely very good. How about here in the studio? Are we feeling ok about stashing strips and et cetera? Okay, well, it's actually seriously said that here's a question just like, do you always use jersey for the session? I do. We've had a little discussion earlier about the potential for using woven on. Debbie shared that she mixes different fabrics in with her sash in all the time, and it works very well. I think you have slight differences in weight that can show up when you're quilting, but we can talk about ways to cope with that tomorrow when we're doing that subject. And then the cool thing about using woman is just the handle. A lot of other options for color and print and things that you could insert into your quilt so I could see a quote made out of solid t shirts and then printed fabrics stashing strips actually become kind of cool. Obviously, the t shirts themselves the main base material most people would have in their homes and it's. Just a question of restoring them to giving them a new lease of life. In terms of all of the other materials you do need to buy, perhaps or tow have toe hand. What do you think would be the average cost for making a quilt from scratch cream? Many variables in that question, that's done. How your quote is going to work out, but assuming you have all the tools on hand, you've got your ten yards of interfacing. If I buy that at full price, it's ten bucks this jersey, depending on where you buy it, whether it's on sale is going to run you, you know, between forty eight dollars a yard, depending on its quality and I generally by about three yards at a time for a quilt. So thread another two fifty if you want to buy a backing, which you will that's, another about three yards of fabric. That's going to be in the neighborhood of five, eight dollars a yard, depending on where you buy it. Another half yard for binding, eh? So what are we up to, like thirty ish dollars at this point, when you buy batting that's one place that can get very expensive, but the good news is most of your big box craft stores put that batting on fifty percent off sale constantly because I hope it will draw you into the story that you'll buy a lot of fabric at the same time, so I just watched the sales and I get it then, and I get a piece of batting for, quote the size for something like twenty dollars, so I mean, you can really get a lap sais quote done for under fifty, especially if you watch for sales and and watch for discounts on prices, so, yeah, which is, incidentally, significantly less money than you're going to spend if you go out and buy all of the woven fabrics to make a complex, traditional quote, not that that's ever happened to me before, all right? Shall we wrap up by taking a seam out? Everybody missed. So this seems sometimes don't ever worry about it don't ever feel like it's a bad thing, it just happens. I'm actually going to work with this one that's a little shorter because I think it's a better example, so let's say I have ms sown the same and I need to remove it the way that most so it's will utilize one of these same rippers is they will work on the surface of the fabric and they'll go in and help pick out individual stitches in the seam. Some of you may have already learned that, but the problem is that this feasible interfacing is very fibrous, and so when you start digging to get the stitches picked up, you can easily pull up the fibers of the interfacing, and it just ends up chewing up this entire edge of your block. So here's, the way that I do it instead, it works absolutely great, and the more close up we can get on this, the better, because we're operating very small here I will first go in, and I will pull out with my little seam ripper, the first two or three stitches of the seam, and that if I end up cutting some interfacing in that process, it's only the first couple stitches and it's ok, but actually you can already see where a sort of marge the interfacing just taking out those couple of stitches at that point, I don't work on the back of the fabric anymore. I actually begin pulling the layers apart with my fingers gently, and there comes a point where the fabric will no longer pull apart, but you'll be able to see visible stitches here on the surface and you can easily grab him and cut him, and then, once you've cut those, you can pull a little more. Once you cut those, you can pull a little more and you just keep going it actually goes much faster than the more traditional way of seam ripping damaged and you don't have to reinforce it them exactly refusing doesn't get damage so you have a clean edge to re so you're seem correctly the next time and it also prevents you from potentially piercing the fabric when you're trying to because you're having to dig into that interface and defined the stitches so it's so easy to accidentally, you know, poke right through it these blades are a little bit sharp, so if you work from the front and you're only cutting the visible stitches that show up when you pull the layers apart then you're fine you're not going to hurt anything. The worst thing that's going to happen to you is you're gonna have some little pieces of thread sitting on the surface of the fabric here and if you have a lint roller in the house, those will go away in short order so then it's really enough problem at all so I'll just finish ripping this down that this little technique works great whether you have to take out short seymour along scene and there we go, then I'll just run my lint roller to take out all these little extra bits of thread that air clinging along the original same line, but then you're totally fine
Class Materials
bonus material with purchase
Ratings and Reviews
Arlene
This was a really fabulous class with an excellent instructor. It took us from a pile of t-shirts through every step to a finished quilt. There was a lot of time spent in design which was great, since t-shirts are highly variable in color and design. The second half of the class was all about basics, including information on backing, batting, and quilt top. Then making the "sandwich" with several options on basting. And then quilting (fancy, which was discussed but not included), hand tie and a couple of machine quilting options. Then binding. Each step was explained and demonstrated. Options were very often given, with easy, non-stressful techniques encouraged. This was a excellent class and the instructor was really awesome. Questions were anticipated and thoroughly answered. The instructor was always helpful and pleasant. This course expects some basic sewing machine knowledge, but you definitely do not have to be an quilting expert to enjoy this class and end up with a wonderful quilt.
user 08dcb9
Diane Gilleland is a fantastic teacher. One of the problems I always face with quilting classes is that the teacher seems to forget that everyone is at a different ability. I love the way Diane goes slowly enough for beginners while at the same time adding tidbits of information that even an experienced quilter could appreciate. Her "laid back" approach is appealing and non-threatening, which made for a very comfortable learning experience. It is such a wonderful idea, to be able to save the memories of your t-shirts, by making them into a comfy quilt.
user-33438f
Diane was fantastic! I am fairly new to sewing and have taken a tee-shirt quilt class before, but Diane's class was so much more informative, helpful, easy to understand and professional. I can't say enough good things about the class and how impressed I was. This was my first visit to creativelive, you can be sure it will not be my last. Thank you