Stabilizing Your T-Shirts
Lesson 4 from: T-Shirt Quilting: Warm Up With Your Life StoryDiane Gilleland
Stabilizing Your T-Shirts
Lesson 4 from: T-Shirt Quilting: Warm Up With Your Life StoryDiane Gilleland
Lessons
Day 1
1Turning T-Shirts into Usable Fabric
28:15 2Organizing and Measuring Your Patterns
19:51 3Building Your Quilt Skeleton
25:03 4Stabilizing Your T-Shirts
22:28 5Creating Quilt Blocks
33:40 6Quilt Design Process
31:22 7Sizing and Layout of Your Quilt
32:42Sewing Machine Basics
19:22 9Sewing Odd-Shaped Blocks
10:35 10Sewing Your Columns Together
18:52 11Cutting Your Sashing Strips
24:49Day 2
12Planning Your Backing Piece
23:49 13Cutting and Sewing Your Backing Piece
26:09 14Making Your Quilt Sandwich, Part 1
28:07 15Making Your Quilt Sandwich, Part 2
19:16 16Tacking and Tying
34:48 17Seam Quilting
30:00 18Creating Your Binding Strips
26:11 19Attaching Your Binding Strips to Your Quilt
36:30 20Finishing Your Quilt
30:54 21Hand-sewing the Opening Closed
29:20Lesson Info
Stabilizing Your T-Shirts
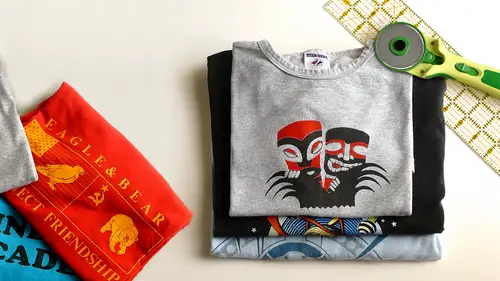
What I want to do in this section is take these individual shirts, and we're going to convert them into quote blocks that we will then fit together into the quilt itself. If usable interfacing is pretty cool stuff. It's ah, not exactly a woven fabric it's more like oppressed, spun fiber, it's, very thin and fill me as you can hopefully see on the camera here and on one side of it, which I hope that we can get a close enough shot for this to be visible on one side of this fabric is actually a pattern of heat activated blue dots, so I'm gonna lay a dark colored shirt underneath this in hopes that we can get a shot of what this looks like up close, you all here in the studio have ah, a good chunk off usable interfacing in front of you, so feel free to touch that and get a sense of it. You should feel that one side of it feels quite rough and that's the side those glue dots are on, and the other side feels quite smooth. The glue on here will melt with contact with an iron, and it'll actual...
ly bond the t shirt fabric to the interfacing, and that will take the stretch out of the t shirt fabricas we mentioned before, and that makes it much easier to cut with precision and so with precision like we need to for quilting reasonable amounts of precision, not extreme precision. So let me get this out of my way. I actually got a number of sample pieces on working with here. It is good to note that although this material will take away the stretch from your t shirt fabric, it does have what's called a grain, and if you've ever worked with woven fabrics in a sewing context of making garments or regular quilts, you're familiar with the term grain. All grain means is that fabric is generally woven from vertical threads and horizontal threads. And when those threads air perfectly perpendicular to another, the fabric is on grain. This stuff is made of fibers that have been laid and pressed, and they actually run in a direction. So if you look closely at the interfacing in front of you, you may notice that those fibers air kind of laying in a horizontal direction along this long strip of interfacing. And if you attempt to give your interfacing a little stretch in the same direction that that grayness laying, he should notice that no stretching happens at all right. And, yes, just what happened there, you stretched across the grain and that's exactly what happens. The stuff has quite a bit of stretch to it, and if you pull hard enough, it'll tear the world has not ended when this happens, so don't worry too much this is a piece of information that will become important a little bit later, but I wanted to show it to you now the way that I'm going to teach you how to cut and work with this as we're stabilizing our shirts will manage the grain question for you so there's not a lot of reason to worry about it at the moment, but when we so the blocks together will want to pay attention to the direction of the grain having tourney this, I have a terrific opportunity to get into some content about how to use our rotary cutting tools so let's to that. And then I'll cut away this torn section and we can use it to stabilize here in our group, how many of you are familiar with rotary cutting mats and rulers and such always, of course, because you make any of you other three no okay, good three rotary cutting converts just about to happen you're going to love working with these tools. It amazes me when I go to a quote museum and I see elaborate quilts and I know that they were cut before the invention of the ruler and rotary cutter they were cut with scissors and precision of those is so magical to me, because once you do it this way you're just like forget this is here is I'm never doing that again I want to show you how the mat and the ruler work together first and then I'm going to attempt to really frighten you about the potentially dangerous nature of the rotary cutter but we'll save that for the moment you're cutting matt as you may notice is printed with a grid of one inch squares all over the surface seven we're using an eighteen by twenty format so if you look along the outer edges of this matter you will notice that there are measuring lines that started a zero and go all the way up to the highest measurement list this side has a twenty four inch increments this site has an eighteen inch increments and you may also notice that at each corner is zero and each of these lines is heading a different way now the reason those exist is to help you measure pieces easily because if you line any piece of fabric about zero point then you can very easily determine where the measurement unit is because it's printed right along the edge of the mat and whether you're a left handed person or a right hand person you can position the zero points in a location that's comfortable for you to make your cuts easily and you're actually going to see me flipped my mat around several times during this process because for cutting interfacing I liketo have my zero point to my right, and when I go to cut fabric blocks all want to have my zero point to my left. So keep in mind that the location and orientation of this is never etched in stone cutting should always feel very comfortable, and you always want to move this mad around to give you the best fit. Now, in terms of the quoting ruler, we're working with a very simple basic rulers is a three by eighteen inch and those of you in the internet audience who've worked on quilts before know that this is only one of about a bazillion different sizes and shapes of rulers. I chose this one because it's really affordable and it's a great ruler for getting started. When we make especially long cuts, we're gonna have to sort of move this ruler around. I'm going to teach you how to do that. But for most of the applications of making a t shirt quote, this will be plenty of ruler for you, so you'll notice that like a typical ruler that you're used to seeing it's got one inch increments on it from one to eighteen, and you may also notice that those increments also run across the shortage of the ruler so I can measure with the ruler horizontally, and I can also measure with the ruler vertically there's, also a very handy grid of quarter inch lines in between these one inch lines. So once again, let me get ahold of a nice, solid piece of shirt to give us a background so we can get a nicer shot of this ruler. So in between the one inch marks are these little quarter inch marks. A lot of times, beginners with a ruler and rotary cutter assume that the on ly way tow line up for cutting is to take the edge of the ruler and line it up with one of these solid printed lines on the cutting. That and I'm here to tell you that that's only one way to do it. You actually have a tremendous amount of placement flexibility because of those quarter inch marks, right? So I can, for example, shift my ruler so that this printed line on the mat is actually lined up with the half inch mark on my ruler. That still constitutes a straight line. But aiken place when when we start cutting, quote, blocks out, we're going to use that very heavily. So just know that you have a tremendous amount of flexibility. And then the last cool thing to know about these two tools, all those not at all useful to for this particular class is they come pre printed with these handy angle marks so if you were making a more traditional style quilt with a star motif for something that required diamond shaped pieces you could follow these lines to cut perfect forty five and sixty and thirty degree angles and if you look closely a true ruler those angle marks are also replicated on there. So these air dynamite tools for getting nice, precise cuts holly have you ever cut yourself with a rotary cutter before and it's so please tell the story no good for you okay, I have I want you to know if you've never used one of these rotary cutters before that displayed is sharp enough to warrant a trip to the emergency room these air fantastic for cutting fabric but I would be I would recommend obviously handling them with great care please never leave one of these cutters unattended around children or pets and never leave a rotary cutter laying out always store it after you use it. This particular clover rotary cutter is one of my very favorites for two reasons. Number one the handle is nice and beefy it if it's very comfortably in the hand number two the mechanism that exposes the blade for cutting is controlled right here by the thumb so if I'm looking at the overhead camera I just slide it toward me and that lifts away the little covering and exposes the blade. Okay, whenever you're not directly cutting with this thing, I want you to get in the habit of closing it right away because the number one way that people cut themselves with the rotary cutter is by doing this right here, leaving it open with the blade exposed on your work surface because the next thing that's going to happen is you're going to come in and be spreading out stuff and you're going to knock into it with your hand or you're going to accidentally knock it to the floor and in bed, the blade in your foot really this any most people that I've seen in my classes who cut themselves do it specifically by leaving it open on the table? So I'm going toe be kind of annoying for this next segment of class about constantly asking you guys if you're closing your blades, just forgive me it's a it's a good habit to develop, so why don't we do a little practice cutting? I'm going to go ahead and cut off this tornado area in my fuse herbal interfacing, but if you have not turned if usable just feel free to cut an end piece off, we have plenty of it it'll just give us a good basis for practice here now the edges of this stuff, of course, are manufactured straight this seems really thin. It is for listen, is it is that your preferred? It is that's a great question, actually, I'm using what's called a featherweight usable interfacing, and I like it because a lot of t shirt fabric is actually quite heavy and stiff, and I don't want to add a whole lot of body interface ings are manufactured in many weights, and in fact, some of them are very stiff, but I feel like anything stiffer than this nice, feathery stuff is just going to make your quilt too stiff and kind of heavy to cuddle under just adds too much body. This will do a nice job of stabilizing our fabric without adding a lot of weight. So in a typical cut, the first thing you want to do is establish what I call an a sort a tive line. I have no idea whether anyone else in quilting uses that phrase is just something I made up, but it basically means out of all the potential edges where you could line this piece of fabric up with this cutting, matt what's going to be the one that you base all your cuts on in this case, since I'm working with interfacing that has nice machined edges, and I know that those air straight, I'm just going to start by lining the edge of the interfacing up with this line on my cutting that that I've chosen the reason I've chosen this particular line on my cutting mattis that I've got cutting that space both sides of the fabric which is pretty important because when you start cutting you always want to have a margin of space before your fabric to start the cut if you start cutting in the fabric then you end up with a little piece that's still connected and you lose a little precision that way does that make sense so have a little space above and below and then I'll take my ruler and that's going to be my vertical edge that I line up and in this case I'm just going to line the edge of the ruler at with the line on the cutting back because this is a very simple cut and I don't need to do a lot of careful alignment here when you cut with the rotary cutter you want to pay attention to several things this is mostly for those of you who never used one before you want to use your non dominant hand toe hold the ruler down firmly and make sure it doesn't move if you hold the ruler to lightly it's very easy as you're cutting toe actually shift it and of course that's going toe blow your straight cut right out of the water so always use just a straight downward pressure and try to be fairly centered on the ruler and then as you cut we're going to expose the blade of the rotary cutter we're going to start cutting below the fabric actually we're just going to cut matt for justin inch or so you want to make sure that the edge of the rotary blade is right up against the edge of the ruler and then you're maintaining pressure in two directions during this cut you want to press the cutter downward and you want a very gently keep it pressed against the ruler what I see happening a lot was new cutter's is this exact thing they cut very quickly and they forget tio they forget to stay close to their ruler and then the cut wanders on them so it's really a mindfulness thing it's like a piece of zen meditation you really want to be careful about where your blade is located you want to maintain that pressure and you just want to cut slowly and with purpose and then you'll be just fine so I'm gonna really align that so I can do better cut than this when you get to a point where you're running out of ruler which is gonna happen with our eighteen and true ll ear's what you do is you stop cutting closure blade and then you can kind of move this excess out of your way and as you notice that creates a straight edge and you can just move here ruler right up and line it up along that straight edge like so and then pick up your blade and we establish your cut so how'd that work for everybody? No one was injured during the heading of our excellent well hanging guy but not much where where when I moved the ruler up on a little teeny blip but blood and you can avoid that by just starting the cut lower than you need to okay always takes care of it and he thoughts from the internet j k o are we ok to move forward if we have some really great comments of people sharing in fact carry cia's just said online that diane is one of the very best teachers I have ever watched she's really able to explain things in such an easy way thank you for that carrie thank you cary c just made my day in a huge way that's exciting? Well, how about them we take t shirt and add some stability to it so I'm gonna do that cooking show thing on you again I've removed all the shirts that we just worked with in the previous segment. Now I just want to work with a few sample shirts to give us the lay of the land for stabilising so here's one and we're going to make the assumption that I have completed a quote skeleton worksheet on this even though I haven't and so let's say that I have measured this shirt and I've determined that the maximum with I can get out of it is sixteen inches ok for the sake of discussion I need to end up with a cut quote block that has interfacing going off of all four sides of it I need to get that stuff out to every edge so I actually need to cut my fuse herbal interfacing wider then I'm going to end up cutting this t shirt block because otherwise it's impossible to aim a cut that'll hit the edge of the interfacing just right if you ever watch that show you know who bob vila is? Yes oh bob vila used to always say measure twice and cut once so my measuring mantra is measure it quite a lot bigger than you need and trim away the excess that's how we're going to roll here so if I know that I need to get a sixteen inch wide quote block out of this piece of t shirt I'm going to cut my interfacing two inches wider than that which is eighteen inches ok just a math test it's all good alright so let's talk about how the line up for that cut then I am most comfortable with interfacing putting my zero point to my right as I mentioned and so you all in the studio might want to test that are any of the four of you left handed by any chance okay, if you are left handed watching on the internet, here's what I recommend you might actually want a place you're zero point to the other side because a southpaw what you're going to dio obviously has hold the ruler down with your non dominant right hand, and you're going to cut with your left hand and so you may find it easier to orient everything backward to what I'm saying that will make more sense in just one second for us, right? Pause or whatever the term is for right handed people, I'm gonna spin this matter around so that I've got my zero point here and that way as I stretch this strip of interfacing out over it got a little breeze here that's moving it around as I stretch this out, then it's very easy for me to see where I have eighteen inch wide measurement, right? So if I need to cut an eighteen inch wide piece of interfacing, I know that I don't have to do any other measuring them to look for the number eighteen on the edge of my cutting that right? So I'll give you guys a minute to get oriented cause I know in that smaller space it's a little harder to cut. You may find it easier to stand up while you're cutting tio when I can, I always stand just because I can get, like this bird's eye view of what I'm doing, so if that feels more comfortable to you guys, give that a try sometimes it's just easier to see a whole edge and in alignment and such. So I started having already made a cut in my interfacing, so I know for a fact that this cut edge that I started with is a straight edge, right on all of you know that too, because we all cut them together, so to get an eighteen inch wide piece of interfacing it's azizi is lining my ruler up here on this eighteen inch line like so and I'll just shift is I need to to make sure I'm maintaining this alignment and then I can make the cut along that line, so I'll go ahead and do that. I just want to be really careful not to move my ruler and again, I'm cutting slowly and with purpose and then I can peel that out of my way, but I still have this bit to finish, so I'll just slide the ruler straight up like this and then I'll open the cutter, continue the cut, that's looking like some good cutting going on. I didn't put it in the middle of the night did shift yeah, that happens it's ok? And you can just move your cut a little bit. Okay, so now that angle you're using though not good? Well, I think richard is always safest to cut upward and it's always safest to have the blade moving away from me, okay? Any time that you're having to cut towards yourself or twist your arms around you just run into the potential of aiming that blade into your own flesh, which is bad, don't you cool and apologies, but and studios also is there a way to the interfacing you're using? I'm using feather way the one that I like, and in fact, if you go ahead and click the course length it's above our video window here and go to the syllabus and r s v p, you can get the exact weight and refer to it again in the little getting started guide. But it's, a product by pell on and it's number nine one one f f and you can find it in any way big box craft store they have them readily. If you can't find that brand, just look for something that's usable and feather weight and that'll work for you too because of the little stick do you have a way that you like to store it by any chance like I know, with, like, soluble interface, since you have to keep it in a plastic bag so it doesn't get humid and sticky on itself, I didn't know this was the same. Well, that's. A nice question. I'm well, number one, I go through my music, so honestly, never did you get it like a sail on a big stock, and you're on my corner. E, I would say, just try to keep it out of the heat, like I wouldn't store it in my garage in the summertime, because if they can, I get quite hot. But other than that, it's, not it's, a heat activated glue, some moisture is, I'm going to affect it at all.
Class Materials
bonus material with purchase
Ratings and Reviews
Arlene
This was a really fabulous class with an excellent instructor. It took us from a pile of t-shirts through every step to a finished quilt. There was a lot of time spent in design which was great, since t-shirts are highly variable in color and design. The second half of the class was all about basics, including information on backing, batting, and quilt top. Then making the "sandwich" with several options on basting. And then quilting (fancy, which was discussed but not included), hand tie and a couple of machine quilting options. Then binding. Each step was explained and demonstrated. Options were very often given, with easy, non-stressful techniques encouraged. This was a excellent class and the instructor was really awesome. Questions were anticipated and thoroughly answered. The instructor was always helpful and pleasant. This course expects some basic sewing machine knowledge, but you definitely do not have to be an quilting expert to enjoy this class and end up with a wonderful quilt.
user 08dcb9
Diane Gilleland is a fantastic teacher. One of the problems I always face with quilting classes is that the teacher seems to forget that everyone is at a different ability. I love the way Diane goes slowly enough for beginners while at the same time adding tidbits of information that even an experienced quilter could appreciate. Her "laid back" approach is appealing and non-threatening, which made for a very comfortable learning experience. It is such a wonderful idea, to be able to save the memories of your t-shirts, by making them into a comfy quilt.
user-33438f
Diane was fantastic! I am fairly new to sewing and have taken a tee-shirt quilt class before, but Diane's class was so much more informative, helpful, easy to understand and professional. I can't say enough good things about the class and how impressed I was. This was my first visit to creativelive, you can be sure it will not be my last. Thank you