Working with Preliminary Sketches of Street Cleaner
Lesson 9 from: Sketch like an Industrial DesignerJorge Paricio
Working with Preliminary Sketches of Street Cleaner
Lesson 9 from: Sketch like an Industrial DesignerJorge Paricio
Lesson Info
9. Working with Preliminary Sketches of Street Cleaner
Lessons
Introduction
06:17 2Preliminary Sketches of Different Products
05:53 3Steps of Rendering Coffee Maker
06:02 4How to Create Quick Orthographic Views
20:35 5Description of Isometric, Oblique, 1-2-3 Point Perspective Views
11:03 6Best Angle for Perspective View
06:16 7Perspective View on Graphics 360 Paper using Different Materials
13:31 8Final Render of Coffee Maker
15:19Working with Preliminary Sketches of Street Cleaner
16:25 10Chrome and Reflective Materials
10:42 11Final Render of Exterior of Street Cleaner
06:41 12Sketches of Interior of Street Sweeper
09:18 13Design Concepts for the Interior
07:20 14Final Rendering of Interior and Exterior of Sweeper
17:47 15Defining Final Outlines and Contrast
08:04 16Creating Texture and Composition
04:31Lesson Info
Working with Preliminary Sketches of Street Cleaner
All right. So the first step here would be working with preliminary sketches similarly to what we have covered before in our previous step. These are two preliminaries catches that I have worked on. You sing in this case, uh, headed, See? Non twice. None. Non photo blue. So actually regular blue pencil, because I figured I could just be more into it. You get a white piece of paper so that we have better contrast. So what I did over here is just some preliminary work. Let's let's step, Let's trace our steps back lightly. My construction lines would be done with just regular pencil. These are old pencils that I steal from my Children from Been 1/2 um, blue pencil that I would do on top whenever we draw transportation in transportation design waste hard. Not that you would have to follow this rule, but it started that we work with just very thin black pencils. And then you kind of define better your lines. You sing either blue or black, but the good quality pencils, right. In this case, I...
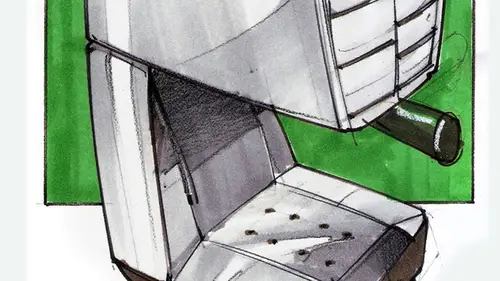
have a step below see, actually a watercolor pencil. So I would just clean up my lines on top of my pencil lines and define my shapes slightly more. Just still very lose. Just to get a sense of where I'm going. Still done on tracing paper so that I can put more layers from top on. Define my stages. Little by little, that's always the key to go. You work with tracing paper, developing your stages slowly. So this is this would be these would be my second stage drawings where I have developed a bit further. What I initially had the recent why I chose a street sweeper is because I had an extra challenge here. I was thinking What should I do for this class who are back? Hold something like a digger, something big and massive. And as I was thinking, the streets free burn my street just off the town, just passed in front. I'm like all that school, but that's an ugly design. I'll redesign that. So it just happened the I got the answer right away looking at the street sweeper that just happened to cross. Um, So, um, I took some pictures Yes, to have a reference. And then I visited there with the website of the manufacturer I'm like, Oh, that's kind off. The design is a bit boxy, and if I wanted to be the driver of that street sweeper, I would want to have more of a funky design to tell the tale the town that it's in town, an energetic and fun town to be an and then we're doing our job and then just you may want to work for us into town. So let's just tried by just having products that are, in this case, a vehicle that would be fun to be in not so boxy. So are, you know, manly. So we ended up. I ended up just sketching on top of the original photographs, which is something that is totally fine. You can do that kind of speed up your sketching process. And again the same thing. I did some pencil lines on top and then some regular pencil regular blue lines on top. Now, at that stage, I started to modify my outlines a bit more. Um, I wanted to have the outlines modified so that I would have a younger looks. For example, I put the bumper out. I really wanted to make a point on the back Not so much that it would ever be years. But just make it more fun to look at not forgetting as well that I would want to have, like a very utilitarian looks. So I have the back. I have a 3/4 front. Then I have more of a front view, but also allows me to see the side. So I worked on this at this point, this These faces have been more involved because you would want to if you remember what we have learned in the previous step. Remember the the portable speakers, right? How I have different sketches off just one concept from different angles, right? Or even the car example that I showed you right. If you like a particular view, this is what I want to say here. You don't want to get fixed fixated on just one point of view and forget to you are the ones on at this point. We need to say that you need to work. Like for example, a sculptor would work right? Sculptor, if they are doing a portrait of somebody in clay didn't work just from one point of view. Just that single point of view on they forget the back, they actually stand up and then work around. They're sculptor, this culture or they actually put it on some sort of a lazy zoos and so they can turn it around and get a sense of how the design would be. From all points of view. You have to do the same thing from all points of view. I know it's more work, but it will benefit your design. Otherwise, you might just get concentrated too much on one view, and it would look great. And you keep on pounding this drawing, and then you take a break. You come back on your like I don't like this design. I wish they had kind of designed it from all points of view, especially when your design of equal it's seen from all angles right front and back. When you pass cars in the highway, you see them from the front. If you look back, if you're not driving or if you're driving, you see them from the back right over there part see them from all angles. So just make sure that you visit your design from all angles. So if I wanted for example in this case to have a hip kind off, more younger feel Look on the back. So I worked on this profile, you know, made the bumper stick out the rear lights. I made them more interesting. Kind of cut at an angle. It has some sort of a outside metal metallic structure testing case. It flips over. For whatever reason, it would not crash the driver. I'm pretty sure that's why we have that for So instead of just having a railing coming up straight, why not angle? It's slightly right. Make it a little bit more interesting. All right. So we got the design on the back, and I also added some rear lights over here in red. I'm not in red and blue. I'm gonna hatch them slightly just to make it more interesting. So when I break, I can be seen from the middle and also from the top. Good. All right. So we got this idea from the book, But how about the front? Let's do the same thing from the front, but again, slightly different. So at this point, it's important, too, to keep the same look and feel. It's right over here. keep in mind the user always keep in mind the user who always going to be driving or operating these vehicle. All right, If you keep in mind a younger person or you want to portray a particular look and feel, keep that always. If you find it hard to remember, they need so simple as having a posted note, you know, with a couple of lines how you want your user to be, and then you stick it in front of your computer or in in front of the wall where you're working so that you have a constant reminder of who would be that person. All right, very important. And then once we have that in mind, we can just have fun. Okay, let's look at the front. This case, you know, I wanted you see how the back had these rear lights kind of cut on an angle. I wanted to do something like that. So I You see how I have this angles here that are kind of meeting each other? I am doing the same thing over here with a slight angle. Um, remember the contour lines that I had covered in my previous face? I am doing them here to Whenever we are working in transportation design. It is always a very important point to make that we have to draw a parting lines so that we have the middle. And that would also indicate well how the volume would really work. So you see the let's continue with the idea. We have the rear bumper that sticks out a little bit. Okay, We should do the same thing under front. The bumper sticks out the angles. We got them covered. You see, we have the bumper. Looks very massive on the back. So let's make it a bit more. It's alleviated the massive massive it by just carrying a little cut out there in the center. Why? Because we can. I mean, you can change your design. So I did that cut out and you see that from an angle you barely see. It is fairly like a little notch. But on the front, my friends, from this point of view, would be more visible. So you see, I want to keep the same look and feel the count on the back. We have a similar cut on the front, but if I only had this one, he would look a bit missed, a bit massive. So I want to kind of repeat that. Another cut that would be slightly smaller on the top. Do I really need it? No, but that's it. Look interesting. Visually, Yes. So then I'm all for it. And also, these gives me the illusion of having a front on a frontal grail, slightly coming at a point, a virtual point that it's not existence somewhere up there. But it kind of signifies that the front is more important than the back. I only have one chisel cut on the back. I have to on the front, bigger on the bottom, smaller on the top and then the bumping out. And then I have, um, rear side view mirrors. The original design is very boxy, just a couple off rectangles and nothing more. Then just a couple of Rob's connecting it to the mainframe. Well, if it is, wouldn't really affect too much the operational of my design. If they were circular instead off a rectangle, not really. I could still be able to see from the side, right? So let's cut them a circle. Or maybe it's a full circle, but that it's cut on the bottom. So it's almost 2/3 of a circle, but then an angle, 2/3 of a circle and then an angle. Remember, if I'm cutting it this way, Since this this line is symmetrical, the cut appears the opposite way on the other half. So be sure to work in symmetry. All right, so I am kind of explaining how he came up with this design. So we have a 2nd 1 here, and then we have. If the town sweeper has to kind of work off hours or late at night, they really need to do their job before the next storm comes seen or whatever they need to have front lights, right? So they actually have 42 on the top and two on the front. I still have not decided what to do with them. I work on them better on this one on this sketch over here. But the important point to make here is that I wanted it to make it more continues. The design is cohesive from the bottom, all the way to the top. So instead of just having again to rectangles in the top for my standard lights shining down more of a hip vehicle. What if not so much rabbit years, but maybe kind of circular, half circles, or at least an arch, so that it would be more gentle design, in a way. Right? So that looks good. And then I added that circle that's half circled, repeated over here on the front hood, the sexual front is actually filled up with sand or whatever. They picked up whatever debris they pick after a long winter, right. And then this guy gets actually moved. It has a couple off piste ums, and this whole thing would be kind of moved at an angle so that it could be a good discharge on some sort of a container. And I don't have a recycled the stand or not. But the point is, this whole front moves out of the way. So I have circles here. Have circles that repeat over here. Repeat over here. So I have a little bit of a theme and you say how I have these very gentle curve coming under front after that dress. Theis more utilitarian. You know, if he does a street sweeper, it has to have God. Yeah, for wheels, right? The two wheels in the back are closer together so that it can take actually sharp turns. And it has the big circular sweeper over here to sort parts of the drawing that actually have to happen. Otherwise, he wouldn't really be a useful design. So I have this one here and then I work from the next one using these to us. My guides. I have the back 3/ from the back, 3/4 from the front, more off a side view, but showing a little bit off the front as well. And it also shows better my side. You see the difference? The camera. See if he can pick up the difference between the back over here on the back. Over here. We barely see the back over here, but we do a better job showing the back over here. And these drawing relates better to this one. So I have three that I'm working on in conjunction. Three of them at the same time. So this is when again, you would have to put some good music in the background to get your full census in, and then Let's see if you bump this out. You found this out. You add this chisel cut on the front. Not so much here, but you added here at this, make sure that you have it here. And then when you start discovering mistakes like who? The space over here is too big. The space here is too narrow. What should I do? Should I worry and erase thes and start all over again? This is still preliminary. This is what it would be going on. My mind. Um, should I worry about that? This kind of small or I can Can I fix that later? Uh, I'll fix that later. Um, if you'd really bothers here, you can go ahead and erase it, but still were working on tracing paper. We have many more layers to go, so we would be good at this point. All right, So you get the idea on how we work with this progressively before we move into the next face. Then they just wrap up this face saying that as always when we start our drawings with my tracing paper, we have to make sure so that we work. This is kind of linking to what we have learned already. Just make sure that you guys are on top of things. Teachers Will we say this? What we have learned of what we have taught in the past? This applicability here still, we would have to make sure that we have. My vertical lines are vertical And then we have a vanishing point going to the left and to the right. Still, in other words, still fits in a box. Vertical lines vertical. But still I can take it us if he was a matchbox and fitted inside a box. All right. Your three dimensions Very important. Tall How tall it is, how wide and how deep need to be in checked.
Class Materials
Bonus Materials with Purchase
Ratings and Reviews
Mike
I thought this was a well rounded introduction to this subject. Really liked the teachers attitude as well - very inspiring!