Lesson Info
18. Crop Tool and Curves
Lessons
Day 1
1Intro to Apple Aperture Part 1
25:50 2Intro to Apple Aperture Part 2
28:39 3Library Setup
23:48 4Single and Multi Library Setups
17:58 5Apple Aperture Layout Part 1
21:04 6Apple Aperture Layout Part 2
23:45 7File Import Setup
16:12Managed and Referenced Files
17:23 9Importing Workflow Part 1
24:29 10Importing Workflow Part 2
19:34 11Organization and Culling
31:01 12File Relocation
25:29Day 2
13Baseline Adjustments Part 1
27:12 14Baseline Adjustments Part 2
32:09 15Baseline Adjustments Part 3
26:05 16Color Monochrome
31:55 17Chromatic Aberration and Color Tools
19:40 18Crop Tool and Curves
20:37 19Additional Add Adjustment Tools
27:45 20Keyboard Shortcuts
19:55 21Lift and Stamp Tool
07:26 22Quick Brushes
31:16 23Presets and Stacks
24:10 24Slideshows
20:28 25Exporting and Sharing Images
25:21Day 3
26Intro to Apple Aperture Book Design
31:00 27Layout Tour
41:51 28Layout Tour Part 2
20:00 29Editing Engagement Album
33:42 30Exporting and Printing Engagement Album
19:30 31Editing Wedding Album
29:38 32Exporting and Printing Wedding Album
17:57 33Overview Q&A
09:44 34Apple Aperture Workflow Start to Finish
25:21 35Start to Finish Q&A Part 1
34:14 36Start to Finish Q&A Part 2
18:07Lesson Info
Crop Tool and Curves
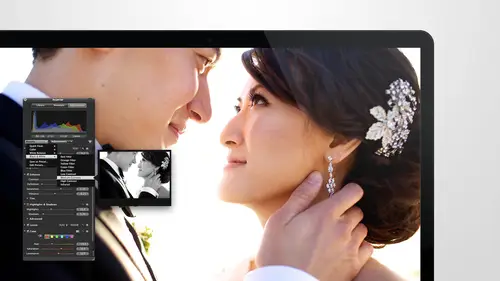
Crop is in here but typically I would get to crop in a few other ways there's another way to get to crop you can hit the crop tool right here that's probably the easiest but also the crop shortcut kiis sees you can hit craft any time that you want and I'm gonna zoom out and go find you a good image to crop there was one that I was looking for yesterday that I know is in here today where she is by herself she never wants to leave him she's always with him okay here we go I think it's in here ah there it is all right so we happen to get just a a little section of the videographer and the shot so I'm going to go ahead and crop this image and you can just select the crop tool and start doing the crop and you'll notice it's going to keep the same parameters of the image so the same aspect ratio that the image was shot in like to pull it into a corner that I want to shoot and then just go grab and go right to the edge of where you want a crop that tool when you're done and ready to go you ju...
st hit enter andi it will crop that image for you if you hit the crop tool again or the shortcut key which is see then you can see the full image and haven't got anywhere but you can see kind of where you're cropped and do the adjustment a couple other things that you can do in the crop tool as I zoom in you have the aspect ratio so you can change the aspect ratio from the original aspect ratio tio a few different aspect ratios you can also do no constraints, so no constraint would allow you to just change this in any way you want. You can make it any size and shape that you want if you go back to constrain it will give you the option of two by three which is a standard size that you shoot in and the images are so two by three is always the best misago even always also hit this button, which will change your crop from a vertical to horizontal sofa back out of there you can see if I go to buy three it's going to give me the same shape as the images in so portrait and landscape would be this this crop as well. So you can a apply a you can imply the crop and make it horizontal image if you want tio um and we do that sometimes, so I got you into preferences we do that sometimes with images that we feel like just didn't kind of turn out the way that you wanted you can also then you know we can crop out the videographer I'm still in that and make that a nice great horizontal image sometimes I just I should a lot of portrait and I find that we go to like blawg something or put something up and I'm like, oh why didn't I shoot for maura's huddles s o we'll go in and do some crops on images to make him in whatever shape and size that we want. This also works well for five by seven eight by ten if you want to do custom sizes so if you need a five by seven image, you can flip this back around and mom really wants a five by seven for her her desk or something you can already determine what the five by seven size is going to look like. Make sure you know what kind of crop you want to send to the lab so you can crop this is a five by seven you can export it as a five by seven and then you can send it straight to the lab on as a five seven most labs that you work with d'oh in I'm rose or whatever you're ordering ordering system is that they use you can make a five by seven adjust the crop in there so you don't need to do it in here, but if you're putting something in your home or you ah home printer despite by seven you may need to use something like this you can also do eight by ten eight by ten isn't in the crop total, but if you go up to the options here and hit custom, you can make any size that you want so now you can make it and, uh well, we dio by eight and oh, I did that and rivers okay, ten by eight r eight by ten so now we have an eight by ten image and we can you know, cropper nay by ten so just not to go off on a side tangent, but just to talk about aspect ratio when it comes to the different sizes and prince I don't know why. Years ago, when they decided to make print enlargement sizes, they decided to keep cutting off part of the images that got bigger, but they did so for my six is a full frame of the image, but if you notice here I'm just going to show you guys, just in case you didn't know this. Um if you're shooting an eight by ten or trying to shoot for an eight by ten file format now, I've I've lost part of her guitar pry wasn't what I was going for it, they put a frame around it, I could end up losing some of her head in the shot, so an eight by ten will crop that same amount top and bottom I have your image so when you're shooting if you do expect to deliver eight by ten's, you need to keep that in mind when we shoot family formals we're always keeping that in mind we're shooting family foremost leaving in room on each side for those images tio I have that extra space so they can crop into an eight by ten for our clients who want to put a nice eight by ten and a frame and and put it somewhere in their in their house so if you want to check your images to make sure that you're doing that you can always check it for an eight by ten, check it for five by seven and just get a good understanding of where you need to be at in order to make those crops sizes work for your clients and for you questions on cropping no o from the audience yes from from from the other end from marcia from our from marcia marcia marcia can you talk a little bit of a little bit more about d p I and pre crop sizes pray capsizes. Yeah so all of our images are set tio export at three hundred d p ay you're deeply I really matters when you're doing your export and when we talk about exporting later around today we can go into really your dp I but dp I stands for dots per inch so it really matters when you're doing printing that's why you'll hear peop e I or pixels per square inch versus dp I, which is dots for square it so pixels or what you would see on the screen dot so what you see on a printed piece paper and all that really matters is that you're images when they're printed are really any above two hundred three hundred, preferably when you're doing dp I but when you're cropping into an image, you really just want to think about how many pixels you have and how tide of a crop that you're trying to do and what's size your full file is so it's a pretty deep conversation, but basically if you have a very large size image and you do a crop as long as you're not trying to blow it up to a poster size, you'll be fine if you want to crop into an image tighter like we were trying to crop into her face and get a nice face shot from here and we wanted to print this is a five by seven we would be okay, but if we wanted tio print this as like an eleven by fourteen, I would be concerned so you can really check that when you do the export just make sure do three hundred d p I but check the pixel dimensions when you export it just to make sure that really it's just a matter of how many how many pixels per id she won about two hundred to three hundred pixels per inch that you are printing thank you and for david and see our crops in aperture destructive crops and capture and are destructive at all so they really that's why you can still see the full image any time you hit the crop tool so if I hit enter that's not doing anything to the image it's just overlaying and almost giving you a mask a preview of what it will look like it's not until you export it that the crop is actually applied terrific so you export it yes the crop is applied yes but then you still have these still have your image in your catalog in your in your library so the client calls and says sarah making a wider shot of that yeah just come back to that original yeah and all you do is hit the crop tool again great I'm given a wider crop and the rest of the image will be there and then give them the new export and you're good to go thank you thank you I want to go down to curves to talk about curves a little bit on dh then I'm going to get rid of some of these other bricks so that we can um see see things a little bit easier here it's going to minimize some of these basic ones that we have been we'll get rid of her crop tool and ok, so we have the curves channel that we can work with um and I'm going to make these a little bit smart so we can see the image that we're working with a swell we can add a curves adjustment to any particular image that we find a good image for this to kind of show you good curves adjustment the sun only nice ah there so que are they I don't know if you guys missed it yesterday but I'm david is it is a wedding photographer in san diego, dear friend of mine and morgan his girlfriend is a country singer and she's so amazing her coming she is morgan lee but it's l e I l e I g h and I think they're putting a link tio in her resource guide but you guys definitely got track check her out she's she's great eso let's find an image that we can all will go back to these do some adjustments on okay, so I'm gonna go ahead and add it curves address mint to this if you guys have either you use curves at all no, I think the audience is probably right there with you there are some people definitely out there who have you discos and they're like him advance time killing it I was a little bit afraid of curves in the beginning, so don't feel bad it's definitely more advanced advanced tool, so the basics with curves is that this is going to be anything that is white. So this is where your white point is basically and this is your black area and you'll notice that our blacks has some like negative space here that just means that are blacks aren't really black because there aren't really blacks in this there's brown in the background and that's where most of the dark is coming in. So that's just fine that's exactly where we want it, but if we had a black suit and here is something really black, we wouldn't want to make sure that that showed black here this is a history, graham you'll notice that this is historic ramez well, looks just like it on dh it's doing basically the same thing. This is showing you all the colors on the history ram this is just showing the basics, but the the key with curves really here and using in after there's a couple auto options right here, this auto option here will adjust the whole image as it as a whole when it comes to curves and it'll do it, it'll do an auto adjustment I knew I picked this image because I knew the auto adjustment wouldn't really work with it because it was having some unique challenges, and so I'm just going to reset that. But the other auto option, a cz well, is this one which adjust the each of the layers like red, green and blue. So each of the channel channels, I should say independently, so you can try the auto on that as well. It's again not going to really work with this image when it comes to auto, but I will show you how it's trying to work. So one of the most popular things you'll see with curves is what they call an s curb. So if you d'oh, this is basically taking this line and saying ok, in them, in the white, this is white, so that will be all the way it stops. So in the mid tone of the whites, we want to make them brighter so you can pull that up, and then in the mid tone of the blacks, we want to make those darker, so that is like a contrast adjustment, basically. So if you just want to bring up the midtown of the whites, or maybe you want to bring up the mid tone of the blacks, you can play with this line to really fine tune it, and then you can also play with this to be maybe you want to be further into the blacks and you want to bring the really dark, dark colors up or maybe you want to bring the lighter versions um the of the dark up so you can really adjust in play with this just very minute. Lee the big thing about curves is you don't want to take it too far. Do you see how we just have such a slight curve adjustment here? And look how much it's already done to that image so that's just a very slight curve adjustment, but if you, you know, start to get crazy with this, what you don't I want to see is this line at the top, bottom out, so if you see that you're going to get psychedelic images and if you really want to get crazy, we just go like this and that what you don't you don't but that's what the reset button is for, right, you're gonna wait? I did too much went too far, so this is your curves adjustment again, you can brush it in, you can brush it away, you can save it as a default. This is a really great thing to have in your default said if this is something that you use and that you're familiar with people who get into curves and really start to love it, they leave like all the other adjustments away behind and like just use curves you know they want to just find him there whites and they get in here and you can do more like tons of these little dots if you decide you don't like a dot you don't like what it's doing or you didn't mean to put a button there um a point there I should say you can keep fine tuning this line as much as you want and then you go oh I don't like what that one did even just pull it off so it's gone now so these are going to be basically where you will do some curve adjustments question how did you pull the daughter I just dragged it off the side so if you want to pick it up and then just get rid of it get rid of it just pulled out of the box get out of there ok so that's a curves adjustment and then we'll move right down the line to david yet who I was talking about this on an image which image was it is the question oh it was one of the first images we adjusted it was with the tree and it's over here yeah it was right in this area perfect this one will work we're going to play with this other one though which was on the tree and it where'd you go um well use one of these even yet ok, so for deven, yet one of the way we can use this image, this was one of the images we were adjusting and playing with a little bit earlier, we got really tight could see the image, but, um, this part of the trees still looks kind of dark and clumpy noticed, like, maybe didn't need as much of a vignette, so deven yet works in this way I'm gonna just pull it up. It works in the opposite way. The vignette works, so you can see I'll pull the intensity off or on to see how it's affecting the image, just like a vignette would but it's doing the opposite, so the reason that you'd use a divan yet is really based on your gear. There are a lot of lenses and that ad of and yet to the image, so you might want to remove the vignette from that particular lens that you shoot, you can always add the divan yet in you can also use it just to lighten the side of an image. So if we like the way that this looks, maybe we pull in the radius and we don't look at the top and bottom, but just the side over here and we decide ok, we want we wanted to be like that you can just brush the divan yet in and then it will get rid of it and the rest of the image we can imply it just to the trunk of the of the tree here and you can have just that lightning of the tree you can also brush a tool into this I'm like a brightening or lightning or anything like that but that's kind of a cool way to use the divan yet tool fix it alright moving right along um the other option we have down here under deven yet is ed sharpening the and sharpening used to be there's a couple different sharpening options this is ed sharpening and then there's one down at the bottom down here that is sharpened sharpened was the first tool that app ritter release for sharpening and sharpening was the second one so sharp and came out worked really well but then people were asking for little things here and there and then ap chards they decided to release ed sharpening as an additional tool so they couldn't get rid of the sharpened tool but if you're going to do sharpening I recommend ed sharpening this is also a great one if you use sharpening quite a bit we don't you sure thing that much so it's not in our default set but if you want to add it to defaults that you definitely can eso if you're working on an image, I'm gonna work on the image of him with his camera let's say we're working on this image let's go ahead and add the ed sharpening in and you can see the intensity you can adjust the intensity you can ingest the edges and I want to zoom into the cameras you can see this s o this is before and sharpening and after so you can see all of the actors how much sharper they are on the actual camera like app after after after there was like three ways to talk about aperture there I feel like I said that word a lot okay shukan do the intensity and then the falloff is it's a interesting tool? It does a lot of things but basically it adds the majority of the sharpening a percentage of the sharpening on the second and third round of sharpening so this tool actually does three layers of sharpening fall office just one that is best to kind of play with depending on the image the edges is one you don't want to get too carried away with but you definitely can add in some great you want to take that right to the edge of where you want it edge edge yeah no anyone on dh then intensity is just going to bring up how much of the scharping you're going to d'oh so look at the difference between before and after on that scharping amazing it looks really, really great and highly recommend using this tool for sharpening on dh. We'll just leave the other sharpen tool for another time.
Class Materials
bonus material with purchase
Ratings and Reviews
cricutDIVA
I have been working through the videos and I am so happy I purchased this course. Sara has taught me sooooo much. I have been using Aperture for some time to organize my photos, but even now, two thirds of the way through the course, I just learned something that is going to make things so much easier. It is actually super obvious, but I never realized it was there!!! (the ability to create a new export preset). Thank you so much for this great course. Thank you so much Sara!!!
Eric Sanchez
THANK YOU SARA FRANCE AND CreativeLive!!!! This course is exactly what I needed to fully understand this program. I have been using it for about a year now with now instruction. Really, I have just been fumbling through it. Now I can set it up to work for me and understand how Aperture works. Sara France has a way of explaining this product that makes everything easy to understand. I am completely happy that I purchased this course. I know I will watch it several times over to make sure I am using Aperture to its fullest potential. CreativeLive, please bring Sara France back often as Aperture grows and gets better. I absolutely loved learning from her and hope she becomes a regular on CL! Thank you so much. Eric Sanchez
a Creativelive Student
Since I first purchased this software in early 2008 I have been seeking a comprehensive look at Aperture. And I have now found it in Sara France's course. She gives us not only a detailed instruction in the finer points of a workflow using Aperture but discusses in detail each of its features. I can't express how much I appreciate this course. I've used Aperture extensively since I first purchased it, but what I suspected before is clear now - I only knew about half of it. In the past 3 days my education has proceeded at a good clip. Thank you, Sara France.