Theater Shoot: Capturing The 1st Shot
Lesson 22 from: Cinematic Lighting for PortraitureChris Knight
Theater Shoot: Capturing The 1st Shot
Lesson 22 from: Cinematic Lighting for PortraitureChris Knight
Lessons
Class Introduction
04:29 2What is Cinematic Lighting?
06:42 3Motivated & Practical Lighting
07:41 45 Cinematic Lighting Tips
04:53 5Low-Key & Upstage Lighting
06:26 6Control Your Fill Lighting
05:18 7Show Depth In Your Image
13:24 8Pre-Production for Cinematic Lighting
22:42Grip Tools: Clamps
08:41 10Grip Tools: Apple Boxes, C-Stands & Grip Heads
10:53 11Grip Tools: Pins & Portable Gear
04:50 12Grip Tools: Scrims, Silks, Flags & Tape
13:52 13Grip Tools: Wind and Haze Machines
04:07 14Grip Tools: Unusual Tools
04:47 15Grip Tools: Filters
11:05 16Grip Tools: Q&A
15:04 17Theater Shoot: Concept
08:03 18Theater Shoot: Pre-Production Considerations
08:48 19Theater Shoot: Lighting Gear
04:27 20Theater Shoot: Motivated Lighting Considerations
26:47 21Theater Shoot: Lighting Walkthrough
20:45 22Theater Shoot: Capturing The 1st Shot
27:37 23Theater Shoot: Hero Shot
21:47 24Theater Shoot: Capturing In The Seats
21:48 25Airstrip Shoot: Concept
05:49 26Airstrip Shoot: Pre-Production Considerations
19:31 27The Haircut: Location Specifics and Motivated Lighting
13:17 28Working With Scrims On Location
06:34 29The Haircut: Getting the Shot
24:28 30The Haircut: Shooting Plates
08:21 31Staggered Planes: Location Specifics and Motivated Lighting
08:10 32Staggered Planes: Getting The Shot
08:23 33Capturing Plates With Talent In Background
16:26 34Airstrip: Environmental Portraits
07:01 35Airstrip: Location Shooting Q&A
22:05 36Using Plates to Create a Pano in Lightroom®
16:08 37Transform Tool
04:50 38Post-Processing 1st Theater Shot
09:48 39Retouching Details in Photoshop®
13:09 40Color Grading in Alien Skin Exposure X3
06:27 41Post-Processing Theater Hero Shot in Photoshop®
08:11 42Creating a Spotlight in Photoshop®
05:31 43Adjusting Color for Cinematic Lighting
12:28 44Post-Processing: The Haircut
12:08 45Coloring the Sky and Removing Modern Building
05:10 46Creating a Pano Using Plates in Photoshop®
17:12 47Developing Cinematic Portraits in Lightroom®
07:29 48Retouching Cinematic Portraits in Photoshop®
08:57 49Color Grading Cinematic Portraits in Alien Skin
13:20Lesson Info
Theater Shoot: Capturing The 1st Shot
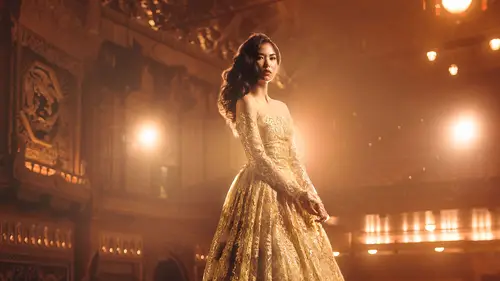
So I hope you're really excited to see what the final product looks like. I'm gonna take you through what that ended up looking like for three different shoots, I'm gonna show you the diagrams for each of them, and let's take a quick look again one more time at the diagram. So this is where we ended up. We've talked through it, we've seen what that looks like, we know what everything is doing, and now we're gonna turn it over to the footage and see what that actually looked like. So we are just about to bring in the talent to start shooting. A couple of things that I want to remind you of before we do. One, remember, it's very dark in here, so we're using a really slow shutter speed, so I had to have the conversation with our model Amy that we need to pose very slowly. So that's definitely something that we have to keep in mind. We've also added in a couple of Pelican cases to elevate her a little bit, to make sure the dress fills out a little bit more. I'm also, I'm gonna be switching...
between a wide-angle lens and the more medium focal-length lens that I mentioned a little bit earlier, and that's because even though I'm pretty comfortable doing a stitch, I wanna make sure that I have it in a single frame just in case. So I'm gonna do some very wide stuff, and then I'm gonna do some stuff that's stitched together. I'm probably gonna end up using the stitched stuff, but it's just a point of safety to make sure that I have everything. Then I'm going to flip off a few of the lights, I'm going to move some of the lights out of the way, and I'm gonna make sure I get my plates in both of those situations as well. So I'm basically, I have to think about two different formats as I'm photographing this. So Amy, come on in. Why don't you stand on these two Pelican cases and we will begin to get some photographs going. Do me a favor, can you shift forward just a hair? There, yeah. Let's see what that looks like. This is one of the only times I'll ever use the screen, just because it's so low to the ground. I mean, it's not really flaring that, that much. Yeah, let's swing it around a little bit. Let's, um, I think what we gotta do is get a little bit more on plane, and then we'll angle it up a little bit, yeah, we're gonna see, let's see if this works. 'cause I kinda wanted to hit the hair, but if it doesn't work, it doesn't work. I think we also lost a little bit of haze in here. And let's turn the power of this down a bit. So I'm at 10, I'm gonna try seven, see if I like that any better. I'm really not sure, do you want me to move, and you see the on-camera plane? Yeah, let's do that. All right. All right, up or down? Try moving it a little bit to the left. My left, sorry, keep going. There. A little bit more. Keep going. Keep going. Keep going, keep going, keep going. No no no, you gotta move it. Move it this way, and then angle it back to me. Yep. There, that's a little too much. Do you want it more the other way? There you go. Amy, lean forward just a little bit for me, please. That's beautiful. Really, really good, really good. I'm gonna try this with a little bit less power here. Just to see if I like that any better. I had a nicer glow earlier on, and I wanted to bring it back. There's a little bit more haze in the front, so it was making her glow a little bit more. So it's, the tricky thing with a haze machine is you're always trying to kind of get somewhere in between making it look like the room is hazy and making it just look like it's atmosphere, and that's the tricky kind of thing to bridge. And you're gonna find that when I switch over to the 55 I can use the Black Pro Mist, which I can't, because I don't have a step up ring, or step down ring in this particular case, for this wide-angle lens. It's just something to kind of work around and solve, but that's generally what I'm trying to finesse here. And fortunately she's great, so the shots also still look really good even though, like, we're technically shooting even though we're finessing the light as we do it, and she's doing it really well. So I'm just kinda balancing out what these shadows are looking like, and saying, do I want this to be bright? Do I want it to be dark, you know, stylistically, what am I after? That looks nice, very glamorous. So I'm also a very methodical shooter, I'm very, very, very slow, so I tend to kinda work through the frame very specifically versus doing lots and lots of adjustments. A lot of people, you know, there's a lot of people out there who like to shoot very fast and move around a lot, she does. Lindsay shoots a zillion frames and moves around and gets a ton of variety, I'm much more about, like, creating the single shot, and so just two different approaches, and neither one of them's right or wrong, this just allows me to kinda play with light really specifically and get it to where I want it in-camera. Good, very nice. Lean forward just a little bit more for me. Pretty. Beautiful. Stunning, that's stunning. Lean forward a little more. Yeah, we'll alternate between the two, 'cause we gotta use the fan to spread it out a little bit. Very nice. Very nice. Turn, that's nice, yeah. I like the introspective, kinda like, head down a little bit. Can you hunch over just a little bit? Good. Do the same thing, but turn the body. Turn this way, there you go. Yep, nice, nice. Good, turn the head that way a little more. Beautiful. Can we, give me something a little bit more like, uh-huh, good. How's the hair in the face? You can open it up a little bit. Yeah, that's great. Look down and out that way, turn your head a little bit, good, yep. Chin down a little more. There, that's nice. Good. Uh, yeah, turn that all the way down, and then run that fan so it doesn't hit her directly. Other way, can you point it that way? No, I know, I just need it a little bit. Okay, it's good behind. Yeah. Let me try to get this out this way. Yeah, fan on, please. Yeah, look at those light streaks. Yeah, and they're like, super dramatic. I just want to get all that, 'cause I can see the particles. I don't want to, you can run that fan. More, do you want me to fan more? Mm-hmm. You know what I might have you do for a couple frames? Just have it, no, have you hold this, and then I'll take you out. But yes, stay right where you are a second, I wanna get that side shot again, that was really nice. And I also need to switch to the and shoot some with the 55. All right, let me get you to the side. Turn back to me just a little bit, that's good. Right there. Yeah, that's nice. Try the other side for me. Good, yeah, that's great. Give me a little bit more bend to the fabric. Yeah, there you go, a little bit more of a drape. Uh-huh. Good, look off that way. That's nice, yeah, that's pretty. Very nice. All right, Linds, I'm gonna have you drop it on the count of three. One, two, three. That's slow, damn. Hold on. One, two, three. You have to hold it, I think. Bring it out a little bit more, yeah, there you go. Uh-huh. Now bring it down lower, down down down down down. Keep going, a little bit more, a little bit more. There, that's it right there. Good. Turn your face to me a little bit, Amy, good. Beautiful, nice, that's nice. All right, so we have swapped out the wide-angle lens for a 55, it's gonna be a little bit more of a medium length. I installed the Black Pro Mist filter on top, so it's gonna get me a little bit more of a hazy effect. I've also gone from, I was shooting at F45, because that was the lowest my other lens could get to. I'm now at an F32, this one can open up to a 28, which is the other benefit of it. It gives me a little bit of a different compression, I can throw the background out of focus a little bit more and because I'm at 32 now instead of 45, I've been able to move my ISO down to 1000, which I'm much happier about. So the downside of this is that I'm gonna have to back up just a tiny bit, so I'm gonna do that, just to get a little bit more of the frame in the shot. We're gonna run the haze machine for just another second, and this is gonna give me a really pretty, pretty look, I think. All right, let's go ahead and turn that off for a minute and then just run the fan. Yeah, no, this is just, it's a more contrast-y lens, I think. Great. Lean a little more to me, I'm losing you with the perspective. Turn your shoulders to me a little bit. Other, there you go, yep. And then lean forward on me. So that's nice, really nice. The far, my far right. All right. Can I get some more in here, maybe? I'll back up a little more. Okay. That's great. Yeah, I'm, the B one is a little bit too forward. Uh-huh. Better or worse? Um, that's better. Good, straight out that way with the head. Nice. Lean forward to me a little bit more. Now, I'm gonna get some plates of the other side, so don't move. Can you back that fill light up, please? Yep. That's good, right there. Great. Okay, all right, now I'm gonna get one back with the, without these two lights. All right, Amy, I am, you are all set. I'm gonna now get just a few plates. Take it away? Yes, no, you are good to go. Thank you so much, well done. Do you want these two gone, or-- Those two gone, and these gone. So I need plates of the stage. All right, we're back, yeah, no, that's good, all right. Hooray. So this is again the diagram of the setup that we were working with for that particular, that particular round. Hopefully you have some questions ready to go, but before you do that, I'm gonna take you through a few of the images from the shoot. So we're gonna cut over to the, there we go, the laptop. So this is kind of the last one you saw. This was that, her in place, pretty wide-angle shot, pretty good example of the lighting and the perspective. So now I wanna show you a little bit of what was happening there. What you might have seen was the, here we go. The image getting a little bit of a process as it went, and I'm a big fan of tethering for that reason, because I think a little quick adjustment sometimes is just enough to give it that extra layer of punch. And so this was kinda how I was processing the images that were coming in. So a haze machine generally makes your shadows a lot brighter, gives you a loss of contrast, I just put a little bit of contrast back into that, helped to ground it a little bit more in reality. That's actually what that shot would've looked like as I was tethering it. Now, as far as the stitch, what you saw, this was the image. This is what it looked like as it came into camera, and I could just shoot her in the frame that it needed to be, (imitating camera clicks), on and on and on, no change, no change, no change to my frame, looks really good. And then once I would have that, I did plates. And so my main plate is this one up here, it's that first five set of images, it's the horizontal plane. It's just me shifting a few degrees, giving me that stitch. Now, before I actually start doing it, as soon as I have her in place, because I'm at like, F, what was I at, F35, I think. I flipped off the focus so that it was in manual so that there was no chance of it changing focus, so that it kept the same focal plane throughout the plates, and that's really important. And so once I had that there, it was just, click, move, click, move, click, move, click, move. And then because I know from experience that I lose a little bit at the top and the middle, I went up and I went across across across across, just to make sure I was getting that really beautiful ceiling texture, and that's what the point of that was. I'm gonna show you this in the post-production in a later section, how to stitch this together, but once this does all get stitched together it ends up looking like this. And this is still in Lightroom, this is, it stitches together a raw DNG. You can see that's why I said there's a little bit of a gap up there, but it's not much of anything that I necessarily, it's not a difficult thing to fill in. But this is what it looks like when it's all put together, and it gives you the ability to make all of those raw adjustments in Lightroom. So this is more or less the stitch right out of camera, and when I said that this is ISO 1,000, at this made up, I mean, it's 15,000 pixels on the long side, to put that into perspective. We're gonna let this camera struggle for a second with trying to zoom in on it, we'll get there eventually. There we go, okay. So, but this is at 100% for scale. I really mis-focused on that, apparently. But so, while that's coming up, this is what it looked like kind of straight out of the camera. There we go, it's pretty sharp. I mean, it's, the noise is negligible at this point, and I think that looks pretty good overall. And then it'll figure out a way to zoom out. I mean, that is the one downside when you're doing stitches is that the images are huge. So A, when you start bringing it into Photoshop, these files get massive. You can obviously resize them if you want, but I think it's a really nice way to create the compression and the effect that you otherwise wouldn't get, 'cause I just personally prefer the way this looks to the way this other image looks, which will eventually show up. There we go, okay. It's just different, I mean, they're different, I'm happy with the other image, I just prefer that. I think it looks a little bit more cinematic, because, you know, when you're doing something that looks like, movies don't really shoot with this perspective that often, whereas this seems a little bit closer to that anamorphic style of lenses where you have a perspective that's closer to this. Now, also, this is cropped to a 16x9, which helps, but it just, everything in the room just feels a little bit more natural to how the camera lens would see it, I think. So that's why I would gravitate toward something like that. You can also see that the Black Pro Mist helps a little bit with the haziness, it just looks a little bit more, kind of across the board hazy. The detail, I think you lose a little bit of the structure detail, like with the metal and stuff, which I think puts a little bit more attention onto where you want it, and so I'm a little bit happier with that. But to kinda show you the progression of where this goes, this is again where it starts. Then we light the background, we get the subject lit, this is the safety shot, and then that's kind of the actual final shot that I was going for when that was all said and done. But I would, of course, bring this into Photoshop, I'd make a few more tweaks to it, clean up some things, and you know, that's where this would end up. So let's take a couple of questions, maybe, non what the first shot kinda went through? Uh, Kelly asked, did you say you bounced the light in the octabox at the camera right off the subject onstage? If so, did you manage to freeze the subject, or how did you manage to freeze the subject at such a slow shutter speed? Okay, so it is the strobe, that's the strobe light is the main one, is the one that's lighting her camera right, which is what's happening over here. Kinda the cool little lucky thing about this particular stitch is I had actually selected a stitch where I had moved that light out of this frame, 'cause it is actually in frame in one of the other ones. I mean, you can kinda see it here a little bit, but it was even further in frame in one of the other stitches, and so all I did was I replaced her middle shot with what would have been the stitch of the middle, and it just kind of automatically cleaned it up for me and it really did, it was really a fortunately beautiful job of not me having to do very much. And so it's feathered a little bit more at me just to get less light on her, but what there would have been here is a flag blocking it from flaring as much at camera. And so that was kind of the point of that. Hector asked, looking back on this image now, just seeing it on the screen and sort of talking through it, would you have done anything different, or would you just try to capture that exact same image? I was pretty happy with it. I mean, it ended up real close to what that final image, what I was aiming for with it. A few things kind of ended up a little bit lucky, so for example, I actually think the left part of the image over in that backstage area is visually really interesting, which I liked. You know, best-case scenario, I would've loved the spotlights to be higher up, but that was not an option. So they're a little bit low, I would've liked probably a little bit more definition on the beam, but I have shots where there is a little bit more definition on the beam, and I didn't prefer them. So I ended up just sticking with what this looked like. Yeah, no, I was pretty happy with the result of this. It kinda turned out how I was planning to, and I mean, there's always little tweaks and things, but overall I was pretty happy with the result as to where it began, cool. How many photos did you take for the stitches? So in this particular one, I took, I mean, I did a couple different versions, so you know, obviously, probably about 20 or 30. But for what this stitch became, it was 12. But I think probably of the it actually uses, by the time I cropped it down, it probably uses seven or eight of them. 'cause I mean, this is, let me show you. This is what the crop does. Hurts my computer. No. Okay, there we go. So I mean, you can see, like, it's not using a lot of this. Yeah. Yes? Could you talk about the posing process? It didn't seem like you were giving her a lot of direction. She was very professional. She is very good. And then also, the placement of her in the frame, having her face the second third in terms of rules of thirds rather than facing the other way or having her back up. So, um, I'll start with the posing question with her. When I'm doing this kind of stuff, I really like to go the extra mile and get people who are professionals and good at this, because there are so, so many moving parts to this, it makes my life a lot easier when I don't have to micro-pose and micro-manage the talent. There are definitely times when you have to, and you have to go through that process and explain that and break it down and spend the time and energy to do it. I didn't have to with her, and that was very, very lucky, and that was on purpose. So when I'm looking through a model's book, I'm looking for variety of pose, because if they're giving a variety in their book, it, chances are, is them, but if it's kind of like the same stuff over and over again or there's not a lot of movement variety through it, chances are, I recognize they may not necessarily be the best at it, and so it just becomes something that the longer you do this the more you see in a book who knows how to move. And so that was something that I really considered for her, she moved really well. And then the other question was, compositionally. So the thing about composition is, composition is all about a suggestion, not an absolute rule. And so this, it's kind of a third, but I was more thinking about, like, the triangle of the golden triangle more than anything, so it's all about creating diagonals. So the third composition is a little bit more useful when you are working on a flat plane, so your strong horizontal lines are better when they're, like, your horizon lines are strong horizontals. When they start getting into diagonals, it doesn't really work as well as a compositional, as a compositional device. So this was more about creating balance. So you can kinda see, like, she's framed by the arch. She's also framed by the lights. She's framed by what's happening here, like, it's about trying to make sure your subject has their own space a lot of times. So that was really what my main consideration was for this. I also knew that this whole bright area on the left-hand side is very attention-heavy, and so I didn't want to put her right up against it because it would weight her, it would weight the image too heavily to the left-hand side. So she is actually, like, this is meant to draw your attention because it's a person and she's the only figure in the frame, and all of this is bright, but this is supposed to even it out and anchor the left side of the image and give it a little bit of weight compositionally to what's happening. But again, it's only one thing, and it's off in the corner, so it's not supposed to be all your attention, it's just supposed to create a little bit of visual weight over to the left-hand side. So that was kinda my reason for that. Pointing her into the edge of the frame is just about kind of crowding it a little bit on purpose and giving a bit of, almost like, putting her in a condensed space, which makes her feel a little bit more small. Like, that was kind of the point, so it wasn't so much meant to be grandiose and to the crowd, it was meant to be a little bit more, you know, introspective and kind of a more personal emotion in a grandiose scene. And so by putting her facing the edge of the frame puts her in a more confined space, her expression matches that a little bit and the pose matches that a little bit. So it's not meant to be this performance to the crowd, because there's no one in the crowd, it's supposed to be kind of the opposite in that setting, and it hopefully creates some layers to what the image is trying to convey.
Class Materials
Bonus Materials with Purchase
Ratings and Reviews
Bruce Walker
This course is simply terrific, and I highly recommend it. Firstly it arrived at the perfect time for me as I am soon to do a studio shoot very much in keeping with a cinematic or theatrical aesthetic. Secondly it's taught by Chris Knight who I swear is like a long-lost twin brother. :-) There are so many parallels in the way he thinks and works to my own style. So I avidly watched this as soon as it was available for anytime streaming. This is the first time I have made extensive use of the CL iPhone app, btw, and I love how it pretty much enabled me to seamlessly switch back and forth from desktop viewing to my iPad that I carry around the house during the day. I was able to make coffee and still carry on taking in the course, uninterrupted. The content is fantastic, delivered succinctly yet entertainingly. Some material and ideas are already in my repertoire and were reinforced and validated by Chris' demonstrations. But he also introduced a lot of ideas and methods new to me and very welcome. I was particularly glad to see how practical it is to stitch a series of tripod shots into a wide pano. I have been afraid to try that but I will now be using that in my next shoot, for sure. As alway, his post production practices revealed all kinds of tips about Lightroom and Photoshop I didn't know. Negatives. The volume level mastering is iffy. It started out at a decent level then midway through one of the early lessons dropped so much I had to turn up my sound system to compensate. And as I write this one lesson (34) is missing and in its place was a duplicate of the next lesson (35). I expect CL will have that fixed shortly though (I sent support a note).
Jeph DeLorme
One of the best classes I have viewed at Creative Live. Definitely worth the investment of time and money. The pace of the class allows you to learn extra tips and tricks throughout the process. Great instructor, highly recommend this class to anyone looking to step up their creative game.
a Creativelive Student
excellent class in all regards. outstanding instructor with experience in complicated cinematic shoots but who also is willing to thoroughly cover the basic nuts and bolts. i wish all creative live classes were of this quality.
Student Work
Related Classes
Lighting