Lesson Info
48. Fog + Flash + Grid = Dramatic Change
Lessons
Chapter 1 Introduction
06:59 2Welcome to Lighting 201!
03:16 3OCF = Anytime/Anyplace
06:49 4Chapter 2 Introduction
05:11 5Wired, Infrared or Radio?
15:03 6“Pocket, Medium, Full Strobe?”
13:23 7Our 3 Favorite Flashes “Pocket Strobes”
09:26 84 More Flashes “Pocket Strobes” Worth Looking At
14:33Our 2 Favorite Medium Strobes
12:55 10Understanding Radios Part I: Channels & Groups
11:04 11Our 2 Favorite Radio Triggers
07:59 125 Simple Steps to Trouble Shooting Radios/OCFs
15:10 13Fantastic ND Filters at Any Price Range
09:03 14Our Favorite “Sticks”
11:01 15Our Favorite Ultra-Portable OCF Light Modifiers
19:38 1612 Mounting and Must-Have Lighting Accessories
12:28 17Gear Setup - Setting Up a Light Stand or “Stick”
08:14 18Gear Setup - Setting Up a Monopod Light or “Boom Stick”
09:30 19Gear Setup - Setting Up a “Medium Boom Stick”
12:15 20Gear Setup - Setting Up a Manual Flash “Big Boom Stick”
13:30 21Gear Setup - Setting Up a Full Feature Flash “Big Boom Stick”
09:40 22Chapter 3 Introduction
04:12 238 Steps to Perfecting Each Scene & Image When Using OCF
12:30 24Over Powering the Sun - Part I
16:42 25Over Powering the Sun - Part II
12:42 26Slow Down! Watch the Details
08:32 27More Power Without The Power
11:03 28Adding to Existing Light - Part I
10:52 29Bare Bulbing with Large Groups
14:36 30Back Lighting to Create Interest
13:33 31Getting Crazy with the “Whip Pan”
17:27 32Chapter 4 Introduction
03:44 33The Flash Modifier You Already Own
12:05 34The Oh-So Powerful Umbrella
11:13 35Large Group Shots with an Umbrella
11:21 36Exposure Balancing via Lightroom
04:20 37Portable Softboxes - Westcott Apollo
10:22 38More Light Control, Just Grid It!
12:53 39Dusk + Modified Pocket Strobes
13:51 40More Power? Medium Strobes FTW!
12:37 41Perfect It In-Camera. Then Photoshop
05:23 42Adding to Existing Light - Part II
12:00 43Adding or Enhancing Light Direction
11:17 44Our Ideal Group Lighting Technique
12:58 45Incorporating Flares with Flash
10:39 46Cutting Light, Grids and GOBOs
10:29 47Chapter 5 Introduction
03:34 48Fog + Flash + Grid = Dramatic Change
08:56 49BYOL! The 3-Light Setup That Only Requires One Light!
12:07 50What About the Fill Light?
12:15 51Backlight + GOBO + Fog = Magic
08:36 52Drawing Attention via Light Shaping
08:29 53Visualizing Lights & Color Shifts
09:17 54Mixing Ambient + Gobo w/ Flash
11:37 55Better Light Can Change Everything!
09:47 56Chapter 6 Introduction
01:57 57Subtle Refinement = Massive Difference
11:31 58Great Light Changes Everything! Part II
11:50 59Manually Triggered RCS + Shutter Drag
11:29 60The Right Power for Each Scene
14:24 61Dodging and Burning via Light In-Camera
07:23 62Subtle Light for Natural Portraits
09:14 63Light Modification & Simple Compositing
10:16 64Expanding Your Photographic Vision
11:37Lesson Info
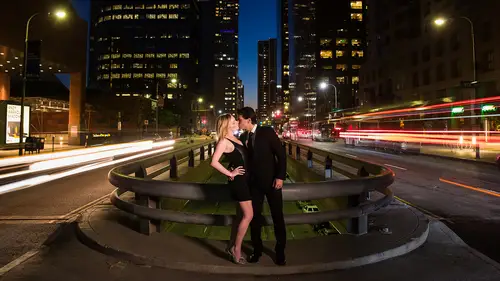
Fog + Flash + Grid = Dramatic Change
Fog plus flash plus grid equals dramatic change and super fantastically delicious photos and whatever adjectives you could possibly think that throwing their now understanding and predicting what a scene is going to do when you change camera setting is when you change exposure values in camera as well as flash exposure values as well. Modifiers and so forth. That's. Something that's going to come over time. Okay, but we can help you with that process. We can speed that process up dramatically, because for someone that has not seen, you know, a course like this, it might take you thirty, forty, fifty shoots in different scenes, different situations to really understand and be able to predict and visualize those things. But after this chapter and after this course, after a few shoots on your own, you're gonna be able to do this every time, okay? And what's gonna happen is when you're working with your clients, you can walk up to a scene. I know exactly what's gonna happen when you change...
white balance. When you change camera settings, when you change flash exposure and when you change the quality of light and so forth and create an amazing image out of something that doesn't really exist there, it only exists for that split second. In camera when you shot the image and when you show that to your clients they're going to be absolutely amazed that you have that kind of artistic vision and then you're going to think back and go yeah, that comes from lighting to one in my own practice and you'll be like I know what's up but then you don't tell them that because then they'll be with less amazed it's like a magician you don't give away your secrets don't give away your tricks right? Don't show them okay? So let's talk through this scene now when we approach this scene this is what it looked like just right in the morning and it was it was gorgeous we had this we often have this kind of mist and fog in orange county if you get up early enough for sunrise, I know that's like the butt crack of dawn most of us don't get better, but if you do I would highly encourage it go out to the park and in places like this you'll have this beautiful missed that just looks fantastic with fog that kind of just stay there. Your problem is that by around, say, two, three hours it's not even that long it's probably like an hour to two hours after the sun has risen that early morning fog burns off basically and so once it burns off, you don't have it now with this particular scene well we arrived at the set and our model I forgot a lot of his clothing so like a lot of clothing that we needed we didn't have so we had to go make runs to get a tie we had to get black pants will get all these things and we started this shoot about hour and a half to two hours past sunrise which was when we were originally going to start which was when we took this shot so what happened by then was we still have the light direction you know the sun had come up to about here by that point eh so we still have a really good like direction but we didn't have any mr fong to help us out so we knew that okay we need to kick a lot more fog and spend a little bit more time kind of working the scene over but that's all right so we go into this shot now what I'm visualizing or what I want here right? I want to shoot with this path that kind of comes left to right and I want to have the background to be these trees so we had just the angle the bike this was the first kind of angle that we took with the bike and I thought you know what's gonna happen with that angle is that if the sun is directly behind no matter how much light number at how it fog we introduce in this scene we're not going to get the light rays that we want to lead into the subject because if we do see any light rays they're going to be you know the sons right here the light rays will be coming off in this direction right and around these sides which might look cool and it might be a different type of effect but I wanted those light rays to lead into the subject so the first thing that we do is we adjust the bike position so basically revenue shooting the bike flat against the path and kind of seeing the path disappear in a distance we turn the bike so now we're shooting with a path going from left to right and we're shooting against these trees right here and I go okay great now we need to see if we can introduce enough fog into the scene to basically get that light streaks coming into the shop so we use the roscoe mini vi and I have my fantastic production assistant logan that's back there and he's wafting the fog like a champion with the reflector and he's filling the entire scene and basically what we have to do is we have to keep working because with the wind coming through we talked about that how you need to work the entire scene to get that even amount of fog otherwise it just looks unnatural so we keep going, and all of sudden I start seeing the light streaks kind of coming through, and so I haven't standing place just for a second while we're getting everything set up and I shoot a shot just tio make sure that I'm getting what I want, and I can see the light streaks, I can see everything, and it looks fantastic it's at this point that I go okay? Now, if I want everything to be more dramatic, if I want this shot, I mean, this is a cool shot and you, you know, you see a lot of doctors that, you know, they would take this shot and be cool with that and that that's a great shot in of itself, but it lacks a bit of production value. Still, we have these great lines of fog, but because of the exposure in this shot, we don't see the fog as much. We kind of end up with this lifestyle look rather than editorial look, because we have white blown out skies and we have a kind of, like just bright natural skin on him and so forth. We don't have a lot of shadows in the scene, and so we don't end up with a very dramatic look to the shop, so while you could say that this is okay. As is right here I would want to take it a step further and that's where I go okay, now let me visualize if our toe add a a kick of light onto his face and onto the bike I can pull down the background by one to two stops okay if I pulled on the back and I want to one to two stops it's gonna amplify that fog effect because now the fog is going to be over a darker background right the back and we'll get a little bit darker which will bring out the fog transition a little bit brighter because the only way we can see fong where if we were to shoot this original shot we're not going to see fog over this entire center area we're not going to see those lines of those streaking light over that center area because that area's too bright right? So we need to have the bright over a dark area in the background to able to see that contrast if we can darken the background further that contrast will pop even more so using our three photos metro's into a that westcott orb we put the diffuser the grid on it we place it off the camera right? We're shooting at a very high power setting with three of them going into it and what am I doing? I'm using the light that exists in the scene I'm saying okay I already have a rim light here let's use that room light toe etch out his body to etch out the highlights indy in the motorcycle and let's add that light from the right side to kind of give a little bit of drama to the image and leave his face on the shadow now this brightly exposed skin becomes shadow as we pull it to stop down and we add in that extra light into it are brightly exposed background now becomes dark and dramatic allowing these fog lines to kind of streak through these light lines going to streak through and have a more dramatic presence in the overall image. So this was the thought process of moving from image to image and shot two shot was let's keep kind of molding and crafting the image until we get to what I'm visualizing in my head and this is exactly what I'm visualizing but it took a few steps to get there now for those of you that are thinking well pie you had a fog machine and I can't afford a fog machine or pie you had this and I can't afford that we've already shown you that you could be using I mean but everyone one was all about getting great results out of aa you know basic dslr basic kit lenses and prime lenses right? So all you need is a five hundred dollar dslr you a hundred dollars fifty millimeter prime, we shot this on the sigma, but guess what? You get a very similar look if you shot this on a fifty millimeter, the nifty fifty right one hundred dollars fifty millimeter linds, you could get the newer or the young nor budget flashes to start out, and three of those would set you back maybe a few hundred bucks as opposed to getting three foot thick, mitro says, which is going to be twelve hundred dollars ok, and now a fog machine will farm machines are incredibly expensive, right? We'll know roscoe many v is like four hundred forty bucks it's, not that expensive to purchase, and if you don't use it that much to justify purchasing it, then you can rent one for like twenty to thirty bucks it's for a day. Okay, so this entire shoot could be done on a production budget of four to five thousand dollars. It could be done in a production budget of one two two thousand dollars it's completely up to you, and you're going to get ninety percent or even like ninety five percent of the exact same results by following steps bring, regardless of the gear that you're using, nicer gear simply makes your job a little bit better. It makes her image just a little bit higher quality, but that's it okay, so this was kind of our first analysis and kind of just looking at a scene and backing our way into what we're visualizing in our minds. So let's. Go ahead and move to the next video now.
Class Materials
Bonus Materials with Purchase
Ratings and Reviews
Colin
Pye is a god. His teaching style is really engaging, breaking down everything you could want to know about each example in a fun yet detailed manner. The course is absolutely jam-packed full of great information and fantastic inspiration. This course, as well as Lighting 101, give not only a perfect foundation for anybody learning about flash from scratch, but also have more than enough tips and advanced techniques in them to help experienced flash users seriously up their game. Cannot recommend it enough.
Lê Tiến Đạt
I'd like to say thank you to SLR Lougne, Creativelive and especially Pye for creating this wonderful Lighting series. Pye has a great sense of humor and he is also a great teacher. He expains everything in tiny details. I love his creativity, all the tips and dedication. Recommended!
Karen Ruet
I'm watching this live and am seriously considering buying this course. I really like the examples and all the information. Pye is super generous and easy to listen to. I also appreciate the talk about gear and am happy that Pye is giving us options for different price ranges. Thank you, Creative Live.
Student Work
Related Classes
Lighting