Lessons
Chapter 1 Introduction
06:59 2Welcome to Lighting 201!
03:16 3OCF = Anytime/Anyplace
06:49 4Chapter 2 Introduction
05:11 5Wired, Infrared or Radio?
15:03 6“Pocket, Medium, Full Strobe?”
13:23 7Our 3 Favorite Flashes “Pocket Strobes”
09:26 84 More Flashes “Pocket Strobes” Worth Looking At
14:33Our 2 Favorite Medium Strobes
12:55 10Understanding Radios Part I: Channels & Groups
11:04 11Our 2 Favorite Radio Triggers
07:59 125 Simple Steps to Trouble Shooting Radios/OCFs
15:10 13Fantastic ND Filters at Any Price Range
09:03 14Our Favorite “Sticks”
11:01 15Our Favorite Ultra-Portable OCF Light Modifiers
19:38 1612 Mounting and Must-Have Lighting Accessories
12:28 17Gear Setup - Setting Up a Light Stand or “Stick”
08:14 18Gear Setup - Setting Up a Monopod Light or “Boom Stick”
09:30 19Gear Setup - Setting Up a “Medium Boom Stick”
12:15 20Gear Setup - Setting Up a Manual Flash “Big Boom Stick”
13:30 21Gear Setup - Setting Up a Full Feature Flash “Big Boom Stick”
09:40 22Chapter 3 Introduction
04:12 238 Steps to Perfecting Each Scene & Image When Using OCF
12:30 24Over Powering the Sun - Part I
16:42 25Over Powering the Sun - Part II
12:42 26Slow Down! Watch the Details
08:32 27More Power Without The Power
11:03 28Adding to Existing Light - Part I
10:52 29Bare Bulbing with Large Groups
14:36 30Back Lighting to Create Interest
13:33 31Getting Crazy with the “Whip Pan”
17:27 32Chapter 4 Introduction
03:44 33The Flash Modifier You Already Own
12:05 34The Oh-So Powerful Umbrella
11:13 35Large Group Shots with an Umbrella
11:21 36Exposure Balancing via Lightroom
04:20 37Portable Softboxes - Westcott Apollo
10:22 38More Light Control, Just Grid It!
12:53 39Dusk + Modified Pocket Strobes
13:51 40More Power? Medium Strobes FTW!
12:37 41Perfect It In-Camera. Then Photoshop
05:23 42Adding to Existing Light - Part II
12:00 43Adding or Enhancing Light Direction
11:17 44Our Ideal Group Lighting Technique
12:58 45Incorporating Flares with Flash
10:39 46Cutting Light, Grids and GOBOs
10:29 47Chapter 5 Introduction
03:34 48Fog + Flash + Grid = Dramatic Change
08:56 49BYOL! The 3-Light Setup That Only Requires One Light!
12:07 50What About the Fill Light?
12:15 51Backlight + GOBO + Fog = Magic
08:36 52Drawing Attention via Light Shaping
08:29 53Visualizing Lights & Color Shifts
09:17 54Mixing Ambient + Gobo w/ Flash
11:37 55Better Light Can Change Everything!
09:47 56Chapter 6 Introduction
01:57 57Subtle Refinement = Massive Difference
11:31 58Great Light Changes Everything! Part II
11:50 59Manually Triggered RCS + Shutter Drag
11:29 60The Right Power for Each Scene
14:24 61Dodging and Burning via Light In-Camera
07:23 62Subtle Light for Natural Portraits
09:14 63Light Modification & Simple Compositing
10:16 64Expanding Your Photographic Vision
11:37Lesson Info
Large Group Shots with an Umbrella
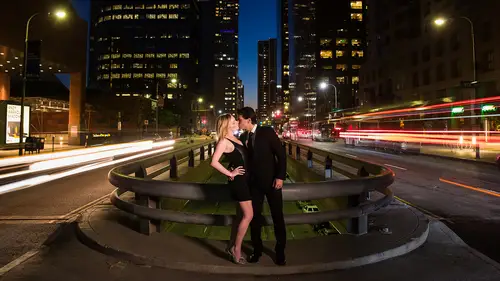
So large group shots with an umbrella once again this is a fantastic light modifier when we don't mind that light kind of spilling everywhere the fact that an umbrella is this kind of a shape it's this orb shaped this convex shape meaning that it's it's basically bending out means that when the light hits it it's going to push a large amount of life forward and then small more amounts of light are going to basically spill out outside of these other edges so essentially it's going to fill an entire area we don't have a lot of like control but what we want that is an absolutely fantastic tool especially for the price and for the portability of this guy so let's take you on set to an actual wedding isn't it cool that we could take guys on actual shoots these air all actual shoots real clients real photographers teaching you real techniques okay so here we are we have a large group we have roughly I don't know like close to twenty people in this shot someone somewhere around that number so...
tip number one set up your lighting set of everything's at least you have the rough lights and everything in place before you start actually working with your group so while the you know wedding party is kind of all talking and mingling amongst themselves and give me about three minutes guys, we're going to set up my life now this is a fantastic life set because it's so damn quick, okay, so with the composition attributes were shooting with a wider aperture of f five and that's used basically because we have a large that the field here that we need, right, we have three rows of people we have one sitting, we have ah, standing in the back when we have our stand in the middle is standing in the back. So what? Those three rows were shooting f five for that reason. So that's the main compositional camera? Actually, that we need to set in now, from there, we essentially start to dial in the other attributes. Now we don't need to worry about sink speed because we're dealing with low life situations and so sink is obviously going to less than one hundred a sec, but for the amulet, exposure would go down to one fifth of a second in iso eight hundred there's a couple reasons for this why we're bumping the iso and why we're slowing the shutter down and doing that kind of conjunction one we want to keep the shutter speed around, you know, one thirtieth toe one fiftieth is adequate for this type of a shot, why? Because we're shooting on the cannon twenty four seventy mark too. So this is a wide angle, lands were shooting wide and stabilizing a wide england is fairly simple. You don't even need to pop it on the tripod even if you're at one third of a second, as long as you're holding the camera in a fairly stable manner just like this, you're going to get decently, sharpe images, and they'll be totally fine, so we bring it down to a point where basically we can get enough ambient light in to the shot, and we're raising the iso for two reasons. One we want to amplify ambient light, but we also want to amplify our flash power, right? Because shutters be we know is not gonna affect flash power, so that's just strictly an ambulance balancing issue, but aya's so will, and we bring the is so up because we need to add additional power to the flashes so that way we don't need to fire at full power. The goal? The whole goal here is to not have to fire full power, even though we're at five on the rapture. So while the aperture and the iso are going to affect both ambient light and flash power, equally r shutter speed isn't, and so we're using shutter speed to kind of control ambient we're using aperture to control depth of field we're using risotto boost up the flash power to balance everything out in conjunction with ambient light. Okay, so this is the goal here so you can see this top shot is fired without flash just so we have, you know, that image in place just so we can show you basically what the ambient light looks like. So the annualized, fairly bright want to make sure that we have a good balance in the background. We can see these chandeliers because the amulet is beautiful it's in the scene as president, we want to make sure we don't override that and just end up with dark chandeliers that would look kind of booby. Okay, so get that right balance it flash and your overall image just isn't looking the way you want it's that ambient to flash balance is off, so look back and analyze that now for the light direction equality against similar to the previous large group shot. So this is basically we're building on another technique to that previous large group shot rumor we did a large group shot with just bare bulb flashes in midday light. Well, now we're taking it a step further. We're improving on that technique this go around by modifying it with a flash our sorry by modifying with an umbrella, but could we do this technique outdoors? Hopefully every one of you said this modifier over a pocket strobe outdoors, even when fired at full power is going to make that pocket strobe look completely invisible. Okay, it's just not going to travel. So for firing with pocket strobes outdoors and mid day sun, then an umbrella really is not going to do any good because it's going to cut off too much light you're gonna end up with not enough flash power. So with media or with pocket strobes, if we're shooting outdoors with one is an umbrella, it needs to be around dusk. It needs to be where the sun has set and that's the only time where we can kind of balance and get the right uh and me into flash power exposure with a pocket strobe. Otherwise we need to step into a medium strong. Okay, so the lights place off the left. We have two lights on their stands. We have the two newer ta fifties on stands we do similar to the previous set up where basically one of the stands has this placed into that umbrella bracket, right? The other stand. Basically, when we're modifying the flashes like this so one of the flashes on the stand, the other one is just next to it, all we're going to do is do the same thing that we did before we were basically feather the flashes now this go around you don't really need to feather the powers as much you can if you'd like, but because they're both firing through the diffusion, you know, cloth, it doesn't make a big difference, but basic, I have one pointed off to the right of this to cover the right side of the group one pointed out the left of this to cover the left side of the group, you know, we might do one quarter power and then one half power on the right side as we're trying to cover the further subject, but together, you know, when they hit the umbrella that kind of open up in a way that the flash power doesn't make too much difference there what we want to do, just make sure that the angle is correct because from left to right, we want to make sure that we have roughly within a half stop of light, a good balance across the entire group. Okay, this doesn't take long to set up once you get used to this, everybody. So once you get used to this, this is like a two, three minutes set up, you'll be done ready to go, and it makes for a fantastic looking image we're using to stands you guys can use three sticks if you'd like, you can use for six, you need however money you'd like to get to a good balance. But generally at least two is a good number for this type of a shot. But you don't see here the test shot with the you know, I have my own lighting assistance basically standing in in different places. I wanted left one the right way. Take a test shot, basically. All right. So with that test shot, we know also that because of the ambulance being all tungsten, that yellow three thousand thirty six hundred kelvin temperature we need to gel are flashes. So we just use a velcro jail. We pop it directly over with a full cto on both of those flashes. One thing to keep in mind that when you gel, it does cut down the flash power by bit. Okay? Because you're adding a jealous changing the color and it's also dimming the light just a little. Okay, so we pose and framing shoot. Now, this is where we would say, okay, guys, we're ready for the wedding party to come and step in. We have everything ninety percent ready to go and we start posing, we start grouping and we tell him and just be patient for one second we're going to organize this. This kind of a shot becomes very complex. Why not? Necessarily because of the lighting. The lighting is fairly simple, it's just the fact that we have so many people in the frame that we're going to cast a ton of shadows. So what do we do to help us out? Well, not only is the light directional as far as being from the left side of our group, we're also placing it up high so that the shadows are going down again. Look at all the shadows being cast, they're going down against bodies behind them. They're not travelling up. If they're traveling up or in a direction straight across, they become distractions. The next thing we look for once we have our entire wedding party in place is to make sure that ambient light balance I'm sorry. The flash balance fromthe left to the right side of the group is roughly within a basically half stop range, because in the next story, we're going to show you how we essentially balance that out in post production because it's a very simple fix and easy to do. All right, so we get everybody posed in this shot. Now a couple little tricks here we have, of course, the front row sitting. We have the middle row which I composed of mainly our girls and kind of people that are medium height with a taller people we place them into the back we tell them to put their heads basically where people's shoulders are or in between the middle rose heads so their heads were all in between then we asked the back roto lean forward into the middle and we asked the front roto lean backwards into the middle so basically what we end up doing is bringing all the faces closer together and when you do that you don't stagger the depth and the distances as much and that makes it easier when you're firing this kind of shop because you don't have much shadow toe worry about essentially there's not a lot of people casting shadows on each other that leased it mitigates it a little bit so we take our first formal shot and then it's time for fun stuff so from there we analyze we make sure our balance is good and we're solid so we start popping off shots I adjust them into another pose I love to do like different shots with the wedding party we have them all set up let's do some formals let's do some fun stuff let's do stuff when we have a mole hugging onto each other just be careful with this hugging shot you'll notice that our guys head right here god caught into the shadows of her head so again, I'd just say, hey, don't worry about that one just lean forward a little bit more, and I pop a shot again, but you need to make sure that you're analyzing between frames, otherwise you're gonna miss these things, so don't feel like you're so caught in the moment that you can't slow things down a little bit to say perfect guys, that was amazing. Hold still right there, let me take a quick look, glance the bag camera, zoom in, zoom across the images and then go back and start shooting again, we get another shot. I love doing this kind of fun shots. I have the biden groom go for a little kiss, I have everybody kind of looking snicker and do whatever they want at them, and we get a really cute little shot of entire wedding party again. I love doing these kind of things. We work off their mood boards to make sure that we're covering in, creating images that they want, if they want fun and goofy and great kind of wedding party images like that will create them. If they only want formals, we'll just do formals, and we'll do what they ask on the mood board, but this is howto light that scene, and we did this all with just simple. You know, these air hundred dollar flashes a twenty dollar modifier, and we were able to create an amazing group shot again with just making sure that we balance our ambient to flash exposure and making sure that we're watching to make sure we've balanced the overall flash in the group and making sure that we don't have a lot of shadows and highlights in the wrong kinds of places, mainly in this kind of a shot. We're looking for those shadows cast in the wrong places. That's it for this tutorial. Hopefully all enjoyed large group shots with umbrellas, eh, eh eh, eh, like that. Every time I break out an umbrella makes you want to sing my bad, I wasn't expecting the cough to follow, okay?
Class Materials
Bonus Materials with Purchase
Ratings and Reviews
Colin
Pye is a god. His teaching style is really engaging, breaking down everything you could want to know about each example in a fun yet detailed manner. The course is absolutely jam-packed full of great information and fantastic inspiration. This course, as well as Lighting 101, give not only a perfect foundation for anybody learning about flash from scratch, but also have more than enough tips and advanced techniques in them to help experienced flash users seriously up their game. Cannot recommend it enough.
Lê Tiến Đạt
I'd like to say thank you to SLR Lougne, Creativelive and especially Pye for creating this wonderful Lighting series. Pye has a great sense of humor and he is also a great teacher. He expains everything in tiny details. I love his creativity, all the tips and dedication. Recommended!
Karen Ruet
I'm watching this live and am seriously considering buying this course. I really like the examples and all the information. Pye is super generous and easy to listen to. I also appreciate the talk about gear and am happy that Pye is giving us options for different price ranges. Thank you, Creative Live.
Student Work
Related Classes
Lighting