Histogram, Hue and Contrast in Lightroom
Lesson 25 from: Fine Art Landscape and Travel PhotographyPeter Eastway, Tony Hewitt
Histogram, Hue and Contrast in Lightroom
Lesson 25 from: Fine Art Landscape and Travel PhotographyPeter Eastway, Tony Hewitt
Lessons
Overview of Fine Art Landscape and Travel Photography
08:44 2Our Passion For Photography
07:38 3Looking For The Next Great Photo
19:05 4Peter and Tony's Photography
18:35 5What is a Landscape?
15:48 6Considering Color: What is Real?
13:16 7Shooting Travel Photography: Exotic Locations
13:33 8Preparing for a Travel Shoot: Research
16:35Who Should You Travel With?
12:13 10Photographing People
04:25 11Choosing Gear for Travel
21:26 12Overview of Aerial Photography
09:03 13Flying Machines: Planes, Helicopters, Balloons and Drones
18:05 14Shutter Speed in Aerial Shooting
12:48 15Manual vs Auto Focus
14:28 16Lenses for Aerials
13:14 17What to Shoot When You're in the Air
17:52 18Using Emotion to Capture Your Images
14:28 19What Stories Do You Want to Tell?
08:44 20Who Are You as a Photographer?
14:41 21Finding Your Creative Process
14:20 22Getting Your Vision Across
26:56 23Quick Image Enhancements Using Lightroom and Capture One
06:21 24Light, Color and White Balance in Lightroom
19:55 25Histogram, Hue and Contrast in Lightroom
09:16 26Masking in Lightroom
11:50 27Cropping and Aspect Ratios in Lightroom
13:19 28Image Adjustments With Capture One
13:38 29Further Adjustments With Capture One
13:44 30Advanced Editing Concepts With Photoshop
07:38 31Peter Eastway Enhances Landscape Details
13:08 32Tony Hewitt Uses Multiple Images to Build Texture
13:04 33Peter Eastway Aerial Edit
09:33 34Tony Hewitt Aerial Edit
15:40 35Part 1
10:31 36Part 2
08:18 37Part 3
09:31 38Part 4
07:08 39Part 5
05:50 40Part 6
24:19 41Sharing Your Vision: Exhibitions
11:54 42The Artist's Statement
10:17 43Preparing Print Files
03:39 44Framing Options
05:50 45Exhibition Space
06:43 46Once the Exhibition Is Up
13:11 47Making a Photo Book
18:49 48The Art of the Print
16:51Lesson Info
Histogram, Hue and Contrast in Lightroom
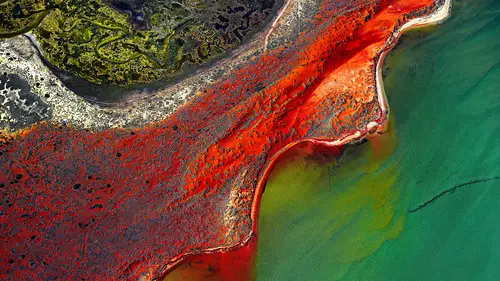
We're here with a photograph taken out of a helicopter. Yeah. First thing that I'm looking at, to be quite honest-- That's a pretty good picture straight up, isn't it? Yes, you could basically say that's all I need to do, couldn't you? And that, you know, again, that is another challenge for people. Often we get caught up in thinking I have to fix this picture; I've gotta do something with it. And we need to step back a little bit and look at it and go, "Is it doing the story?" There's a couple of things we can look at, though. Yeah, I mean, we're gonna look at Photoshop later on, and we're gonna show you some examples of some really in-depth Photoshop processing. But some of the images that we put up on walls and exhibit might only have four or five layers. Might only be three or four adjustments to what we actually captured. So, I want people to, you know, take away from this session that lots of steps are not necessary to make a great photograph. Correct. So, but my ...
angle was a little bit off, wasn't it, there? Yeah, the horizon's just gone. Maybe the helicopter wasn't flying straight. (Peter chuckles) It happens. So, let's just straighten that around and, I'm looking at it at an angle, Tony. Oh, here we go, I can look at my reference monitor, and that looks about right there. Is that okay, guys? Did I come close enough? Okay, and we'll just say Close. Okay. So, what have we got happening up there? What I'm looking at, I'm thinking, okay, what is the strength of this image? And one of the strengths of this image, and, you know, there's a difference between looking at a photograph and not being the person who was there when it was taken or not being present and being present when it was taken or being the person who took it. Because when you're there, you also have that added advantage of a feeling that came with that picture. I've been here; I know what that is about. This picture's about that water. It's about that beautiful, clean sand. It's about that beautiful color of the water. So, I'd like us to somehow maybe bring that color up. Bring that water up? Okay, all right. So, should we be starting off with our color temperature, then, because if we're looking at the color of the water, I'm gonna suggest the answer is yes. So, let's do an auto and see what happens. Warmed it up again. It's warmed it up again. And to me, that doesn't look the way I'd like it. That doesn't look the way I'd like it, either. What about the daylight preset, there? That's probably cleaner. That's pretty neutral. The clouds look white. So, but there's no emotion. No. It's just cleaning a bit. Need a little bit more coming out of the water. So, we might do that in a slightly different way. Maybe we'll come down to our hue saturation color controls to actually develop the color, but before we do that, let's try and get a little bit of light into the ocean. To lighten that ocean would be good. Okay, so if the exposure is basically right, we should still come along and-- Have a play? Have a play, lighten it up. Well, we know we don't want to go too light. We don't want to go too dark. The exposure is pretty much where it needs to be. If we looked at our histogram, we'll see that. Yeah, it's a nice, happy histogram. We like happy histograms, don't we everybody? (murmur of agreement) Yeah, go happy histograms, okay. They're the ones where the blacks are up, and the whites are up, and in the middle it's not. No? Moving right along. (everyone chuckles) Must be Australian humor; it was upside-down there. (both men chuckle) Okay, so we've got exposure. We're pretty happy with the exposure. Now, as I lighten that exposure up, I am getting more detail in the tree color and I'm bringing a little bit more light into the water. I think the clouds are still okay. I mean, if we check the histogram, I mean, I can manually check the histogram, and they're still not clipping. So, in other words, they're not paper-white. They haven't gone completely white, so not even down there, which is a bright bit of sand. So, let's say we're quite warm and comfortable with that one, Tony. Yeah, what about the yachts? Well, all right, they're probably overexposed, aren't they? Just a little, but that's-- Yeah, I think we're gonna have to live with that for the purposes of this demonstration. Correct, yeah. Yeah, we could go down and individually tweak them, but let's just look at the big picture first. Let's get the big picture happening. What about contrast? As we increase that contrast up. Beautiful. Beautiful? Yeah, don't mind it a little bit more, 'cause the water's coming out. So, contrast is not so good that way, but we bring it up. It is bringing in that color quite a bit, isn't it? Absolutely. Yeah? Yeah. So, interestingly enough, notice how as I move the contrast to the right, how the blues saturate. So, that is one of the little things that you find will happen. When you increase contrast, you also end up having more saturated colors. And I know the color scientists out there will probably be telling me that I'm not using maybe quite the correct terminology. Right terminology? But it looks more saturated to my eye. Okay, so we've got that. You prefer a little bit more contrast? No, no, I just liked it when you pushed it a little. It just seemed to bring up the vibrance in the area. Yeah. And I liked the way that's affecting the blues. Okay, so let's lighten that up a little bit. If this is a little bit too hot, should we take the highlights or the whites maybe just down a little? I think blend that a little bit. Because the other thing that bringing out the contrast does is it actually adds a bit of structure in the sky, and that allows the clouds to look like they're coming out-- Coming out? Of the top of this a bit more. Gives us a depth in the image. Yes, okay, all right. Okay, so this water down here. I don't know whether we're going to lighten that there with our shadows, but let's just have a little look and see if that lightens up. It does; it comes up quite nicely. Is that a little bit bluer? Do you find that's a little bit more detail? Well, I'm not good with colors between green and blue. (both men chuckle) Well, I love your blue jacket. (both men chuckle) So, if we lighten that up a little bit, it's sort of working. I might just have a quick look at the clarity tool, 'cause sometimes that can bring up a little bit of detail in the water as well. Particularly the textures across the water. I think that will help. But this wasn't too windy that day. So, it's not gonna be a lot there, but let's just have a look at that and see. See, it just puts in a little bit more detail and definition in there. Okay. Let's now just come down to our HSL. Got luminesce, saturation, and hue, so that's the color. And you can use this little fellow here, which is a pointer, and you can click on there, and it will show you the colors that you're fiddling around with. You can actually adjust them, but I like coming over here and just fiddling around, and I can change it to a really bluey blue, or I can make it more of a yellowy blue. What do you want, Tony, in terms of that? Well I find if you make it-- Do you want turquoise? Yeah, I kinda liked it when you went, bring it down to the left, yeah, so we turned into what you would call a greeny blue? A greeny blue, yeah. I think that gives me a greater impact, because that area of the water at the bottom of the picture now is larger. When you had blue and green it broke it up a bit too much. But I've got a problem. Yeah, well, there you are. Look at my sky. Well, you're gonna have to mask that out. (Peter chuckles) Can you do that? No, I can't actually do that. (both men chuckle) Not easily at any rate, but it is interesting. I've actually probably cornered myself a little bit there in that by making that adjustment. I'm actually affecting that sky up there as well, so that's one of the things where when we're doing global adjustments, and this is sort of a little bit of a segue into why we like to use selective adjustments by using brushes etc., that you can affect one area without affecting the other. So, if we went and cropped the sky out completely, there would be no problem. But then we've lost our photograph. In one way, because that's not the image. So, let's leave that process of exploration. We'll just say that, yeah, that's not a place that we're gonna go with at the moment. We've lightened that up, got a little bit of presence. I am a little bit of a vignette person. Yes, we know this. I just like them. So, I've got down here the effects and a post cropping vignette, and I might just darken it just a hint, just down there. I might feather up a little bit more. So it's just, just a hint. And that's pushing our eye into the middle into that inlet area itself, isn't it? My view is that when we have compositions, and we've got a frame, the idea, I think of it that light areas let our viewer escape from the photograph. Dark areas contain us. Now, that can work the other way as well, where you've got a completely white area with dark bits in the middle. But generally speaking. So if you've got light areas around the frame, means our viewers could get to escape. So, I'm putting a fence around with a vignette. I used to do quite strong vignettes. I'm more now into just a subtle vignette. You can almost not see it, but it's just a subtle darkening, and I just think it refines the image. So, I am a big fan of vignetting. Yeah, and I don't mind it on this image. The way you've done that kinda holds our eye in and drives us into the inlet. And that's all about that depth of this picture. I mean, having been there, it's all about how that inlet winds its way back into the back of the island, and that's where you've taken my eye. Okay, so we've shown that we've done just a couple of little adjustments. We've made a false start so that we've tried something, 'cause we were looking at color, but it didn't quite work. We've come back, we've finished the image off. That's what we're doing with all of the photos. It's a process of exploration, backwards and forwards, what works, what doesn't. Shall we have a look at another one? Yeah, let's look at something different. You know, and sometimes when you think of travel photography which we're talking about as well, you come back and you look at your pictures, and this is what we're doing here. It's a way that you can actually just make quick adjustments and get pictures that you're gonna be satisfied that share the experience that you had, but not necessarily they're about a fine art expression of the experience that you had, if that makes sense.
Class Materials
Bonus Materials with Purchase
Ratings and Reviews
Esther Beaton
Two Aussie blokes just having fun. Peter and Tone did us proud by representing the spirit of Australia, which is: don’t take anything too seriously. They hit off each other well, in fact, they are the best twosome I’ve ever seen on Creative Live, each giving the other respectful space yet not being shy about taking the micky out of the other guy when appropriate. The whole dialogue was spirited, informative, casual and fun. They also perfectly proved the symbiotic relationship between red wine and beautiful photography.
Swapnil Nevgi
Loved the positive energy of this class. Just finished watching it and I would definitely recommend it to someone who wants to take their landscape photography to the next level. This course is not about learning camera or software skills, but learning how to develop conceptualizing and composing skills. How an award winning creatives mind works is a lot more important than how to use camera. This is exactly what I was looking for and very happy with my purchase. Also it was good to see some of their raw vs post processed files to learn how far the professionals like Tony and Peter go with post processing (Something I have always been concerned about). Knowledge about exhibiting was also priceless. Thank you, I have learnt a lot in this class and I am sure it will reflect in my work in future.
Debra
This class is fabulous! One of the best on Creative Live. Peter and Tony share so much of themselves and their great art that you can't help but want to pick up your camera and get out to shoot. It was like watching two close friends. Thanks very much for a very enjoyable 2 days of learning and viewing.