Manual vs Auto Focus
Lesson 15 from: Fine Art Landscape and Travel PhotographyPeter Eastway, Tony Hewitt
Manual vs Auto Focus
Lesson 15 from: Fine Art Landscape and Travel PhotographyPeter Eastway, Tony Hewitt
Lessons
Overview of Fine Art Landscape and Travel Photography
08:44 2Our Passion For Photography
07:38 3Looking For The Next Great Photo
19:05 4Peter and Tony's Photography
18:35 5What is a Landscape?
15:48 6Considering Color: What is Real?
13:16 7Shooting Travel Photography: Exotic Locations
13:33 8Preparing for a Travel Shoot: Research
16:35Who Should You Travel With?
12:13 10Photographing People
04:25 11Choosing Gear for Travel
21:26 12Overview of Aerial Photography
09:03 13Flying Machines: Planes, Helicopters, Balloons and Drones
18:05 14Shutter Speed in Aerial Shooting
12:48 15Manual vs Auto Focus
14:28 16Lenses for Aerials
13:14 17What to Shoot When You're in the Air
17:52 18Using Emotion to Capture Your Images
14:28 19What Stories Do You Want to Tell?
08:44 20Who Are You as a Photographer?
14:41 21Finding Your Creative Process
14:20 22Getting Your Vision Across
26:56 23Quick Image Enhancements Using Lightroom and Capture One
06:21 24Light, Color and White Balance in Lightroom
19:55 25Histogram, Hue and Contrast in Lightroom
09:16 26Masking in Lightroom
11:50 27Cropping and Aspect Ratios in Lightroom
13:19 28Image Adjustments With Capture One
13:38 29Further Adjustments With Capture One
13:44 30Advanced Editing Concepts With Photoshop
07:38 31Peter Eastway Enhances Landscape Details
13:08 32Tony Hewitt Uses Multiple Images to Build Texture
13:04 33Peter Eastway Aerial Edit
09:33 34Tony Hewitt Aerial Edit
15:40 35Part 1
10:31 36Part 2
08:18 37Part 3
09:31 38Part 4
07:08 39Part 5
05:50 40Part 6
24:19 41Sharing Your Vision: Exhibitions
11:54 42The Artist's Statement
10:17 43Preparing Print Files
03:39 44Framing Options
05:50 45Exhibition Space
06:43 46Once the Exhibition Is Up
13:11 47Making a Photo Book
18:49 48The Art of the Print
16:51Lesson Info
Manual vs Auto Focus
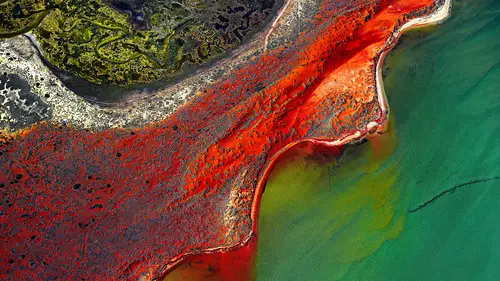
Manual or shutter priority. But we're different. Aperture prioriority or Auto ISO. So, when you're going to set that shutter speed, how are you going to do it on the camera? Well I shoot manual as you know, but you don't. I don't. I shoot aperture priority. Let's talk a little bit about them. Why do you shoot Manual? I'm a control freak. I like to be in charge. But it does mean I open myself up to risk, because I set what I want to see coming out and I run by the histogram. So I'm constantly having to look at the histogram. One of the advantages I think I can see in what you do is don't have to rely so much on looking back, because if you're on aperture priortiy, the camera is keeping somewhat control of the light. My experience has been, when I do that sometimes if a flash of light comes into my metering, it throws it out. Where is at manual, I'm in charge. And I have to then, in my mind be thinking, I'm looking at water, the wave's coming in, I'm shooting it, that's the rig...
ht exposure, but in about three seconds that wave will break. And when it breaks, it's going to be a much larger percentage of white. That white is going to blow my histrogram. So as I'm shooting, I'll shoot shoot the wave's about to break and then I might push up two stops on my shutter as I'm going. That's taken practice. Whereas I find that's a little bit challenging perhaps and certainly when I'm advising people to go up and do it themselves, I know that when I'm in aperture priority, if I go to my widest aperture I'm going to have my fastest possible shutter speed. So, if I'm at a smaller aperture to get better image quality then I have to keep an eye on what that shutter speed obviously is. But as that shutter speed drops, I go to my maximum aperture and now I know that I'm at the fastest shutter speed. So I'm keeping an eye on this in the viewfinder. And it works for me in that way because, if that flash of light happens really quickly, I figure I'm not going to be quick enough to stop it down by changing my aperture. It's probably going to catch me. So I might as well let my automatic metering do that for me. Just on that, the metering style is important isn't it? Well, these days with matrix metering it's amazing how well the camera performs. Now, not all the time. We're also using medium-format a lot, which has a greater dynamic range, but the more recent DLSRs and mirrorless cameras also have much improved dynamic range as well. And so, you don't get time to expose your brackets. You've got to get it in the one shot. So I'm aware of what you're saying. I usually set my exposure compensation to minus point seven. Nearly minus one stop just to make sure that there's always a little bit of room between my highlight and the edge of the graph. So that I'm not clipping my whites. So, why do we do that in exposure? If we look at prints or photographs on a screen, and there are areas of detail-less white we sort of, we don't like that. It's like where's the detail? It's lost. We don't mind detail-less black, that's just a shadow but white seems to be more of an error for us. And so I'm always exposing in a way that I'm not going to clip my whites. I'm not going to over-expose those white areas. 'Cause once you over-expose, you can't bring them back. You can put in detail and do other post production stuff, but let's not make life difficult for us. So I'm always keeping an eye on histogram. So I'll shoot, shoot, shoot and then when there's a break I'll quickly look at the histograms that I've got, and make sure they're okay. Maybe because you'll find that they're all either a little bit dark or a little bit over and your exposure compensation allows you to adjust that. Because every camera is different. And I find that most of my cameras, well maybe all cameras are perfect, and I chose to under-expose a little bit. Because I normally find i'm at minus point three or minus point seven. I do under-expose, probably a little more than anything else. And the other thing is, with that shooting with exposure changing etc, its important I believe to not hold back on shooting. I mean, I shoot a lot when I'm shooting aerials. I'm not too economical, I just want to make sure I don't miss the shot and as we come into something that I'm looking at, I don't wait until I'm there to get the photo. I know photographers that like to sort of think that I take it in one shot but I'm quite happy to know that the first three frames I probably won't use, because I'm coming in to what I think will be the optimum composistion and position for the light, but as I'm coming in I'm still shooting, 'cause I don't know if at that moment that I take the shot it could be really smooth air and it comes around and (poof) you get a little bump. And if that's the only shot you took you missed it. Or if you come up near it and you go "Oh I've missed it" you're now going past it, so lead into it. It's a bit like panning, but you're shooting as you go. And the plane is panning for you if you know what I mean. So there's as you can see, we shoot differently and hopefully we both get half decent aerial shots. So when it comes to my recommendation, I'm going for aperture priority. I actually now on DLSRs will use the Auto ISO setting, depending on the camera. So for instance, and I could be wrong so don't kill me out there but I feel that the Fujis, with their Auto ISO the highest shutter speed you can set is a 500th of a second and use the Auto ISO. Whereas on my Canon, I can go up to a 2000th of a second. So I set my minimum shutter speed to 2000th of a second with Auto ISO up to 3200 and happy days. It keeps things under control. I don't really have to, I can just set my aperture as well and the shutter speed is always going to be there. So that works well for me. Exposure compensation I can use as well as I said. Normally it's a little bit under. But that's the way that I'm tending at the moment. We're not a lot different really, other than the fact that I still like that feeling of control by being in Manual and changing it. Plus also I can be, now that shot that we showed earlier of the mudflat that sort of brown-y shot with the reflection. I can go for two types of shots. So as I'm coming in I could dial my exposure right down and make sure that I get it really dark and only get a hint of the highlights, that real dark moody kind of shot. But then I can wind it up and get a better technically balanced exposure. And that will give me two types of shots. One with just flashes of highlights, and a lot of dark background very abstract, and the other a little bit more natural looking. So Manual means that I'm in charge and I'm not relying on the camera to make decisions. It also means that I can make mistakes deliberately. Which I believe is part of the creative process. But, if you're gonna go down that way, like if I had to give advice to someone starting off for the first time in aerial, then I would be saying go Auto and then when you feel confident, you might to try it and play a little bit with Manual. The differences aren't going to be that much really. It's only every now and then I get an advantage, but I also pay for it with some mistakes. And maybe some people would recommend Shutter Priority. Go and set it on to one 2000th of a second, and then let the aperture change and your ISO as well. If you're going to do that I'd say make sure you got good sharp lenses all the way to the edge. Because if it does open up at 2.8, and if you haven't got good sharp lenses, then maybe go Aperture Priority. Again every system will have its strengths and weaknesses. I guess that comes to the point of focus as well, and some of my earlier aerial landscapes, didn't quite have nailed focus. Now we were shooting on large format, medium format so 60/80 megapixel, I could resize the image down to 20 megapixels and they'd look great. No trouble at all, but when you enlarge it up with the extra resolution, they just were a fraction out of focus and getting that focus was a real, real challenge and we in those days were using manual focus, sorry prime lenses and we would manually focus, so we would pre-focus and then tape down our lenses before we went up into the air. I mean, a lot of the old aerial cameras basically just set on infinity and done. There's a problem you might think, well how hard is it to focus on infinity? Because when you're in the air, 500 feet or higher you can go to infinity and you're going to be sharp with a 50mm lens, it's easy isn't it? But auto-focus lenses, when you go as far as you can go they go past infinity, so what I thought we might do is just have a little look at how auto-focus works. So images like this could be very challenging for an auto-focus system, because what does it focus on? Whereas an image like this is probably a little bit easier for an auto-focus system, because there are definite lines etc. Well just going back very quickly Peter. That one before that, that's all water. And that's the problem, there's nothing actually solid. It looks like there's lines, whereas the next one there's definite lines there. So, that lines of contrast are important for the camera to hook on to. So, how auto-focus works when you got a subject like that you might think, well that's going to be easy to focus on. But the original image was like that. That's very, very low contrast. Now if I've got an auto-focus, an auto-focus system relies on contrast. For all of the scientific people out there, just bear with me as this is a rather dumbed down sort explanation so that I can understand it myself. So it needs contrast. So when we, if we focus on that little area there you can see the little lines of sand in there. The auto-focus system will probably pick those up okay, in focus. Whereas if we went to another area, say in that shadow there, there's nothing there with any contrast at all, and the system is just going backwards and forwards and not know what to focus on. So, that can be a challenge. So if we go to use an auto-focuse system, that's fast and accurate and most DLSRs and mirrorless do then what I suggest we do is we use the area auto-focus system, because they have got from nine to 155 million auto-focus spots these days. Hundreds of auto-focus spots, and they can all be looking for a point of focus. Now autofocus systems, generally focus on the subject that is closest to the camera but from the air it's probably not going to be a problem because we are 500 foot or above. We're going to be focused at infinity. We're going to have enough depth of field, no matter what our aperture is to cover all eventualities. So as you said, depth of field is not normally a problem. With subjects like this, very easy for an auto-focus to find a point to focus on. Does that make sense? Yeah, absolutely and often when you're looking at things if you think of it, when you're standing on the side of a road looking at something, everything looks sharp and easy to work with. If you're in a car trying to focus and the trees are going past, you know the camera has nothing to hook on to. So a plane is not much different, you got a lot of movement to deal with. Yeah so, my recommendation, I guess our recommendation if you're using auto-focus and we don't necessarily with our work, but if you're going to use a zoom lens you need to use autofocus, area AF so you've got lots of points to focus on. Single shot, you probably don't want the system hunting backwards and forwards, because it thinks and it can see things moving. Just let it focus (bang) Sometimes if you're having trouble focusing straight down, look out at the horizon and focus on that. Hold it down and then refocus. And that's why we've got written down there Back Button AF, so if you're using your index finger your shutter finger to focus and then take the photo, that means that when you press that down, you can hold your focus there, but maybe it doesn't hold long enough. If you use your back finger, your back thumb its the only thumb you've got, doesn't have to be the back one. If you use your thumb to focus, then that just isolates the operations. Focus with your thumb, take it off. Take as many photos as you feel happy with with your index finger. And you know, be aware that if you're coming into a scene and the distance between the ground and where the aircraft is not going to change dramatically. So once you've got your focus you don't need to change it. You can look up to the horizon, I agree with that. That's a good technique. The other one is you're looking down and you might be on a salt flat, and along the side is a road. Just flick across to the road get a focus, come back. You don't have to go a long ways, just anything that's got an edge. Focus first, compose second. So, I said that we focus manually. That's possibly historical more than anything else in many ways because that's what we needed to do. But the point, what I was mentioning before is that infinity in a manual focus lens, normally when you go like that, as far as you can go you're going to infinity and you know if you go like that and you point it out at a landscape, the horizon will be in sharp focus. With auto-focus lenses, because they rely on a system that says this is more contrasty, this is more contrasty this is less contrasty, I've got to go back. They need to go past infinity, and then come back to find infinity. That's a simplified explanation. So that makes it problematical for us, when we're in the air, because I wear glasses and so I'm looking through my viewfinder, I can't necessarily pick where maximum focus is manually. I want someone to help me. I prefer to have an auto-focus system helping me, or knowing where I can manually position the lens. And that works fine if you're using prime lenses. Doesn't work with zoom lenses, or what we call zoom lenses. Zoom lenses are really variable focal length lenses, because every time you zoom, the focus needs to change to keep focus on the subject, whereas a true zoom doesn't. I said that we do tend to focus manually. Although on the new Phase One with the XF, the hyperfocal focusing point, I can trick to focus on infinity. So again, I just press a button and it automatically goes to infinity. And I get sharp photos, I'm so happy! (laughing) Something came to mind as you were talking there, one of the things you can keep in the back of you mind in terms of both focus and shutter speed, as you're coming in, often when the vehicle turns particularly in a plane, as it turns it slows down the relative ground speed. And what's in the middle of that arc, is traveling quite slowly. In the same way, that when you're traveling and looking out the ground can be moving a lot faster than you think. So when it comes to focusing, if you wait until you get that slowed movement you can sometimes find the camera will lock in quicker. Than when you're moving quite fast through the air, and you're trying to lock it into something. So there's little tricks you'll learn, that the plane and the way the plane is moving, or the helicopter will allow you windows of opportunity to lock in and make sure focus is exactly where it needs to be, and it also allows you opportunity to sometimes slow the shutter down. So you thought you were just going to jump into a helicopter and take photos didn't you? (laughter)
Class Materials
Bonus Materials with Purchase
Ratings and Reviews
Esther Beaton
Two Aussie blokes just having fun. Peter and Tone did us proud by representing the spirit of Australia, which is: don’t take anything too seriously. They hit off each other well, in fact, they are the best twosome I’ve ever seen on Creative Live, each giving the other respectful space yet not being shy about taking the micky out of the other guy when appropriate. The whole dialogue was spirited, informative, casual and fun. They also perfectly proved the symbiotic relationship between red wine and beautiful photography.
Swapnil Nevgi
Loved the positive energy of this class. Just finished watching it and I would definitely recommend it to someone who wants to take their landscape photography to the next level. This course is not about learning camera or software skills, but learning how to develop conceptualizing and composing skills. How an award winning creatives mind works is a lot more important than how to use camera. This is exactly what I was looking for and very happy with my purchase. Also it was good to see some of their raw vs post processed files to learn how far the professionals like Tony and Peter go with post processing (Something I have always been concerned about). Knowledge about exhibiting was also priceless. Thank you, I have learnt a lot in this class and I am sure it will reflect in my work in future.
Debra
This class is fabulous! One of the best on Creative Live. Peter and Tony share so much of themselves and their great art that you can't help but want to pick up your camera and get out to shoot. It was like watching two close friends. Thanks very much for a very enjoyable 2 days of learning and viewing.