Lessons
Day 1
1Day 1 Pre-Show
06:09 2Four Secrets for Great Design
49:25 3Morning Q&A
26:05 4Morning Recap
18:39 5Striking Images
34:14 6Faces in Design
17:24 7Layering and Simplifying
21:33Introduction to Typography
51:51 9Typographic Offenses
35:15 10Formatting Text
29:10 11Formatting Text in Different Programs
19:30 12Day 1 Wrap-Up
03:40Day 2
13Day 2 Pre-Show
08:07 14Designing Logos: Fonts and Text
1:27:39 15Editing Text in Adobe Illustrator/Photoshop
54:50 16Taking Control of Color
46:26 17Creating Business Cards
49:07 18Business Card Makeover
1:04:37 19Day 2 Wrap-Up
03:24Day 3
20Day 3 Pre-Show
03:53 21Designing Magazine Ads
1:20:03 22Designing Postcards & Event Posters
1:16:44 23Creating Your Own Patterns
1:14:18 24Creating Custom Photo Books
1:25:21 25Day 3 Wrap-Up
04:18Lesson Info
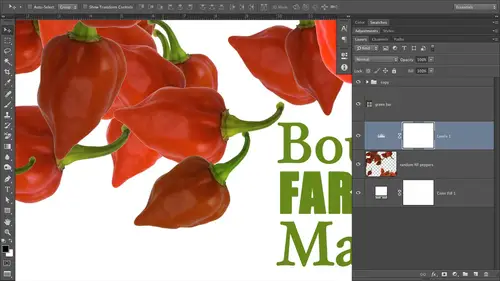
Formatting Text in Different Programs
We've got a bunch of text here and you can see that there's vastly different spacing. Well, if I click, I try to click in that space. Nothing's happening that lets me know that that space is not carriage returns. OK, so in other words, nobody did that to create that space. Put 100 returns in there because that's just terrible. So it's been very precisely handled with space after, Okay, so let's find out where that is. So no need the highlight protects. Just click somewhere within the line that you want in effect, tried up to the formatting, and you choose paragraph Keiko's space before and after its handle on a paragraph level, and in the resulting paragraph dialog box, you're going to see it right here. So there's space before. So whoever said at this template spect four points of space above this chapter hitter, which is what it is, and 108 points of text after. That's why you've got this large block of space. And if you look in the actual printed book that is carried over in the in ...
design because they set up, they saved this formatting in the form of styles that you can click and apply. And when they pork my content when it's all edited and happy into the in design template, those styles air carried over and they're mapped to be corresponding style and in design, which keeps all the formatting that we've done it's very helpful for me cause can you imagine me writing this book? And everything's all jammed together cause it's not formatted that be a nightmare and 1/2 So it's helpful on many levels. So that's where the space after in space before controlling is handled in word. Now, as far as the other controls that we've talked about, most of them you're going to find on the toolbar here. So if you don't see this toolbar right here So we've got our font family right here. If hello, word. Okay, so we've got our font family. See how the styles are handled in the same menu? Kind of is a sub menu so inward we don't have the two men use like we do in the adobe. CS APS. Okay, so here's where we would go to do our bolding. We would not use this. Be right here. Okay, But again. Not as big of a deal these days as it was that your text will probably look better to use the style that is built in if it has styles. If it doesn't, you've got no choice but to use thes formatting controls. Right here. Here's your subscript and superscript. That's just a way to alter baseline our shift the baseline here. So let's see what else I can show you. I'm gonna go ahead and copy and paste some text into another program so we'll take a look at pages I've already got open for you. Hear Pages is a wonderful little page layout tool that you can purchase for Apple computers. It's very affordable. It's like bucks or something crazy like that. But it's really fat. What's got a lot of nice templates were actually going to use a couple of these templates in the class. So we're gonna go ahead and choose a blank piece of paper here, and I'm just gonna pace the text that I copied. So here we go. So let's take a look at where the text formatting is in this one. Well, if we highlight the line weaken, See, um we can use all kinds of different things, like the alignment tool. So we looked at those earlier laughed, right, center, Justify which, of course, you will never use in pages. We do have a font family menu, okay, As well as a font style menu. But if you want to do anything like adjust the turning or the tracking and letting, then you're gonna have to open the inspector. And this is exactly the same in keynote. So at the top of any document, in pages or Aquino, you're going to see this little blue circle with a white I inside of it. Give it a single click and you're gonna pull up the inspector. Then you have to tell the inspector what settings you want to see. So you need to click the tea to preview the text formatting options here. So here we've got alignment here. It works the same as it does over here. But moreover, we've got these additional options of character spacing. So if I highlight the whole word and I start changing characters facing, see how they're they're jamming into each other. But I can use that to just turning. Okay, I'll send it back to zero, and I'll make it really big so everybody can see it. Here we go. So if I want Teoh, let's say Kern, this G closer to the oh, I would just position my first year in between those letters, and I would start messing around with the character spacing, and it looks like it's gonna change it on a word basis rather than an individual space basis. Which arguably is a reason. If you're really doing this professionally, you would be using programs like in Designer Cork. But anyway, you can kind of tweak it here. Line spacing, Let's go ahead and Cruz Downs. We can actually get to some lines of text line spacing and eating to highlight the text and just drag the slider to the right to increase letting or drag the slider to the left to decrease letting okay. So in these consumer level programs, look for characters facing to just turning, look for line, spacing to adjust, letting And then, of course, we've got our space before and after right here. So now let us close that up and we will hop over to photo shop. Don't say so. Let's take a look at these guys over in photo shop and in design as well. Uncle had launched in design in the background. So we've got that going. Okay, so here we were in photo shop. We want to adjust this punctuation so it falls on the outside of our margin. Right? So what are we going to do? Just make sure that you have the text layer active, and then you're gonna open the character pain. Well, if it's not open already, just try up to the window menu and choose character. When you do that, the paragraph panels gonna open to you. I think this one does live in the paragraph formatting options so you could have just chosen window and paragraph. But opening the character panel opens the pair of penalty. So just click the little tab that says paragraph. And then from its fly out menu, which is this microscopic little menu that's at the top right of every panel. Here's your woman hanging punctuation, and I think you don't even have toe have anything. Highlight Able to see. See how it popped it right over. I didn't have anything Highlight. I just had the text layer active. So again it's the paragraph panel, which opens with the character panel. Click the fly out menu and turn on Roman hanging punctuation, and when it's on, you'll see a little check mark next to it. So if I turn it off, then our alignment changes. So that's how you can do that. I would save this toe last when you're doing your designs. Because if you have to change anything than that that the punctuation may not fall on a margin like that. So another thing that we can look at IHS link up to the window menu so I can see all of my open documents. Let's talk about letting. Okay, so here's our leading example. So letting is handled in the character panel, okay? And you do need to not on Lee. Activate the type player that you're gonna change, but either highlight the line or just click within the line to get it to change. So I'm gonna go ahead and double click the t here, and as I come up here to my controls, if you can see and I'll try to zoom in here. Here we go. As you hover over a point your cursor to the little icons. The field labels a little tool tip comes up and shows you what they do, So this is what leading looks like it. Honest to God, it looks exactly the same. In In Design and Illustrator, it's exact same icons. So if you look real close, you can see that the icon actually has a pretty good job of you illustrating what you're changing. So it's got two lines, and it's got a little up and down arrows that's letting you know that you're changing the amount of space in between those letters. If you point your cursor added, it turns into a little scrubby cursor. You can click and drag to the left to decrease letting or click and drag to the right to increase letting and I'll zoom back out so you can see that so see it's changing on the fly. Yes, you can make all that text crash into each other if you want. So that's how you can change letting the next one I want to show you is turning. Here's the fake ad that's really me on my bike. That's my bite. Her name is Supera Blue Dragon Of course, I couldn't use the end of use logo. I actually ripped off for this example. I did rip off that text. BMW does use it on their big trucks when you go to a BMW motorcycle rally that will bring a big semi with all kinds of different bikes and clothing and accessories and stuff that you simply must buy. And on some of those trucks, they will have this this headline really, really big. It's kind of funny if you're in the motor cycles been, anyway, so let's look at turning. So you need Teoh. Activate the type player that you want to effect, and you do need to go ahead and click in between those letters. So, for example, will start with the and the V and have if I want to increase the spacing, all I have to do is press and hold the option key on a Mac or all on a PC and tap the right arrow key to add more space left arrow key to decrease space. Okay, now, since I have increased the amount of space between the and the V, my text box is forcing a carriage return here that I don't want. So I could just make my text box a little bigger to fix my typing in. Okay, So just position your cursor in between the offending letters option or Ault tap the right arrow key to increase space. The left arrow key to decrease space so we can come down here real quick and current. This ellipsis that has how many dots? Three we concurring that in. So it's closer to the letter and we can decrease the current in between the s and the eye. And then over here, my goodness, we can put the apostrophe actually near the letters. So within just a few minutes, you confined to in your text. So remember to do this on especially your headlines, anything that set in large sizes. You do need to make sure to current, you may not have to. Kurt, you don't have to current every single space, but there will be a couple problem areas, especially if you've got an apostrophe in there. You'll need to current that the other one I want to show you is tracking. And we're gonna be using all of these controls all day tomorrow as we start building typographic logos and creating some of these ads that we've seen. So here's tracking. Tracking. You do need to highlight the whole word. Okay, so highlight the word here. My tracking control lives in the character panel, and it's this guy right here and again. If you point your cursor to these Littlefield labels, you get a little tilted. So here, little arrow, we've got two letters of Vienna, and then we've got an era going to left to the right. It's telling you it's gonna space everything out here again. You can point your cursor to it, dragged to click and drag to the left to decrease, click and drag to the right to increase. I use keyboard shortcuts for this stuff. I usually don't use thes controls. Here's your current in control right here, by the way, but it's much easier to do with the keyboard shortcut, so your keyboard shortcut is the same for tracking as it is for turning. But since you've highlighted the whole word, that's why it's happening on a uniform basis. So if we option lifts arrow tap, we decreased, tracking uniformly, uniformly between each letter. If we option or all on the PC intact are right. Arrow Key were increasing the tracking uniformly between all those letters. It works exactly the same way. An illustrator and in design Baseline shift. This one I can never remember the keyboard shortcut to I do have it. I have all the keyboard shortcuts buried in the layered files so you can see right here. I've given you the keyboard shortcut as the layer name of that group. So shift option. So shift option on the Mac or shift all on a PC, tapped the upper down arrow key on your keyboard, and that's going to give you a shifting baseline. Now you do need to highlight the letter. OK, so if I shift, option or shift Ault if I tap the down arrow key, see how that d sliding down? But it's still in the same text box or text layer, if you will. If I shift option for shift all on a PC, tapped the up arrow key, then I am raising it okay and one last one will take a couple of questions and we were in the day is how to access those open type Gedi's well info shop. CS six Domain made a heck a lot easier to access them because we got a new type menu. And within that tight menu is an open type sub menu. So if you at activate the type player and highlight a letter that has zoom in a little bit so you can see that has an open type. Fine. If you tried it to the type menu, that open type menu is gonna become activated and you can slide over to the right and you can see all the different things. Now some of the items were great out. That means the designer didn't build them into that fund. Okay, but here's our squash. So now we've got a real sua she a Okay, So, again, that's the type men you see a six good on the open type. If they've got a check mark there turned on. If they don't have a check, Martha turned off. If you're using previous versions of the program or illustrator or in design, their hidden in the character panel. So we're gonna open that character panel by going to the window many character or just clicking the little A. If it's docked in your panel on the right hand side and go back to that little tiny, microscopic fly out menu at the top of that character panel. And you're open type menu is buried in that menu, so a little bit harder to get to you, Toby made it more discoverable in CS six. And again, we're gonna be using these controls tomorrow, so you're going to see them again and again and again and again. I was actually just wondering something for myself, and I'm not sure if it's even really a good question. But do you have specific settings that you go to with turning and everything else that you automatically know that you like to see things a certain way? As far as Texas laid out, that that's a really good question, not in currently, because that varies by what letters were gonna end up next to each other in the specific fund. Soak earning. There's no real formulas. That's just a visual thing that you got to do pretty much every time when it comes Teoh tracking. I usually have a negative five tracking amount set on everything that I talked. It just puts the letters a little bit closer together, and I personally like the way that looks, so I always roll with negative five tracking value. Highlight all the text type of negative five tracking to squeeze in a little bit more. Tracking is also a fantastic way if you've ever had to fit text into a finite space in the word Is this to Dad Gum Long high. Let that word in tracking in a little bit, so you're just squeezing it to get it to fit where you want. You can use that in the newsletter situation if you've got some bad hyphenation going on on the right and you don't want that word to hyphenate. But if you put it on the but it's not, it's too long to fit on that line like just by a hair like by a letter. Then you could track just the word in squish it to make it appear exactly where you want it. So that's a great question. Okay, just curious. Thank you. Mata answered my question. I'm not sure what kind of went over my head a little bit. So Michael, a TL from Atlanta said, Would you ever Kern letters to correct Miss facing between specific characters if you are also going to apply tracking toe a particular word. Oh, I guess that's kind of that's a good question. I'm not run into that. I'm tempted to say yes, but that kind of depends on where you do. If you're gonna go with all caps, So then your letters going to kind of blocking anyway, then they're all gonna be taken up a little bit more space. So I probably wouldn't worry about it if you're gonna track all caps. But if you're gonna do tracking, not to the point where it's a design element. But if you're just tracking to make something fit, then you'd still want to turn. Yeah, I would do that first contract I heard in the brush. Yeah, but not I wouldn't worry about the current ing if you're setting all caps and you're gonna track it out so that it's a design element like we did on the digital camera conference logo. I don't even mess with turning on that. I mean, I imagine a lot of this stuff is like you have to just dive in, figure it out, what you like and what looks good and what looks bad, right? The negative five tracking value for all text is really a good kind of standard thing. It just kind of tux everything in this a little bit more tightly. You can gain a little bit of space here and there by doing that, so I do that all the time. So if you want to memorize that one and put that into play, that's great. Let's be careful of Just make sure you watch your letters and make sure nothing's crashing together. But negative five shouldn't shouldn't impact anything in a negative way. And one final quick question Mary from Costa Rica had asked about what's in CS six versus other programs. Do you know about anything that you showed us today? If it's specific to see a six? No, everything I should use in all versions, the only thing that's different CIA six when it comes to photo shop is we got that new type menu, but you can just go to the character panel and in the open type goodies were still there, the turning letting space after and all that. I didn't show you that. So the space after is in the paragraph panel did I show you that I already can't remember anyway, so here we are in the paragraph panel. So here's your space before in your space after and those controls have been in all the CS APs for Brazilians of years, so they're all there.
Class Materials
bonus material with purchase
Ratings and Reviews
a Creativelive Student
… exactly what I needed for current and upcoming projects! Actually, it was much MORE than I thought I needed. Once it all sank in, I realized just how much I didn’t know, but needed to know. The training is top-notch and very effective, and just to top that off with a cherry, Lesa Snider is the most engaging instructor with whom I’ve had the privilege to learn. I can’t recommend this course, Graphic Design for Everyone enough. … talk about “clicking” with an instructor… A self-professed Southern geek/nerd with a sense of humor is a darned near perfect click between that instructor and this student. I love to learn anyway, but Lesa Snider’s classes are a wonderful blend of fun that runs throughout the entire course of technically advanced concepts and application. Where do you find a course where you laugh as much as you learn (both massively)? … a Lesa Snider course. I’ve already put the course material to good use and look forward to using the class info and skills even more in future projects.
Adrienne
I've been a fan of CreativeLive for along time. I've attended many classes, but this is one of my most favorite sessions. I think Lesa is a great trainer and find I am learning a great deal. I liked it so much I actually purchased this course. I would watch any course she was part of. Great graphics design course and wonderful tips.
a Creativelive Student
I enjoyed it very much. However, I hated that I could not pause or rewind,,,so I had no choice, had to purchase. :)Lesa is a terrific Instructor. She takes the hardship out of the learning process with her wonderful ever so friendly personality. She instead turns it into a joy and I enjoy very much her courses! Thank You Lesa!