Exploring Final Cut Pro X: Navigating the Interface
Lesson 2 from: Final Cut Pro X BootcampAbba Shapiro
Exploring Final Cut Pro X: Navigating the Interface
Lesson 2 from: Final Cut Pro X BootcampAbba Shapiro
Lesson Info
2. Exploring Final Cut Pro X: Navigating the Interface
Lessons
Class Introduction
12:34 2Exploring Final Cut Pro X: Navigating the Interface
32:32 3Exploring Final Cut Pro X: Project Timeline
18:23 4Exploring Final Cut Pro X: Basic Editing
16:07 5Refining Your Edit Introduction
15:15 6Refining Your Edit: Trimming
37:06 7Refining Your Edit: J and L Cuts
09:00 8Refining Your Edit: Roll and Overwrite Edits
06:25Refining Your Edit: Slip and Slide Edits
03:51 10Refining Your Edit: Auditions
09:27 11Setting Up a Project From Scratch
17:03 12Setting Up a Project: Importing Media
35:52 13Setting Up a Project: Keywords and Smart Collections
21:07 14Working with Audio
13:56 15Working with Audio: Syncing
23:40 16Working with Audio: Mixing
21:28 17Working with Photos and Graphics
09:55 18Working with Photos and Graphics: Scaling and Positioning
14:05 19Working with Photos and Graphics: Ken Burns Effect
15:17 20Working with Photos and Graphics: Animating with Keyframes
15:51 21Filters and Transitions Introduction
03:04 22Filters and Transitions: Applying Transitions
18:13 23Filters and Transitions: Applying Filters
14:23 24Titles and Generators: Lower Thirds
11:43 25Titles and Generators: Titles
05:40 26Titles and Generators: Backgrounds
11:46 27Advanced Skills: Color Correction
38:35 28Advanced Skills: Speed Changes
15:48 29Advanced Skills: Stabilization
05:53 30Advanced Skills: Green Screen
13:11 31Multi Camera Editing
06:04 32Multi Camera Editing: Organizing Your Media
08:54 33Multi Camera Editing: Creating a Clip
07:12 34Multi Camera Editing: Audio
09:25 35Multi Camera Editing: Working with 4K Footage
06:56 36Finalizing, Exporting and Archiving: Final Checks and Tweaks
04:34 37Finalizing, Exporting and Archiving: Exporting Final Project
25:46 38Finalizing, Exporting and Archiving:Cleaning House and Archiving
15:22 39Bootcamp QnA
14:53Lesson Info
Exploring Final Cut Pro X: Navigating the Interface
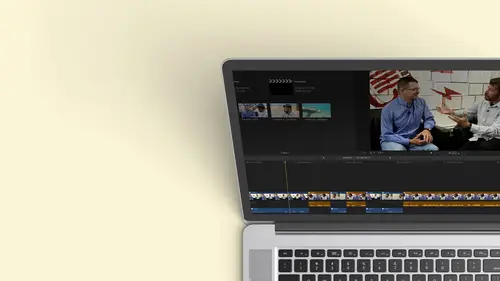
Let's hop into final cut and take a quick look about the application. So what I'm gonna do is I'm gonna walk you through the application. And before we even get into that, let's take a quick look at the kind of show that will be working on and the footage that we'll be working with over the next 10 lessons. And this is the exact same footage that those who by the class will get you'll be able to download. These will be able to download this libraries and project files, and it's it's kind of fun stuff. It's dancing. So just a quick overview of the interface. And then I'm gonna go into detail and kind of give you a tour. So you know where you are. Um, this is final cut pro 10. Say hello to final Cut pro 10. It can't see you waving. Hello? Final cut. Pro. 10. How long, Students? Thank you very much. Okay, so this is final cut pro. We have some basic windows, but this is our story. I could play this back here, but I'm gonna go ahead and bring this full screen so you can see the type of sho...
w that you'll be able to build by the under the class, and everything in this show was built using what was in final cut. Okay, so let's bring this full screen an arrest So I might answer from Crimea. I starting the new other the huge culture for Children to grow up doing something, I think. And this was a huge culture during the Soviet Union and my mom grabbed in those and for my first I remember it was in America at Maryland's Youth Valley when I was eight years old. I remember walking up with sex, and I felt like a dancer had to be a very quiet and not make a sound. If I remember telling off this stuff and so being worried that I would be too loud on my trying to active behaviors muscle high dancers, I could I also play the piano. What I did Waas. I used to go study music starting from 15 years old in Italy on my own, and I would need my professor from Juliette Bear and she would invite some of her best students to me term at her music institute, and we were situated on top of this mountain with my little houses in one house, we would sleep in one house, seats in one house. We would have all of our practicing rooms. And so long as I can continue dancing and teaching, I am So there was a variety of things that we got to see designed into that show. There were titles. There was a lower third. There were some transitions. We did some slow mo I had, uh you know, this wasn't a full final. The mixed wasn't you notice her voice went down to one point. We're gonna learn how to make sure everything is even. Ah, that background or ambient sound is not too loud or can be heard. So that's the idea of what will be working with and what we're going to be building over the next 10 lessons in the next two weeks. So let's go ahead and take a brief tour. Actually, it won't be so brief cause I really want you to be well familiarized with the different areas. And as we go through the course, I will repeat, You know, when I get a with section something that you may have heard as a matter of fact, I do want to point out that you will hear things that might seem repetitive. For instance, when I do import, I will describe things that I'm gonna describe now. And the reason is I've discovered that people when they when they watch something, when they buy something like I have a problem with audio, I'm going to jump to do the audio section and they don't watch anything before. And then they're lost. So I try to make it that if you jump into a section, I kind of give a little bit of a backstory or background to that section. So it also is nice reinforcement. So don't worry if you don't get it all in the first. Listen, I repeat, a lot of the stuff is we focus on different sections, and then, of course, you can always go back and replay it and replay it over again. So this is your basic interface when you open up final cut, except there won't be anything in here. This will be empty. But that would be kind of ridiculous for me to show you an empty interface and try to explain things. So I've already populated it with footage and built a timeline. And this is the show we watch. But let's go ahead and and look at this. So the first thing that we're gonna talk about is the browser, The browser is this area right here? OK, it's locate in the upper left hand corner by default. This is the default settings, and this is where you store all of the media that you're going to work with when editing your show. Okay, So what? What are some of the things that you might use when you're editing these air? Not true questions about So what are some of the elements that you might want to work with when you're working to cut a program, you don't have to grab a mic, you can scream it out and I'm gonna repeat it because I want energy. Yes, images. We're gonna work with images of some type, both video images. And because there's so many photographers in our audience, uh, still images, what other elements would you probably bring in audio. So maybe you're bringing in sound. Maybe it's music. Or maybe it's sound that you recorded separately oven interview that you might need toe meld Our merge with video that you recorded sound effects. Was there some things, other other items you might want to bring in? Maybe somebody has used photo shop, so you might want to bring in a start to the G in rhymes with ethics graphics. There you go. That's great. See, I told you no trick questions. I'm not trying to get anybody shocked, you know, we don't want the deer in the headlights now. Eso that's what's here. Now this is so this is your library and in the library, you'll see, and I'm going to zoom in so you in the class can see a little bit better. And if I don't zoom in, you know, sometimes you can't see the board. Just give me a shout and I want to make sure that people can actually see what's in different areas. So the library, you bring things in and you assign keywords to them. But the ideas I bring in my footage, and then I describe what this footage is with the key words. For instance, like this footage might be from the piano recording. So anything that I shot from the piano I confined by simply clicking on the piano keyword element, and I find all my piano shots. Or perhaps I need to find some music. Well, I brought in a couple cuts of music, so I can very quickly find things because I have keyword anthem. Okay, some of the key wording happens automatically when you bring items in. And for instance, if you have a folder named Music and you import it, everything gets the keyboard mute key word music. You can also assign them very easily, and we do go into detail. So that's think you can dio. It also has what are called smart collections, which automatically knows what different things are like. Oh, I need to just find my audio files or I just need to find my photographs and I can go ahead and click on that, and it finds all my still images. So that's the beauty of Final Cut. Pro 10 is that once you bring things in, it's so easy to find things. So there is that organizational part of the beginning, and we actually spent an entire lesson on that, and that's what happens here. Now there are going to be three terms you hear a lot when you're talking about this thing called a library, you'll hear the term library. You'll hear the term event and you'll hear the term project, and that could be initially a little bit confusing. So I want to do a quick overview of what that is before we kind of moved forward. So an entire world think of that library is a container. So in that library you would have access to all of your media. And all of your projects are timelines. Okay, so think of it as you know, Ah, container, you click on it and it opens up final cut loads this library and has those elements in it. So the library is a big container, and then you have something called events. Events are a smaller container inside that big container. So, for instance, if you want to organize your media, are your footage into more refined groups, you can put them into events. For instance, in this case, I did the studio dancing one day, so I said, You know, I want to keep that organized. I know that's gonna probably be roll. There's not gonna be any voice over there so I'm gonna put that into an event. And then I said, Oh, we did the interview. I want to keep that separate, too, so I can put that into an event so I can control things. Another. Maybe you're doing a cooking show and you might have each lesson. You know, cooking macaroni and cheese will be an event, and all the footage for that would be in there. And then you might have cooking bacon wrapped bacon with a bacon sauce. Obviously very popular thing, Um, in another event. So the idea is, you keep it organized. That's what events are the just groupings. And then you'll hear the term project, and a project is simply your sequence are your timeline. It's that bar that was underneath that I show just in fact, let me go ahead and zoom back out. It's the graphical interface of you telling your story. I'm actually gonna go ahead and talk about some other things. You will better understand this as we go through the next 10 days. You will really understand it when we hit number three, but I don't want you to be concerned or confused by libraries, events and projects. Now you can have multiple libraries and have multiple libraries open if you want. So, for instance, maybe you do both cooking shows and real estate. Okay, so one live, it could be all your cooking shows, the other likely to be all your real estate programs. So if you don't want to be confused or distracted by the real estate stuff, you could just not open that that library and you could also have a library of maybe all your special effects are all your music, so it's very dynamic. But once you get your head wrapped around it and the whole thing here is, we're dealing with keywords, and a lot of folks have used, say ITunes well, and I think this is a good analogy for, you know, when we're looking at clips, you can have music in your library, and you might have, um, a song by the Beatles. And so that would be, maybe have a keyword the Beatles. But also, if you did one of music by John Lennon, he might have that you might have music from the sixties. Okay, British rock groups. Well, you might have one version, but you can find it in multiple places. And that's really what this is all about. With the key wording. You know, it you can might find the same clip with different keywords, but because it's going to serve you a different purpose. So that's the whole idea of what's happening in the upper left hand side. And that's about your browser window. The next thing that we're gonna look at is your time month. This is a graphical representation of your story from beginning to end. This is where you're going to do all your work. OK, so if we look over here, this is the first shot of the show. As a matter of fact, if I move my play head right above it, I see the first clip in the timeline. And whatever I see there, I see here, Okay. And as I moved down that you'll notice this is a little bit stacked. I'm gonna zoom in just for a moment. I have the dancer and a here. But if you notice I also have this Anna left, that's a title. So you start stacking things and layering things. If you want to add graphics are titles are cutaways B roll. So, for instance, right here she's dancing to catcher attention. And then she starts talking well, right here. She still is dancing, but we start hearing her voice. Okay, so you're able to stack things. If I did a picture in picture, I might put that picture on the next area above it. So you have a main storyline will get deeply into that when we start editing, and then you have other video that you may add on top of it. And also you have audio down here. So here we have the dance music, and here I have her voice talking. So one thing to keep in mind with video, think of these areas these layers as you're in a building and the bottom layer is your main story, okay? And you're looking down. But now you want to put a picture in picture there, So you put another image on top of it. And if you ever worked in photo shop or any of those programs aftereffects, you works the same way, and I'm looking down. And if that images full size, I don't see what's below it. I might hear the sound, but also what's below it. But what if I shrink that a little bit? I have to go like this because you can't see it from this angle. You're in the top of the building, right that you're looking over the building now, Um, so I actually see this area around here, and I see this picture in picture. Then if I want a title, I may put that on the third story, and it's like looking through a glass ceiling with words written on it. So that's how you start thinking for layering and videos, and that's how you get the video that you want instead of all one line. And it's either music. It's either like, you know, the narration, the dancing or a title all not all at once, but individually. So that's the idea as we go through here and start working with this program. So that's our timeline. And as I play it, this is called the Play head and that whatever it's over will show up in this screen. So if I go over here, I'm looking at her dancing and I see it here. So I see a visual representation here in my viewer browser timeline viewer, and that's really the magic three things that you'll be working with while you're editing. I'd go ahead, I can play by hitting the space bar. Or I could grab the space bar, just skim through the show. Okay. You'll also notice that I have something happening here. Remember? That was my play head. And I told you emphatically that that whatever that's above, you see well, I kind of lied. Um, this also something called the Skimmer. And that is another thing that makes final cut 10 unique because I might want to be editing and playing something. But then I may wanna go. Oh, you know what? I just quickly want to look at what's happening ahead, and I can skim through some clips and see what's happening. And then as soon as I move my mouth off that area, it jumps back to where the play head is. So it allows me to very quickly skim through my show. And as a matter of fact, if I was looking at any kind of footage will go to the dance studio footage with skimming on. I can also just very quickly go through all my footage and this is brilliant because these days we shoot so much more video than we did in the past because it's easy and inexpensive. It used to be. I start in the days of film, which was ridiculously expensive. So you didn't have as much footage to look at because you were very judicious with how much money you spent on how much you shot. Then we went to videotapes. They were still expensive. I remember buying 10 beta cam tapes, that not beta max, and that was over $1000 for 10 90 minute tapes, right? So if you're not gonna use up a lot of tape now, it goes too hard. Drives it goes toe smart cards. It goes the memory in our phone and you'll end up with hours and hours and hours of footage. And being able to search through that quickly is what you need. And this works brilliantly because of that skimming, and because of the fact you can add keywords to it, you can find the stuff you need. If you have hours and hours and hours of footage, that's the magic. So where it may look? Why do I need all this. Well, if you have a more complex show, you won't be able to not spend 20 minutes looking for a shot. You want to find the shot in by 10 15 seconds and then 20 minutes ba laboring if you should use that shot and how you should use that shot. So that's what happens over there. So that's that playback area. So you'll notice something else that happened here when I was in my timeline with the skimmer. I see what, within the timeline, when I went over at any of these other clips here, I will actually see in my viewer what the information on these clips. So this is dynamic, depending on where I am skimming or where I am playing from, so this is we're going to create netted our story. I'm going to show you how to navigate through that a little bit later, but I want to show you some of the other buttons and areas that you may come across. So these are my main three windows is another window that you'll be using and seeing a lot through the course and using after the course. There's a little button up here and I do want to point out that you know, I I've used this example before. The great thing about Final Cut 10 is this 45 ways to do everything. The challenging thing about final content is there's 45 ways to do everything. Find the way that works best for you and just do it. Okay, If you like to drag things around, it works. Great. Dragging and dropping if you love using drop down menus is a drop down menu for almost everything you like. Keyboard shortcuts, keyboard shortcuts in there, if you like, right clicking and getting these contextual menu. So you click on a clip. You know exactly what you could do that clip. You can do that. I don't think you have to memorize it all. I have discovered that if I am used doing something over and over again, that I sometimes look up and find out what the keyboard shortcut is for that just to save me time. And there will be some keyboard shortcuts that I think are really gonna be helpful for you, and I will tell you those as we go through. So that's just something toe to keep in mind. So this is this button up here is for the inspector. You'll also notice that when you put your cursor over a button, are any area you'll get a tool tip. I can tell you what it does. And if there's a keyboard shortcut, it will even tell you with keyboard. Shortcut is so this is command four. That's the command key. There used to be called the Apple K at one point, the splatter que timing How far back you go in the world of Macintosh, I guarantee there's somebody out there going. I remember using the original Mac, and it was it was the open apple and close apple. So that makes the people who've been around forever really happy. But we just remembered as the command key and the beautiful thing it actually says command on the keyboard. So that's a modifier key that you would hold when you hit down the number four. So I can press this button and I'm going to zoom out so you can see what happens when I press this button. It opens up this area called the Inspector, and the inspector is giving you information about whatever is selected in your browser are in your timeline. Okay, So if I selected this clip here, I'm gonna just grab one arbitrarily. And there's not a lot of information about that one, because I didn't pick an exciting clip, actually, even pick one from the time there we go, But sound so right now, it's telling me some information. I do want to point out that it goes down below and I'm not a big fan of having toe scroll down a lot. So here's a great little tip if you're in the Inspector and by the way, we are using the latest version of Final Cut for this class at this point, which is dot to, um So if you're using an earlier version, it might look a little bit different, though. Ever since it was released in five years, Apple has given free updates to every version. So if you don't have the latest version, log on to the APP store where you bought it, and it will updated to the latest version, and you'll have all the cool things that I'm showing you. So as I was saying, I want to see more so I can double click at the very top of the inspector Not appear. But actually the inspector and what it will do is it uses this whole vertical space. If I need to see a whole list of things and this will be more stuff, maybe we don't know all that now. But if you start adding filters and what not so here I'm looking at three different things on this clip I can look at. I can look at the video aspects of my clip, and this is all the controls. If I'm going to scale it, our shrink it or reposition it or crop it. This is the controls. I can see what's going on. Audio. I can fix audio. I can look at my audio clips here, and then I can find out general information on the clip, such as What? Kodak? There's. And there's 1/3 1 right? Kodak Codex. When you don't know what a code, I guess you hear it all the time. You take anything from, ah, the ITunes movies? Are you, um I tunes YouTube, Vimeo Ah, Kodak stance for compressor decompress. Er, it's basically the fancy math that they used to take these really big files and squish him down to something that you can stream to your phone or your computer, and it doesn't look horrible. Okay, so they get better and better, creating these mathematical formulas to squish and throw outs and stuff. So it's small, and then when it blows up again, it looks pretty good. That's what a Kodak ISS, And there's a lot of different ones, depending on how you're recording things, whatever your camera is, you may use a different Kodak because the manufacturer determined that's what they want to use. The most popular Kodak that you're Polly come across up with is a church 0.264 Why is it called h 0.264? Because an engineer, our group of them, named it. If I named it, it would be Bill are Diane, but it's h 0.264 and that's exactly how they encode things for YouTube and vending video and Netflix and almost everything you download their progressive. So there's a new coat. I called h 0.265 That's really coming down. It already is here, but, uh, and that's just smarter and smaller than h 0.264 Apple has some unique Codex that you'll find in Final Cut 10. It's called Apple Pro Rez and what it is. It's a Kodak, and we'll talk more about this when we do. Importing that Apple came up with that allowed them to compress things without any loss. So when you hear the word Kodak, it's basically the math involved to squish something, and they apply the same math to have it grow. So there you are, so I can find out what my Kodak is. You find out lots of different information in my inspector, so you'll be referring to that a lot you can open and close that very easily. Remember, we talked about command as our keyboard shortcut command. Four. I can toggle that on and off if I don't want to reach over and click on that button so I can either hit the button or if I get used to the keyboard shortcut This like, Oh, I need to look up something about this clip. Why isn't working? Oh, because it's a giant 6000 by photograph. Okay, command for very, very useful. And that is what the inspector is all about in the middle is a great tool bar. Okay, this is right down here. Let's zoom in and move across the pool bar and talk about some of the other elements that you'll have access to. So the first thing are these four buttons here. These are editing buttons. OK, this does a variety of different types of edits that we will learn about. If you've already done some editing, they may be familiar. Uh, they have insert edits and overwrite edits. They have something called the Connect edit, which is very which is unique defined cuts. So the idea is that if I've marked something, I can press this button and bring it to the timeline. I can drag it, but maybe I just want to press that button. Okay, whatever I selected, just put into my show. It has a button to do that, and that's what these buttons are all about. And once again, if you're not sure what that button does, just hang your mouse over it. It will give you a tool tip that's an override, and at the end, it gives you the keyboard shortcut D. So those are those basic editing tools to bring things from your browser into your timeline at the very end of that, and this is important to note if you want to be able to just bring in the video separately, are the audio. Maybe the audio of the dancer was just noise in the background. I'm not using it because I want to be able to just bring in the visual of her dancing because I'm putting in my own music. I could do a video only at it. Or maybe I do want to an audio only at it, because I recorded a voiceover, but you don't ever need to see my face talking. So why bring that in? So it allows you If you switch these, you'll notice this icon changes. So if I do video only, we just see the face. And again you'll notice keyboard shortcuts that up arrow. It's a tricky one. That's your shift key. Okay, so literally with shift 12 and three, I can switch between different ways to do that. I'm going to do that with the keyboard shortcut, so we just did. Basically shift to that was video only. Shift three. Notice how this icon changes it's now just a speaker. I cant. And if I hit shift one again, that's both. And the reason I want to point that out is as you edit, you're gonna learn a lot of keyboard shortcuts gonna teach yourself ones. But there will be times that you make a mistake. Not that this has ever happened to me. And not that this will happen to me at all over the next 10 lessons, I will never make a mistake and a moment of silence for the okay. Now you can stop loving. Okay. But for instance, I might remember keyboard shortcut for another application, and I go shift to and now I'm editing. I'm going. Why don't I have any audio? Okay, so that what I point I would make is that keyboard shortcuts are great. But sometimes if you hit them by accident, you may turn something on and often try to figure out what it is. So I just trying to open your eyes that those are the things that could happen so they can be your best friend. Or they could be your worst enemy. Whether you, uh, do something by accident are not so as we move down this sequence, we've looked at the tools in the middle is the name of the zoom out so you can have the right perspective. This right here is the name of the project. Okay, so if you're working on multiple timelines or sequences, you can know exactly which one you're working on. For instance, as I indicated before, you might be doing multiple shows in the same library, so a library can have multiple projects. Project is a timeline. So maybe you're doing ah, three minute walk through of the house. But maybe you're doing a 32nd sizzle version off that for just the people toe. Catch their attention. So you want a very easily be able to say, which version using Are you doing a cooking? Join? You want to see macaroni and cheese and then macaroni and cheese with bacon and more bacon. Obviously they're close friends, other t things that are very useful. If I had more projects open and there's a couple little arrows here, I'll point this out again, but the kind of great out now, because I only have one. But if you need to jump back and forth between the previous sequence in the next one. Maybe you're doing you want to go back and reference something. There's just a little arrows here if you click on him. Suddenly you but my project go, you might have gone to a previous or next, so I just want you to know what's there. And that's that's very useful. Let's look at some of the other areas that we have some other buttons that are of importance. I'm gonna go up here to the upper left hand corner in the upper left hand corner. We have three buttons here. This is an import button. So if I want to bring media into my show, I have to import that, Um Does anybody has any other programs? But you have to import things photo shop or replacing What? Okay, what's the keyboard shortcut normally for importing something And this is not a trick question, because I'm gonna hover the mouse over it, and you might be able to read that, But what is it? Command I import. I want you to realize that when they came up with the keyboard shortcuts, they thought about this and they said, Okay, what are we using other programs. Oh, I want a copy something. What do you think it is? What's copy in your word? Processing program Command. See what's paste command right now you know how to do it. Two new shortcuts and finally that you now know. OK, so a lot of those same cooking. What if you want to make a new document command and guess how you make a new project. Your editors? No, but that's keep in mind that it is intuitive. OK? And there's little. And even when we get to the the tools which I'll show you a lot of times, is the first letter of the word that represents what you're switching between. So that's import. There's a key. This is key words. We actually will look at this in more detail when, um, we start labeling things on ingesting lesson three. This is something that's very interesting when actually click this open. It shouldn't be doing anything now, but this is your background tasks. So, for instance, when you import something and you're having it like analyzer what not if you go here, you can see what's happening under the hood. Okay? You can also see when you're exporting something that it's doing a bunch of math because you can still at it. The point is, is that if you're waiting for something like, um, perhaps at one point during this class, all in just 400 gigabytes of media by accident, I know my future. I dreamt it last night. I may be going, Why is everything taking so long? And I'll look here and I'll see, like, 400 things happening in the background, like now I know why I am asking it to do too much. So that's the background. Task is very useful. It's up there. You can toggle it open and close. It doesn't, um and also if you need to stop something, but it's it's ah, it's great there. So those are some key areas here. Let me zoom back a little bit, and below them are some other shortcuts that you'll use. So this here, this little button is your library sidebar. Okay, so let's take a look at that. So if I click this button, it opens and closes this left side, which is part of my library. So if I don't want to see all this stuff and I just want to look at my clips. I can open it and close it. That's pretty self explanatory. These two areas actually very useful, and we'll actually be covering them very shortly. One is show or hide photos. Sidebar. So if I click on that, it actually would show me any photos I might have in my photos library. Or any audio might have an ITunes or any of the sound effects that come with final cut. So this is a great way you could have a shortcut to things that live in your computer that aren't necessarily something that you would always bring in with your media. It's stuff that's already resident there next to that, and you notice as I click these my window changes when in fact I should zoom out so you can see that better so that we have library. We have our stuff from the computer, and this is something called titles and generators, and here are animated titles and stand still titles and generators that you can access from within the application. These come bundled with it and they're customizable. They're not just, you know, they have some parameters, but you can customize that. So the whole idea of this upper left hand corner is when you need to create something, whether it's to bring in your media. You know, your video, your audio that you brought into the show, whether you need to find a nice piece of background music that might be one of your audio libraries or whether you actually need to create something, that's what happens in that upper left hand corner. And that's what those buttons air for again. The idea was to be intuitive is like, Oh, I don't remember where there was, but I know I'm creating stuff, so I'm gonna go over to this left side and start punching some buttons and see what happens. Okay, so that's that area in the upper left hand corner.
Class Materials
Bonus Materials with Purchase
Ratings and Reviews
a Creativelive Student
Wonderful. This is the first time I've seen any of Abba's classes, and he's a great teacher. I've been watching the live sessions for the past few days and have picked up a ton of great tips that will indeed speed up my workflow in FCPX. He's a great teacher, and does a wonderful job of setting people at ease, ie. where he says things like, 'there's no trick questions', and times where he will click on something wrong, then he'll go back and show his mistake (pointing out his minor mistakes are actually a beneficial lesson). In all, wonderful wonderful wonderful. Thank you!
Lara
Fantastic teacher. I enjoyed every video, super worth it. I've been reluctant to jump into FCP X since it got upgraded from FCP. Now I feel confident to work with it again. Seems pretty self explanatory, but I am glad I watched the course. Abba covers pretty much everything you need to know. I also loved his personality, made me want to learn more each day.
Alan Pole
Absolutely brilliant. Abba gets to the point, is clear, organized and articulate, and lays it all out in a manner that quickly brings your confidence level from zero to hero. Highly recommend this to any photographer who wants to blog, build ads, or include video in their offering. I feel like an amazing new world has been provided to me. Thank you!