Lesson Info
3. Exploring Final Cut Pro X: Project Timeline
Lessons
Class Introduction
12:34 2Exploring Final Cut Pro X: Navigating the Interface
32:32 3Exploring Final Cut Pro X: Project Timeline
18:23 4Exploring Final Cut Pro X: Basic Editing
16:07 5Refining Your Edit Introduction
15:15 6Refining Your Edit: Trimming
37:06 7Refining Your Edit: J and L Cuts
09:00 8Refining Your Edit: Roll and Overwrite Edits
06:25Refining Your Edit: Slip and Slide Edits
03:51 10Refining Your Edit: Auditions
09:27 11Setting Up a Project From Scratch
17:03 12Setting Up a Project: Importing Media
35:52 13Setting Up a Project: Keywords and Smart Collections
21:07 14Working with Audio
13:56 15Working with Audio: Syncing
23:40 16Working with Audio: Mixing
21:28 17Working with Photos and Graphics
09:55 18Working with Photos and Graphics: Scaling and Positioning
14:05 19Working with Photos and Graphics: Ken Burns Effect
15:17 20Working with Photos and Graphics: Animating with Keyframes
15:51 21Filters and Transitions Introduction
03:04 22Filters and Transitions: Applying Transitions
18:13 23Filters and Transitions: Applying Filters
14:23 24Titles and Generators: Lower Thirds
11:43 25Titles and Generators: Titles
05:40 26Titles and Generators: Backgrounds
11:46 27Advanced Skills: Color Correction
38:35 28Advanced Skills: Speed Changes
15:48 29Advanced Skills: Stabilization
05:53 30Advanced Skills: Green Screen
13:11 31Multi Camera Editing
06:04 32Multi Camera Editing: Organizing Your Media
08:54 33Multi Camera Editing: Creating a Clip
07:12 34Multi Camera Editing: Audio
09:25 35Multi Camera Editing: Working with 4K Footage
06:56 36Finalizing, Exporting and Archiving: Final Checks and Tweaks
04:34 37Finalizing, Exporting and Archiving: Exporting Final Project
25:46 38Finalizing, Exporting and Archiving:Cleaning House and Archiving
15:22 39Bootcamp QnA
14:53Lesson Info
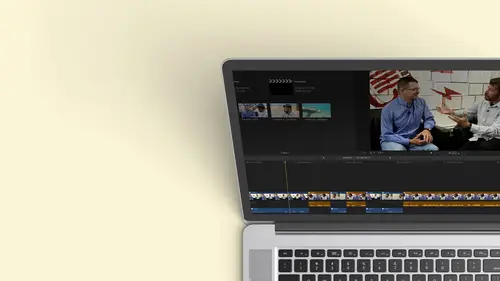
Exploring Final Cut Pro X: Project Timeline
in the lower left hand corner. There's something called the Timeline Index. Here's the giveaway. It says Index. It's closed now, but if I click on that, I see something that's very interesting. A lot of detail here. This is again, something that's pretty unique on there's really that's really not good language, because if something is unique, it can't be almost unique. It either is or it isn't but will use the idea that something could be relatively unique in that Maybe there's a couple people out there who also does so with that random thought. If I click on the index, I can look at my clips and this is every single one of my clips in my timeline, okay, that I've used now it's much more useful than it then. Just a list. If I click on something, I said, You know what? Where is the shot? Where she leaps in the white to to I click on that? It jumps immediately to that shot. So if you've properly labeled things, you can jump to exactly where you need to find it, and there's even a little ...
search box. So if you have hundreds of clips, you could say, Did I use this? Where did I use this? I need to find it. You don't have to sit there and skim through four hours of video. So that's one of the things is very useful in your index as we move across it. And we're not gonna go in tow too much detail in that, um, you know, you need some context for that. And by the way, we have the index of all the clips I'm gonna pan down here so you can see I can even, you know, refined then said, I just want to look at all my video clips, okay? I just want to look at all my audio files. You know something? I just need to find anything that has a title, cause I have to go through cause I found out I spelled your name wrong. There's not three ends in Anna, okay? There was only two, so it has a lot of control. The next button over here in your library, there's something called tags. That's where you can actually put markers are notes to yourself whether you want, you know, you could make him know that. Oh, I need to fix something here. I need toe fixed the audio. I need to find a replacement shot. I need to color. Correct. So you can like to do to yourself and you even have a done button. So it moves them to do and done. You could put markers in. So if you exploit out a quick time movie, it can have chapters. A lot of things we can do with this now, Granted, I'm introducing some of these intentionally, even though I know we won't have the opportunity or the time to cover everything in this course, teaching you everything about final cut in 10 hours would be impossible. Our goal here is to get you comfortable with final cut. So you're not scared. You can put something out out, you can create a show. But if you discover something, you won't be confused. Advanced courses would probably go. We'll go deeper into that. But you know, I want you to be aware what's here and the advantage. And then we have something called roles which I will talk about in the audio section and on export. So I can just look at my music, my dialogue if I just wanna look at my music. I can isolate just my music stuff, so it's very, very powerful. And that is what happens over here. And those are the three main sections of that part. If I'm not using it, I go and close it by hitting the index button and it goes away as we move across. We're almost done with the tour. Luckily, this is not a hop on hop off bus because you're always stuck on the bus with me. I've locked the doors and put a giant dome on top. So it's just a hop on and come along for the ride. Uh, as we move along here in the right side, there's again more buttons, and these buttons allow you to do some things, such as that's skimming process that I did before. So it was really nice. I could skim through it, and then I moved over here and my jumps to my play head. But what if I don't like skimming? I could toggle it off, and now all right. Not that I don't like it, but I find it confusing. I just have the play had to work with. There is no skimmer, and the keyboard shortcut for the skimmer is s. And I like pointing that out because it's a great thing to toggle on and off. But if you don't know that's the keyboard shortcut, you'll be like I was typing something because you're typing a word. But you're not in a box, the type of work. And suddenly you turn off. Skimming is likely to my skimmer go. OK, so ask for skimmer. Okay, So as we move along there, this video skimming And by the way, if you have skin being turned off when you go to those great little boxes here, I can't skim through these anymore. Hit the S key. I can skim through it again. So that's something to keep in mind next. That's an audio skimming tool. I have that turned off for the class because it'd be annoying, because if that's on, every time I skin might hear something. Now that's useful. If I'm trying to find a word to edit out. But for most of the time, you know I can talk about often now. This is where they were clever. So we know skimming is asked So audio skimming should be a variation upon s. And that's what they tend to think about when they create these shortcuts. So audio skimming is shift s to toggle it on or off. So when you start looking at keyboard shortcuts, there's usually some logic behind them. And also that's ah, good way to say, Oh, well, I thought I turned it on, but I didn't have the modifier as we continue down this something called soloing. So if I just want to listen to a unique audio track, I don't know if you can see that, but what do you think they use for the word solo s? This time? It's an option. Okay, we saw a shift. We saw command this little modify your here. That's the option sign. OK, you know, that's the ones like, I don't remember what this quickly one does. Well, to me, it looks like an escalator. I'm gonna actually go up to our drop down menus cause I want to point something out here. What's if I went to a good man? You okay? So whenever you go to a drop down menu, right, you see all these keyboard shortcuts and I recognize part of these words. I know most of my letters. There's a few only 23 of the 26. But what are these things? So I'm gonna give you a quick overview of how you can remember that stuff because I need that. So command is easy. It's on the keyboard. It's the one used all the time. Okay? And that's the most popular modifier shift is easy. We already learned that That's the up arrow. But then there's these other two. So we just started talking about the option, and to me, that looks like a little escalator. Okay, Whether this is true or not, you will now never forget this. And I know if I get on an escalator, I go up, the escalator are down the escalator, which means I have options. And that's how we remember. That little line is option. So I can remember what the keyboard shortcut is for. Option after Option V. Okay, the other modifier is this little carrot here. Okay, that's the control key to me. When I was a kid, there was, ah, little cartoon. And it was long enough ago that basically a cartoon on television were stick figures. Okay, high budget stuff and the, I think was Tom. Terrific. But his hat was a like a little triangle. OK, so where in the hat? I must be in control. Whether it makes sense or not, you will now not forget that if you have a hat on your in control, that's the keyboard shortcut for control. OK, so you can start learning the keyboard shortcuts that if you go down here all the time and say and you don't even know what this does yet detach audio and I do it manually every single time I'm gonna take notes and I'm gonna write Set. I did this 27 times today. That's a keyboard shortcut I should learn. You know, I've had students come to me and they just like they memorized everyone. Everyone I'd want, Honestly, I one student and brilliant, but like I could say anything and he knew the keyboard shortcuts. But do you know, It added, That was a different story, but he memorized keyboard shortcuts. Memorize the ones that you use a lot that you find useful done clutter your brain with extra information as you need them. If you see you doing something 2030 times. Learn the shortcut because that will save you time. Okay, and saving time is important. So that's the idea here. So let's jump back down here where we saw that originally as we fly through here. So we were just on. Um, come on, give me my tool tip soloing. And then there's something called snapping. Snapping is really important. Snapping is the one keyboard shortcut that doesn't quite fit the mold of obvious. And it's been this way since final Cut one back in the year 1999. There are people going 1999. I have food in my fridge from them, and there's people here washing, going 1999. My dad wasn't even born yet, you know, so quite a diverse population. But what snapping is is that when I bring two things next to each other or the cursor to the edge of a clip, it snaps right to that position so it makes sure that I'm exactly where I want to be. I want to be on edit point. I want to be in a marker. Okay, so snapping is an en. Snapping is what we used to say. This emphasizes dropped the silent s. Don't you mistake that for napping. Don't tell people that you're napping at work because you're snapping at work. But that's snapping. And if I turn that off and then there's a couple more things to the right side that are very important, this is very useful. This is your appearance of how your timeline looks. You will be going and changing this often, depending on what you're doing, someone a zoom back a little bit and you'll see along the top that I have different icons. And if I click on these different icons, my interface changes to where I Seymour or less of my video in relation to my audio. There's one that says, I just wanna look my audio weight forms. I'm just cutting audio. Don't be distracted by the video or I still need to see a little video. But I'm still focusing on audio, and as you go down to progressively tweaks that it modifies it. Okay, so here this is all my video, and my audio is now not distracting me, because maybe I'm just looking for cutting for continuity. So it's very easy to switch between these. Maybe I just want to see everything, have a huge amount of vertical stuff, and I just really want to clean it up. Maybe just for, ah, couple of minutes to find something that is way off screen, generally going to use one of the ones in the middle. And in addition to that, there are two sliders, and I'm gonna go in just a little bit. But I want to make sure you see what happens when I work with ease. So this slider here controls the height of these clips. So if I needed more space to see things, I could make a taller with one below. It is the horizontal control. So I'm seeing zooming in, zooming out on my sequence on my timeline to bore less detail. OK, and then, in addition to that, I have the option of Do I want to look at these things called roles or angles, and we'll learn about that over the rest of the course roles being how we define what different clips, what their role is in the show, whether they're a music clip, our dialogue clip or whether they're sound effects are b roll Those there are rules and Sometimes you won't be able to see that very quickly. So that's the idea here, and you'll be moving around a lot there. While I'm talking about that interface, I want to go up here to the upper left hand corner. Sorry, I'm zooming in and zooming outside. You have some perspective of where I am, but you'll notice that up here. I love this menu that keeps popping down. I apologize for that. But it's not me. It's Apple. So there's a similar icon up here. Okay? And if I click on that, it controls the way I view the elements in my browser. So again I could make them bigger or smaller. Okay, I can also look at these. These are, ah, filmstrip view. I can look at them in smaller or larger increments. I'm going to zoom out here, so if I look at them in five second increments, I'm seeing a lot more of my clip. It's longer because I'm basically zooming into each individual clip. I can go all the way down to hoops. Wrong one. There we go, 1/15 of a second, and now I'm really seeing you know, precision. And then I could go all the way back to where I'm just seeing one frame to represent each clip. So those are the controls you have there and we will as you go through. But you can also group things differently. I can say, Oh, I just want to keep all my content ordered by the you know, when I created it or I don't care about that. I need to find out about what kind of file is. I just want to keep by file type. So those air again ways you control the interface up there. So let's go back here. There's two more items on the end. This is for your effects browser. So if you click on these, it actually opens up another interface. We kind of saw something similar to that in the upper left hand corner when we looked at our generators and our titles, because you're creating something again. This is something that's embedded in the application. But the's is where you get filters that you can apply to a clip to give it a different look. You know, one of these is, ah, fifties TV. Look or, you know, aged film are color correction or an audio fix. You need to use a compressor. Those are effects that you can get to. Okay. And these rolling. So where that you're creating something here, You're modifying something in the timeline. Okay, that's why this is over here, because this is part of the editorial process. So you have the effects, and if you move over next to the effects, I want to zoom in so you can see what the's icons look like. There's also your transitions. Okay, We're going to actually spend a session on both effects and transitions. And these air everything from your standard draws dissolve to fancy movements where maybe you have, you know, light changes for your transition. Okay, so that's where you're accessing stuff. And finally, we're gonna look here, and I keep zooming out. Not to make you nauseous, not to make it feel like you're on a roller coaster, but because you have to see where they are because you're like, Well, he showed it to be zoomed in. But I can't find it now. And trust may the larger your screen, the find of the resolution, the harder it is to find these things. If you don't know where to look. So the last thing I want to kind of cover here is this is generally found underneath your viewer and with different layouts. It might end up over here if your viewers in the middle art, But I just you need to look under your viewers. So there's a timing OK, where you are in your sequence. So if I place my cursor somewhere, I can see right now that I'm a minute and 30 seconds and 10 frames in okay, something to keep in mind with video. The way we count is ours, up to 24 minutes, seconds and frames. Okay, so every video you count by frames and there's different frame rates. Okay, you'll hear that there's sometimes 24 frames a second. That's traditional movies that you would see in the theater. There's 30 frames a second. That's what you would see in American television. There's 25 frames per second. That's what you see in the rest of the world. Do not want to leave out the rest of the world because you're bigger than just America and they're going to go. Why don't we talk about 25 by the way. Everything we're using in this class will be 30 frames per second because I have a American TV. But it works perfectly in 25 works perfectly in 24. And even some of the other formats that are now coming with high def 60 frames per 2nd 100 20 frames per second. But it's always hours, minutes, seconds frames. When you're finding a precise location to the left, there are a couple of drop down windows on things that you might do two clips in your timeline. Okay? And the three of them are one is your transform. This is the button where you're gonna click if you want to scale something. If you want to crop something if you want to distort something, OK, so you're transforming the image next to it is another drop down. It's the magic wand, and this is a quick way to do come color balancing, color correction as well as audio. So this is how you're gonna enhanced something. The look are the sound of something very quickly, and then finally, to the right is another one. It looks a little bit like a speedometer because it is a speedometer because it's all about speed. And this is where you will very quickly get to things such as slow mo speeding things up, customizing things, freezing stuff. So those are the quick elements, and we will use these as we go through the next 10 lessons. But that's all these magical, confusing things in the interface. I'm not clear on how to build different bins in the library. OK, so the question was, I'm not. I'm not clear how to build different bins in the library if you've come. If they've come from a traditional editing program, what we used to do is create folders and put the video clips in a folder to organize them. So, like all of our music would be in a folder, all of our B roll, all of the dance stuff, and you would bring a man and you'd make folders and drop them in like you would write it. The operating system level right in the finder. Well, this is a little different. There are no real folders to speak of, and that's a better thing. Folders are automatically created by putting a keyword on something. If I go ahead and I put the keyword on here that says Behind the scenes, That's me shooting. Then it's going to automatically create Ah folder. Think of these folders but the key word collections where I can access that clip. But the beautiful thing is, I'm not limited to keeping it into one location. I could also say this is studio footage, so if I put keywords studio, it now will appear in behind the scenes and studio. So it's automatic and you can also create smart collections on a smart collection is simply, Oh, I want something that's behind the scenes in the studio and anything with both of those keywords can be found again in a new collection, and it's automatically populated. So it does the folder work for you, okay? And we really get deep into this when we do ingest, because a lot of times you do that when you bring it in, are you? Label it your clips into folders before you bring it in from the finder and final cut will automatically apply those keywords
Class Materials
Bonus Materials with Purchase
Ratings and Reviews
a Creativelive Student
Wonderful. This is the first time I've seen any of Abba's classes, and he's a great teacher. I've been watching the live sessions for the past few days and have picked up a ton of great tips that will indeed speed up my workflow in FCPX. He's a great teacher, and does a wonderful job of setting people at ease, ie. where he says things like, 'there's no trick questions', and times where he will click on something wrong, then he'll go back and show his mistake (pointing out his minor mistakes are actually a beneficial lesson). In all, wonderful wonderful wonderful. Thank you!
Lara
Fantastic teacher. I enjoyed every video, super worth it. I've been reluctant to jump into FCP X since it got upgraded from FCP. Now I feel confident to work with it again. Seems pretty self explanatory, but I am glad I watched the course. Abba covers pretty much everything you need to know. I also loved his personality, made me want to learn more each day.
Alan Pole
Absolutely brilliant. Abba gets to the point, is clear, organized and articulate, and lays it all out in a manner that quickly brings your confidence level from zero to hero. Highly recommend this to any photographer who wants to blog, build ads, or include video in their offering. I feel like an amazing new world has been provided to me. Thank you!